Effective and simple turbo water tank repair.

Heads, valves, pistons, rods, crankshaft, etc...

Moderators: Helpinators, Moderators

Post Reply
GeneralDisorder
First Gear
Posts: 81
Joined: Tue Dec 25, 2007 9:42 am

Effective and simple turbo water tank repair.

Post by GeneralDisorder »

We are all familiar with the way the nipples on the stock plastic water tank's of the 22T's disintegrate over time. Looking at them carefully it's apparent that the plastic (which is really more of a composite material embedded with some kind of fiber) has broken down and become soft - allowing the nipples to snap off easily.

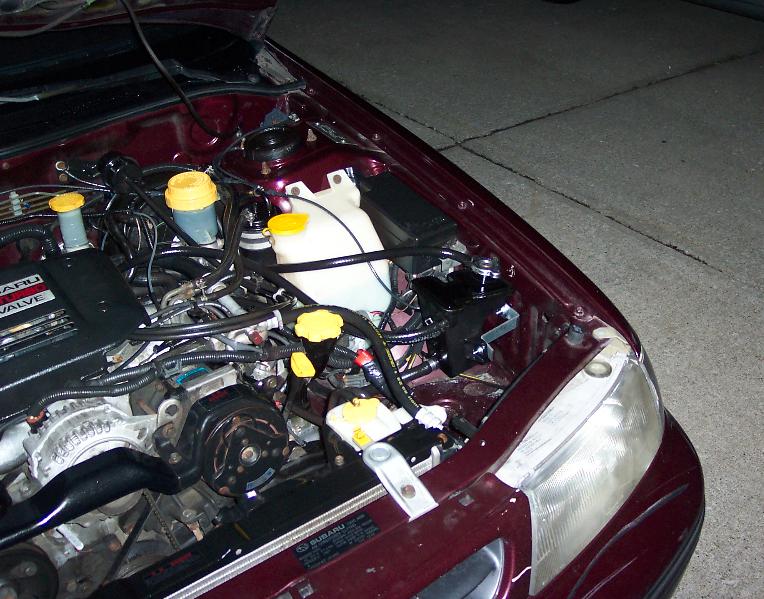
At some point in the past the large upper nipple to the turbo on the back of my water tank was repaired using JB weld or some similar product. The individual appears to have tried to do a good job but the JB weld cracked and began to weep within a couple thousand miles of me putting the car on the road.

I then acquired another used tank from a member here but after installation the upper nipple cracked on it's own after a few days of driving because it too was soft from being 15 years old. This was becoming intolerable and was going to be expensive if I had to buy a new one at $100. Further I will be installing an '07 TMIC and I haven't even decided I want to keep the plastic style tank so buying a new one would be a waste of money if I then decided to go with a metal tank later anyway.

Image

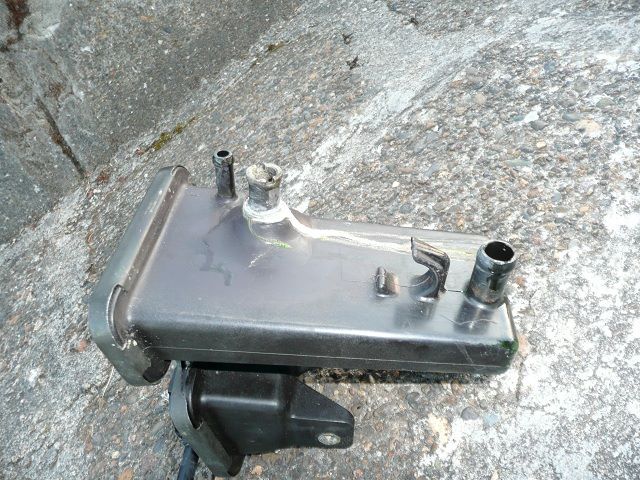
I put the weeping JB welded tank back in to drive the car and took a look around at my options for replacing or repairing the nipples. I considered a few options but after cutting the existing nipples off flush and looking at the dimensions I had to work with I noticed that the body of the tank itself is actually quite thick - around 1/4" where the nipples attach. The thicker material of the body did not exhibit any of the signs that the nipples did of being soft. The holes are sufficiently small to be easily drilled and tapped to 1/4" NPT so I went in search of nipples that would fit. It turns out that the hoses are 13mm ID which is basically 1/2" so I just needed 1/2" x 1/4" NPT hose barbs to make new nipples. The only question left was how to properly seal them. They would likely seal on their own due to the body being plastic but I didn't want to thread them in extremely tight and potentially break the plastic tank wall as the NPT threads are tapered. I had a few options for "goop" that would probably do the job but with the different expansion rates of the plastic and the brass I would have to use a goop that doesn't harden and I didn't like the implications of using a non-hardening paste around coolant. I decided on a true-seal Teflon ring seal to seal tightly against the body of the tank. This provides a mechanical seal for the threads, allows them to not be extremely tight, and has no pipe goop to react with the coolant.

Image
Image
Image

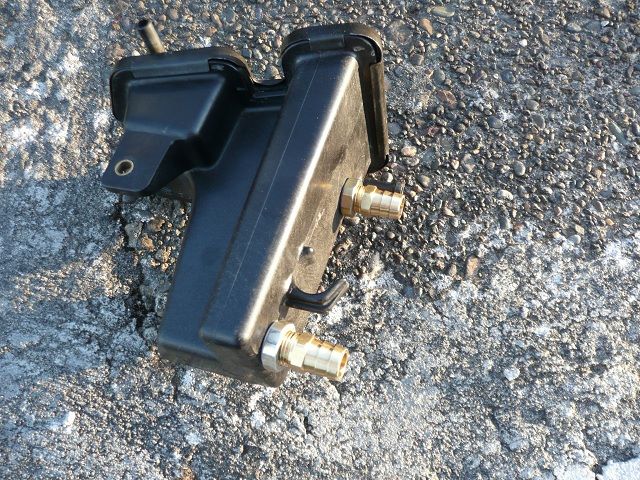
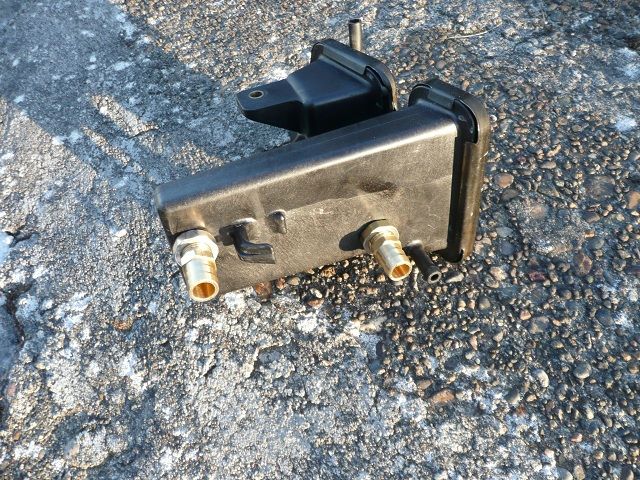
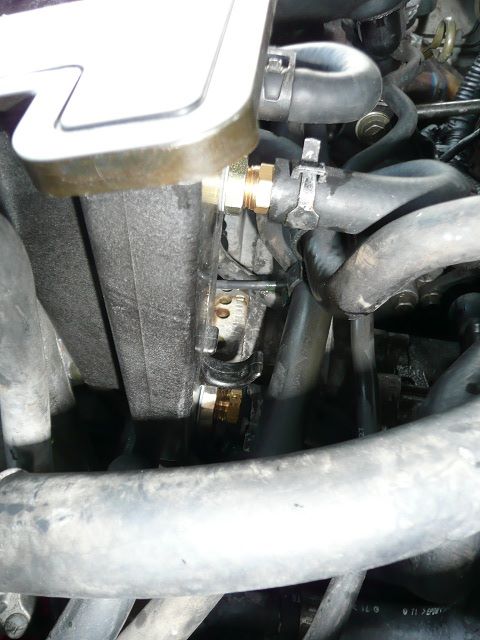
The install is very simple. You cut the plastic nipples off flush, drill the holes to 7/16", tap them to 1/4" NPT, and install the hose barbs and true-seal's. On the bottom hole a standard NPT tap doesn't go in very far but it wasn't a problem for me. If it became a problem I was going to use a bottoming tap to get farther up on the threads but I have been running this tank now every day for three weeks and not a single drop or weep of coolant to be seen. With it only being 13 psi and these barbs/threads easily capable of 200 psi I don't see there being any issue with it ever.

I'm now thinking I'll keep the plastic tank and move it rather that replace it with a metal version. I have a spot in mind where the narrowness of the plastic tank will work to my advantage anyway.

GD
Last edited by GeneralDisorder on Sat Feb 04, 2012 4:05 am, edited 3 times in total.
91 SS, 94 GT, 84 Wagon, 83 Hatch, 85 Brat.
94SS_Canada
Third Gear
Posts: 851
Joined: Mon May 12, 2008 4:19 am

Post by 94SS_Canada »

That looks good, Nice write up too, Good info for those people who dont have the time to get new ones and want to keep stock, i know mine personally broke causing me to opt for the WRX tank on my car
FastRust
Bdub
Second Gear
Posts: 444
Joined: Mon Nov 12, 2007 1:59 am
Location: Connecticut

Post by Bdub »

Fortunately, I ended up getting a tank that someone on here found not installed in a junkyard.
But, I did exactly what you did before I received the tank. I just filed the broken part smooth, drilled it out a little larger, and covered the threads in JBweld as I screwed it in.
Through The Generations...
91 SS 4eat
95 LSi 4eat- Sold
07 2.5i 5mt- For Sale
13 STI Sedan
n2x4
Fourth Gear
Posts: 1522
Joined: Tue Oct 18, 2005 3:52 pm
Location: Massillon, Ohio

Post by n2x4 »

That's probably the smartest way to repair the tank I've seen yet. I think I would have opted to throw some JB Weld on the threads as well, however.
SUBARUEHS Racing
GeneralDisorder
First Gear
Posts: 81
Joined: Tue Dec 25, 2007 9:42 am

Post by GeneralDisorder »

JB weld does not expand and contract with the temperature changes experienced by the tank. As you can see in the first picture it didn't take long to crack the JB weld.

JB is not designed to be a sealant - it's designed to repair rigid assemblies and frankly it's a cheap, consumer level product in comparison to some of the real "filler" products out there such as the Devcon line of products. It is a temporary fix at best unlike the true-seal teflon rings - they are designed to be permanent and they will allow for expansion.

If I had to use a goop I probably would use Loctite pipe dope with teflon. There are other Loctite products that would probably work as well (545 comes to mind) but they are much more expensive than the true-seal's and I really prefer not to use any goop if it's not neccesary.

GD
Last edited by GeneralDisorder on Sat Feb 04, 2012 4:09 am, edited 1 time in total.
91 SS, 94 GT, 84 Wagon, 83 Hatch, 85 Brat.
AWD_addict
Fifth Gear
Posts: 2774
Joined: Sun Nov 23, 2003 12:22 am
Location: Western WA!

Post by AWD_addict »

Nice work, very clean.
90 L+ wgn
Brat4by4
Stratified
Posts: 1608
Joined: Thu Jan 30, 2003 6:52 am
Location: NE Ohio

Post by Brat4by4 »

There are many different places to put the coolant tank, here is one idea just as food for thought.

Image

I had plenty of room after moving my battery to the trunk. :)

I was also going to install my AWIC pump there also before I ended up selling it all.
1993 WMP BC6 5MT EJ22T 9psi 3.9:1 213k 205/55R16

62.6 m/s @ 0.66 bar. Gotta love boost. :)
stipro
Third Gear
Posts: 698
Joined: Mon Apr 26, 2004 4:20 am
Location: Calgary, Canada

Post by stipro »

Looks like a winner!.

BTW where did you get these True-seal rings??
1994 ABM Sport Sedan-Not stock
1990 L series/turbo-Rally project
91legss
In Neutral
Posts: 32
Joined: Sat May 26, 2012 3:28 am
Location: Malone, NY

Re: Effective and simple turbo water tank repair.

Post by 91legss »

Not to bring this thred back from the dead butttttt, any one know where to find these
mike-tracy
Moderator
Moderator
Posts: 5000
Joined: Tue Aug 25, 2009 7:52 am
Location: Des Moines, Wa

Re: Effective and simple turbo water tank repair.

Post by mike-tracy »

Should be able to find the parts you need at a decent hardware store.
1992 Legacy SS 5mt, build in progress
Josh Colombo wrote: Mon Jan 14, 2002 10:23 am Wait....I'm confused now.
Post Reply