
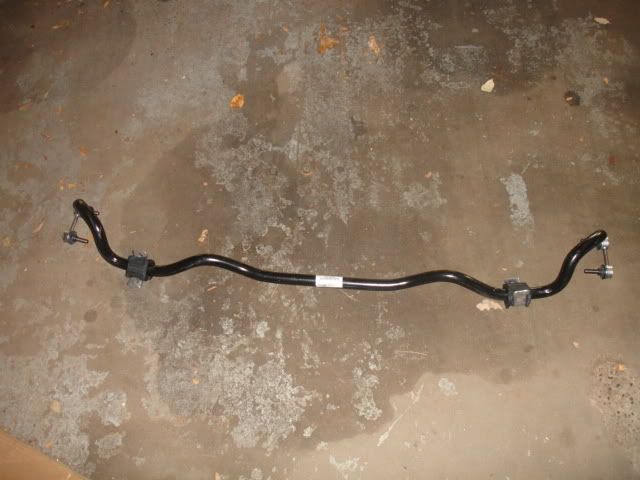
25mm front sway bar for cheapskate Legacy owners.
The story.
I've been following THAWA's NASIOC thread in which people are experimenting with mounting Tribeca B9 stock front sway bars to various Imprezas. With a bit of creative routing these 25mm bars have successfully been installed on WRX sedans, wagons, and GC non-turbo cars. The intriguing thing is the cost.... you can order one from your local dealer for about $75 or less, with no shipping charge. Most any after market front sway bar from Whiteline, for example, is going to cost around $150 plus shipping, so this represents a relatively cheap alternative. We're talking 30-50% savings.
Granted, 25mm is a hefty bar, and probably not the best choice for everyone. But the WRX and STi autocross guys have been using 24 and even 27mm bars recently, so it might be worth a try for some people.
Link to NASIOC thread: http://forums.nasioc.com/forums/showthread.php?t=973884
Props to THAWA for starting the thread and jamal for participating. There may be other legacycentral people amongst those pages, too.
What is different about fitment of the Tribeca bar compared to the stock bar?
Not surprisingly the B9 bar is a good deal wider than a stock BC/BF bar. Part of the solution is to bolt the new bar to the outboard side of the endlinks. The stock bar normally bolts to the inboard side. Also, the B9 bar works best when the ends curve over the tie rods unlike the stock bar which goes under. Clearance is tight at a couple of points, but everything fits. The bar fits both turbo and non-turbo cross members.
Why would I want such a huge front bar?
I'm not going to explain all of the reasons and factors involved. I'd like this thread to deal mainly with the actual fitting of the Tribeca bar to the BC/BF chassis. I recommend that anyone who is interested read as much as possible about chassis and suspension tuning before making the decision to undertake this modification on their own vehicle. I'll give my personal opinions in a review thread to be posted later.
Are there any supporting modifcations required?
If you are on otherwise stock suspension, this probably isn't for you. You'll probably want some sort of upgraded bar in the rear to aid in balancing the car. I'm currently using a 22 mm rear bar (Whiteline BSR17XZ adjustable). If you don't find any appropriate bushings you'll have to modify some. I used a coping saw to cut the stock rubber bushings to fit the B9 bar's 25 mm diameter. If anyone knows of any direct fit 25 mm bushings for the old style mounts please let us know.
Is this a difficult modification to perform?
No, aside from a bushing solution, it's pretty much as easy as installing any front sway bar. You only have to touch eight bolts. Ten if you remove or replace the end links. You'll need 10, 12 and 14 mm sockets and combination wrenches, some PB Blaster, and a set of wheel ramps. It should take half an hour or so, a little longer if you've never changed a front sway bar.
What else do I need?
New or modified bushings to accommodate the larger diameter bar. Stronger end links are probably a good idea, too.
What is the Tribeca front sway bar part number?
20401XA00A
I'll post some photos eventually, and driving impressions in the Review section.
25mm front sway bar for cheapskate Legacy owners.
Moderators: Helpinators, Moderators
-
ultrasonic
- Third Gear
- Posts: 654
- Joined: Sat Dec 20, 2003 6:34 am
25mm front sway bar for cheapskate Legacy owners.
-steve-
03 Legacy L Wagon
91 Legacy Sport Sedan - SOLD
94 Legacy Touring Wagon - SOLD
00 Impreza L Sport Wagon - totaled!
03 Legacy L Wagon
91 Legacy Sport Sedan - SOLD
94 Legacy Touring Wagon - SOLD
00 Impreza L Sport Wagon - totaled!

-
SemperGuard
- Second Gear
- Posts: 307
- Joined: Sat Sep 04, 2004 6:07 pm
heh, yeah, I remember when THAWA came up with the idea he kept trying to get me (and pretty much everyone else) to buy one. I'm going to keep my 20mm front bar and go from my 18mm rear to a whiteline adjustable. 25mm just seems a little excessive even though my struts can keep up with it.
Also it looks like Perrin has 25mm urethane bushings.
Also it looks like Perrin has 25mm urethane bushings.
-
ultrasonic
- Third Gear
- Posts: 654
- Joined: Sat Dec 20, 2003 6:34 am
I'm the original poster. The B9 bar has been installed on my 91 SS for over two months. Works just great. It's probably not as stiff as a 25mm bar that is actually designed for this chassis, but it is somewhat stiffer than the 20mm Whiteline bar that I had on the car before.baddriver wrote:Has anyone tried his on a 91 Legacy SS?
-steve-
03 Legacy L Wagon
91 Legacy Sport Sedan - SOLD
94 Legacy Touring Wagon - SOLD
00 Impreza L Sport Wagon - totaled!
03 Legacy L Wagon
91 Legacy Sport Sedan - SOLD
94 Legacy Touring Wagon - SOLD
00 Impreza L Sport Wagon - totaled!
-
EtchyLives
- In Neutral
- Posts: 37
- Joined: Wed Jul 11, 2007 8:00 pm
- Location: Plymouth, MN
I posted this on some other boards, but here is my write up for my 94 Legacy SS. I still need some after pics. My biggest problem was cutting the bushings.
EtchyLives wrote:My Legacy is running great. After putting the 3-inch DP, the struts, springs, brakelines, changing the oil, changing the belts, and getting a set of winter tires I thought I'd be happy with it. I wasn't.
Sure, with the new suspension setup it was handling MUCH better than the old blown suspension had been handling, but it was still missing the stiffness I do so desire. However, Spending $160 for a whiteline FSB seemed like something I would 'get around to'. Enter this thread over at NASIOC. It turns out that the B9 Tribecas have a 25mm Front Swaybar that bolts up to most NA Subarus. It also happens to bolt up to 91-94 T-Legs. Since the local Subaru Dealership gives a 20% discount to members of MNSubaru.com I was able to get the following parts for less than the cost of a Whiteline Swaybar. And this swaybar is BIGGER.
Parts I used:
Tribeca Bushings (2) : Part Number 20414XA00A
Tribeca Swaybar (1) : Part Number 20401XA00A
Additional Parts I bought:
STi Rear Endlinks: (Right and Left are the same part number but come in different packages) 20470SA011
Tribeca Swaybar clamps (2) : Part Number 20466FE000
2004+ WRX Rear Swaybar mounts (for a future project) : (Right) 20540FE200 (Left) 20540FE210
Here it is, all laid out (minus the swaybar brackets) :
All of that cost less than a new Whiteline FSB. You may notice that some of the parts I bought I didn't use. The clamps on the Tribeca use two bolts (one in the front and one in the rear) as opposed to one bolt on the T-leg (one bolt in the front and a tension flange in the rear). I didn't know this up front and bought the parts just in case. The NASIOC guys recommended using the rear STi endlinks but I couldn't figure out how to install them properly without putting seemingly undue tension on the lower bolt. All of the stress across the lower bolt would have been put at the two narrow points where the bolt passes through the lower control arm bracket... I didn't like that so I used the stock endlink. A future upgrade will be beefy front endlinks (a la Whiteline or the pretty purple kind). I also bought the Rear swaybar mounts from an 04+ WRX. The stock t-leg/GC/02-03 WRX mounts are pretty flimsy, and when I upgrade to a big rear swaybar (now a sure bet) I wanted something large to hold it. Something large that doesn't cost a ridiculous sum of cash from Perrin/Whiteline/anyone else. Anyway, back to the install.
The tools you'll need for this job are:
Jackstands (2)
Jack
12mm Wrench
14mm Wrench
12mm socket
14mm socket
19mm socket
Torque wrench
Ratchet (swivel head if you've got it)
PB Blaster
Large Vise Grip
SHARP utility knife
Here we go:
1. Loosen lug nuts on the wheels with your 19mm socket
2. Jack up car and put it on the jackstands
3. Remove wheels (you don't necessarily have to do this, but it REALLY helps when you're trying to get at the outer nuts on the endlinks)
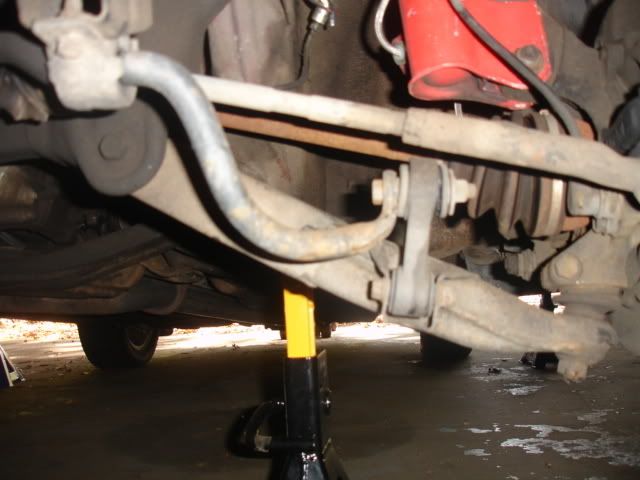
Once you get to this stage you've got a nice view of what your working with:
Notice how the stock swaybar runs underneath the tie rod and attaches to the inside of the endlink (You're looking at the drivers side from the front). The Tribeca swaybar, due to its design, will loop over the tie rod and attach to the outside of the endlink.
4. Grab your 12mm socket and ratchet and remove the jack plate (4 bolts), and the swaybar clamps. You may need a 12mm wrench to hold the nuts on the front of the jackplate in place while you get the bolts all the way out.
5. Grab your 14mm socket and ratchet and 14mm wrench and disassemble the top of the endlink. You can use the 12mm socket and wrench to loosen the bottom if you'd like more play in the endlink, but I didn't have to do that.
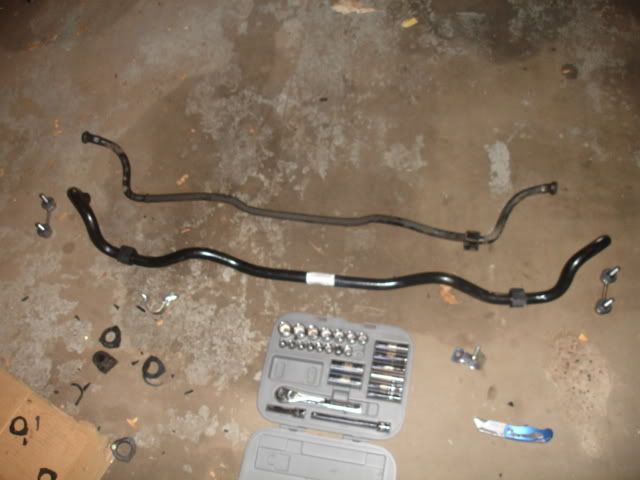
6. Place the swaybar on the ground and admire the contrast between the coathanger you've just taken off, and the true piece of heavy-duty machinery you are about to install. Mmmmmm.... tasty.
7. Get out your utility knife and start carving up those Tribeca bushings. Cut off the lips on both edges, and on the top (flat) side you'll need to remove between 1/4 and 1/2 inch of rubber to get it to fit in the stock clamp. Be careful, that utility knife is sharp.
8. Throw the loops of the Tribeca Swaybar over your tie rods. This will alleviate some of the weight of the bar you have to struggle with while trying to get this behemoth back into those clamps.
9. Attach the swaybar to the outside of the endlinks. This will line up the bar properly before you tighten down the clamps, and will further negate gravity's nasty tendency to drop this swaybar on your melon.
10. Get the clamps lined up over the rubber bushings. Then grab your vise-grips and use them to pull the clamps up to the crossmember to line them up so you have two hands to get the clamp bolts back in place and get them threaded. <-- The ingenuity of this tip was brought on by serious cursing and the fact that, as in most cases, I do all my wrenching alone. Thank me later.
11. Put the jackplate back on. This is a PITA. I have no sneaky tricks for this. I know on my car there was a lot of grit, grease and dirt on the top side of the crossmember that I struggled with while trying to hold down the nut with a wrench.
12. Double check all your bolts (top and bottom of endlinks, clamps, jackplate)
13. Put wheels on
14. Take car off of jackstands and lower car.
15. Re-torque wheels to 75 ft/lbs
16. Take it for a testdrive. During my testdrive I heard the bushings rubbing for the first few corners, the railroad tracks, and bumps. After about 2-miles there was no more sound.
Results: The front end is much more stable. There is almost no dip when I take corners. The only dip I get in the front is because the back still has the stock swaybar.
Future plans: Endlinks and poly bushings for the front. I was going to order some beefy endlinks and poly bushings, but I wanted to make sure this all fit together before I doubled the cost of this mod with those two purchases. I will also put the ONLY available swaybar for this car (Whiteline) on the rear along with endlinks and poly bushings.
This mod took me right around two hours. That includes the time it took figuring out how to cut up the bushing, and time in the bathroom bandaging up my left forefinger as it shot blood everywhere. Any decent wrench turner can do this mod in an hour and a half. I could do it in an hour, now.
Enjoy.

-
ultrasonic
- Third Gear
- Posts: 654
- Joined: Sat Dec 20, 2003 6:34 am
While this bar fits at stock ride height, the passenger side of the bar will contact the crossmember at the turbo up pipe clerance area when the suspension is loaded.EtchyLives wrote:I posted this on some other boards, but here is my write up for my 94 Legacy SS. I still need some after pics. My biggest problem was cutting the bushings.EtchyLives wrote:My Legacy is running great. After putting the 3-inch DP, the struts, springs, brakelines, changing the oil, changing the belts, and getting a set of winter tires I thought I'd be happy with it. I wasn't.
Sure, with the new suspension setup it was handling MUCH better than the old blown suspension had been handling, but it was still missing the stiffness I do so desire. However, Spending $160 for a whiteline FSB seemed like something I would 'get around to'. Enter this thread over at NASIOC. It turns out that the B9 Tribecas have a 25mm Front Swaybar that bolts up to most NA Subarus. It also happens to bolt up to 91-94 T-Legs. Since the local Subaru Dealership gives a 20% discount to members of MNSubaru.com I was able to get the following parts for less than the cost of a Whiteline Swaybar. And this swaybar is BIGGER.
Parts I used:
Tribeca Bushings (2) : Part Number 20414XA00A
Tribeca Swaybar (1) : Part Number 20401XA00A
Additional Parts I bought:
STi Rear Endlinks: (Right and Left are the same part number but come in different packages) 20470SA011
Tribeca Swaybar clamps (2) : Part Number 20466FE000
2004+ WRX Rear Swaybar mounts (for a future project) : (Right) 20540FE200 (Left) 20540FE210
Here it is, all laid out (minus the swaybar brackets) :
All of that cost less than a new Whiteline FSB. You may notice that some of the parts I bought I didn't use. The clamps on the Tribeca use two bolts (one in the front and one in the rear) as opposed to one bolt on the T-leg (one bolt in the front and a tension flange in the rear). I didn't know this up front and bought the parts just in case. The NASIOC guys recommended using the rear STi endlinks but I couldn't figure out how to install them properly without putting seemingly undue tension on the lower bolt. All of the stress across the lower bolt would have been put at the two narrow points where the bolt passes through the lower control arm bracket... I didn't like that so I used the stock endlink. A future upgrade will be beefy front endlinks (a la Whiteline or the pretty purple kind). I also bought the Rear swaybar mounts from an 04+ WRX. The stock t-leg/GC/02-03 WRX mounts are pretty flimsy, and when I upgrade to a big rear swaybar (now a sure bet) I wanted something large to hold it. Something large that doesn't cost a ridiculous sum of cash from Perrin/Whiteline/anyone else. Anyway, back to the install.
The tools you'll need for this job are:
Jackstands (2)
Jack
12mm Wrench
14mm Wrench
12mm socket
14mm socket
19mm socket
Torque wrench
Ratchet (swivel head if you've got it)
PB Blaster
Large Vise Grip
SHARP utility knife
Here we go:
1. Loosen lug nuts on the wheels with your 19mm socket
2. Jack up car and put it on the jackstands
3. Remove wheels (you don't necessarily have to do this, but it REALLY helps when you're trying to get at the outer nuts on the endlinks)
Once you get to this stage you've got a nice view of what your working with:
Notice how the stock swaybar runs underneath the tie rod and attaches to the inside of the endlink (You're looking at the drivers side from the front). The Tribeca swaybar, due to its design, will loop over the tie rod and attach to the outside of the endlink.
4. Grab your 12mm socket and ratchet and remove the jack plate (4 bolts), and the swaybar clamps. You may need a 12mm wrench to hold the nuts on the front of the jackplate in place while you get the bolts all the way out.
5. Grab your 14mm socket and ratchet and 14mm wrench and disassemble the top of the endlink. You can use the 12mm socket and wrench to loosen the bottom if you'd like more play in the endlink, but I didn't have to do that.
6. Place the swaybar on the ground and admire the contrast between the coathanger you've just taken off, and the true piece of heavy-duty machinery you are about to install. Mmmmmm.... tasty.
7. Get out your utility knife and start carving up those Tribeca bushings. Cut off the lips on both edges, and on the top (flat) side you'll need to remove between 1/4 and 1/2 inch of rubber to get it to fit in the stock clamp. Be careful, that utility knife is sharp.
8. Throw the loops of the Tribeca Swaybar over your tie rods. This will alleviate some of the weight of the bar you have to struggle with while trying to get this behemoth back into those clamps.
9. Attach the swaybar to the outside of the endlinks. This will line up the bar properly before you tighten down the clamps, and will further negate gravity's nasty tendency to drop this swaybar on your melon.
10. Get the clamps lined up over the rubber bushings. Then grab your vise-grips and use them to pull the clamps up to the crossmember to line them up so you have two hands to get the clamp bolts back in place and get them threaded. <-- The ingenuity of this tip was brought on by serious cursing and the fact that, as in most cases, I do all my wrenching alone. Thank me later.
11. Put the jackplate back on. This is a PITA. I have no sneaky tricks for this. I know on my car there was a lot of grit, grease and dirt on the top side of the crossmember that I struggled with while trying to hold down the nut with a wrench.
12. Double check all your bolts (top and bottom of endlinks, clamps, jackplate)
13. Put wheels on
14. Take car off of jackstands and lower car.
15. Re-torque wheels to 75 ft/lbs
16. Take it for a testdrive. During my testdrive I heard the bushings rubbing for the first few corners, the railroad tracks, and bumps. After about 2-miles there was no more sound.
Results: The front end is much more stable. There is almost no dip when I take corners. The only dip I get in the front is because the back still has the stock swaybar.
Future plans: Endlinks and poly bushings for the front. I was going to order some beefy endlinks and poly bushings, but I wanted to make sure this all fit together before I doubled the cost of this mod with those two purchases. I will also put the ONLY available swaybar for this car (Whiteline) on the rear along with endlinks and poly bushings.
This mod took me right around two hours. That includes the time it took figuring out how to cut up the bushing, and time in the bathroom bandaging up my left forefinger as it shot blood everywhere. Any decent wrench turner can do this mod in an hour and a half. I could do it in an hour, now.
Enjoy.
I found this out because I bought this bar on this recommendation because I neglected to get a turbo bar when I did my crossmember swap... the N/A bar went back on with the turbo crossmember (it fits with the suspension at full droop) but when loaded almost any amount it contacts the turbo crossmember.
My current concern is that under autocrossing conditions the bar will apply enough stress to the bushing mounts to rip them free of the crossmember; or when the car is lowered with my coilover swap (approximately an inch) the bar will contact the crossmember constantly.
the object of any swaybar is to compress the suspension of the unloaded side of the car when in a curve to try and keep the contact patch of the tires on the road as evenly as possible (keep body roll down/etc) when the bar hits something, it will stop doing this.
any ideas?
91 Legacy Wagon, Total Rally Car.
#82 M4 TRSCCA Rallycross
http://www.youtube.com/mobilepolice/
#82 M4 TRSCCA Rallycross
http://www.youtube.com/mobilepolice/
just thinking about this some more, I'm using the stock front N/A endlinks, if I use shorter endlinks the bar is likely to clear the crossmember much better. does anyone have any idea what I should buy to suit that task?
91 Legacy Wagon, Total Rally Car.
#82 M4 TRSCCA Rallycross
http://www.youtube.com/mobilepolice/
#82 M4 TRSCCA Rallycross
http://www.youtube.com/mobilepolice/
I could probably whack the cross member with a hammer, but it's pretty thick steel - no guarantees that I'd be able to bend it.jamal wrote:The Kartboy rear endlinks are shorter, but I don't think the fronts are.
Maybe some adjustable sphericals will work?
Can you "make" the crossmember fit around it?
Or you could trade me for my 20mm 2.5GT bar...
91 Legacy Wagon, Total Rally Car.
#82 M4 TRSCCA Rallycross
http://www.youtube.com/mobilepolice/
#82 M4 TRSCCA Rallycross
http://www.youtube.com/mobilepolice/
-
ultrasonic
- Third Gear
- Posts: 654
- Joined: Sat Dec 20, 2003 6:34 am
I recently removed the Tribeca bar in favor of the Whiteline 20mm bar that was previously on the car. Primarily because I'll be driving some very rough gravel roads in support of the Hundred Acre Wood Rally, so I wanted the softer sway bar. While removing the bigger bar I noticed some marks on the ends of the bar where it was slightly contacting the inside wall of the tire at full steering lock.
Tire width is playing a part here. When I first installed the Tribeca bar I was running 205/50/16 tires on Subaru OEM 16x7 wheels. No contact between the tires and the bar. The rubbing happened only with my other tires, 225/45/16 also on Subaru OEM 16x7 wheels (same offset as the 205's).
Tire width is playing a part here. When I first installed the Tribeca bar I was running 205/50/16 tires on Subaru OEM 16x7 wheels. No contact between the tires and the bar. The rubbing happened only with my other tires, 225/45/16 also on Subaru OEM 16x7 wheels (same offset as the 205's).
-steve-
03 Legacy L Wagon
91 Legacy Sport Sedan - SOLD
94 Legacy Touring Wagon - SOLD
00 Impreza L Sport Wagon - totaled!
03 Legacy L Wagon
91 Legacy Sport Sedan - SOLD
94 Legacy Touring Wagon - SOLD
00 Impreza L Sport Wagon - totaled!
-
ultrasonic
- Third Gear
- Posts: 654
- Joined: Sat Dec 20, 2003 6:34 am
*Double Post*
Just for archival purposes
I installed a Tribeca FSB on my '91 SS, running the AL forged control arms. The mount points are wider, so the new bar actually lines up perfectly above the arm mounts. Using a shorter (Perrin spherical) droplink, I have about 0.40" space between the bar and turbo crossmember.
I modified the metal clamp rather than the Tribeca bushings; I ground off the 4 grabber claws on the edges that hold the small stock bushings in place, and ended up with a clamp that fits the 25mm B9 bushing perfectly. The big shoulders on the bushing hold it in place.
Jerry
'04 Passat GLS 4Motion 5MT (Subaru by VW)
'86 Vanagon Syncro Camper Garage Queen
'04 Passat GLS 4Motion 5MT (Subaru by VW)
'86 Vanagon Syncro Camper Garage Queen

pics of it installed?
Josh
surrealmirage.com/subaru
1990 Legacy (AWD, 6MT, & EJ22T Swap)
2020 Outback Limted XT
If you need to get a hold of me please email me rather then pm
surrealmirage.com/subaru
1990 Legacy (AWD, 6MT, & EJ22T Swap)
2020 Outback Limted XT
If you need to get a hold of me please email me rather then pm
it's pretty easy to slice into the hump on the crossmemberand dent it in.
im curious to see how you modified the bracket besides cuttin the little tabs off.
im curious to see how you modified the bracket besides cuttin the little tabs off.
93SS 04 wrx brakes/slotted w/ hawks--TD05 -- 06 I/C -- 20mm n/a fsb -- Stage 2 -- 550's -- Perrin DIV DP -- 2-3/4 Tit Exhaust -- K&N -- C/C -- A/C Delete -- Grounded -- GT Leather Interior -- WRX/STI Strut Setup -- 17" 225's -- 2 Kids Seats ;)