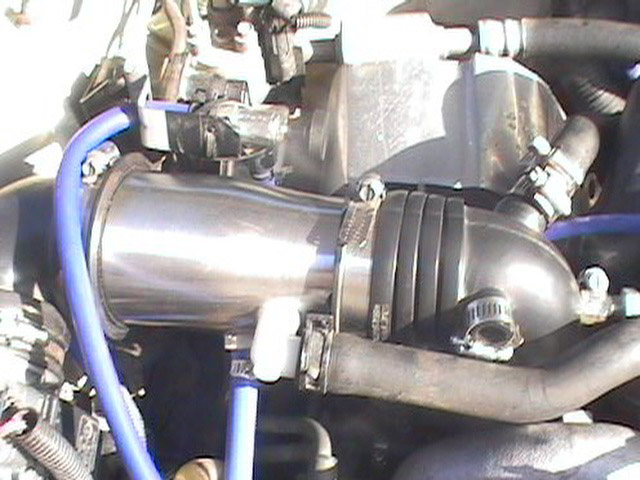
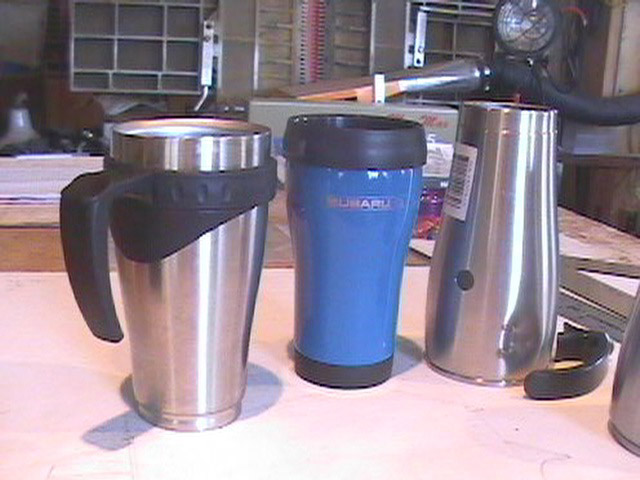
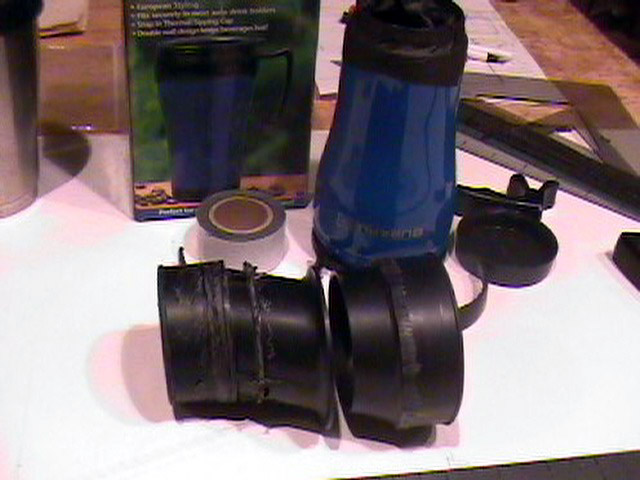
thanks boostjunkie for posting pics, sorry about the size. that mr. photo program for the jvc digicam is one to spend a lot more time with before i know what i am doing. i wrapped the part with that 3m rubber tape/wrap that stretches and adheres to itself and stays put. its mainly to protect the s/s finish from our vermont winter salt and sand, now that it has been on for almost a year i can unwrap it and not worry about the finish. i thought about getting the mrt part but did not want to wait. while i was thinking about what might work my wife came home with a new company item that had their newspaper logo screen on it and handed it to me......i promptly filled it with coffee and went to the shop. while i was drinking the coffee down and pondering what to do i looked in the mug as i was gulping down the java and the dimensions hit me [after too many years of designing and building furniture i have a built in ruler] so i took apart the turbos intake and worked the 90deg. el [ off of the maf ] onto the top of the mug and the same with the reducing elbow to the turbo inlet. heat gun or hair dryer helps make the rubber more compliant. before i went any further i asked the wifes pewrmission to "modify "her mug. next i popped off the plasticky bottom cover and drilled an outlet hole, then test fit on the car to mark the location of the pipe from the iac valve. i had a pvc 3/4 inch 90 deg elbow, barbed on one end and threaded on the other. marked the location and drilled through the s/s shell and thru the plastic liner. next i marked the location for the hose off the charcoal cannister. i used goop to seal the areas around all openings between the shell and liner and to seal the pvc fittings in. i will try to take some pics this evening of the subaru mug i picked up at the dealer yesterday and have started taking it apart to make anew intake complete with subarublue and subaru logo. i will also post the parts list and tools need after food has been consumed but no beer i would get too sleepy and nod off at the drill press..mongo like beer, but like fingers better
Heh, Legazee, I must say I'm impressed. I would never have ever thought of that.
So you basically took one of those steel covered car coffee mugs, cut off the bottom, and then drilled and tapped holes for PVC fittings, sealing them with Automotive Goop(tm)?
The mug's insulated, too, to protect the intake charge from engine bay heat! =)
yea can you believe it, it was staring me in the face the whole time there are several size travel mugs as u well know but you have to find one that iswithin the stretch range of that 3" or so rubber elbow off the maf housing. i just emailed boostjunkie more pics of the part with the rubber wrap off, just shiny brushed ss. and yes that is a plus having the liner also being an insulator. if u are doing this youself u need to make a couple of jigs to hold the mug securely on the drillpress table. and go very slowly with those hole saws,low rpm and slow feed and a little cutting oil. also remember you are drilling thru thin wall steel that will tend to distort,so start out with a small pilot hole when drilling the holes for the pvc fittings and work your way up to the size needed. make sure that u clean out all metal and plastic fillings and debur and smooth all edges,spray with water then blast with air until dry. more details next post,but i've gotta run as its greenup day in vermont.... clean up all that crap on the side of the roads that was hidden under for 5 months under all that snow
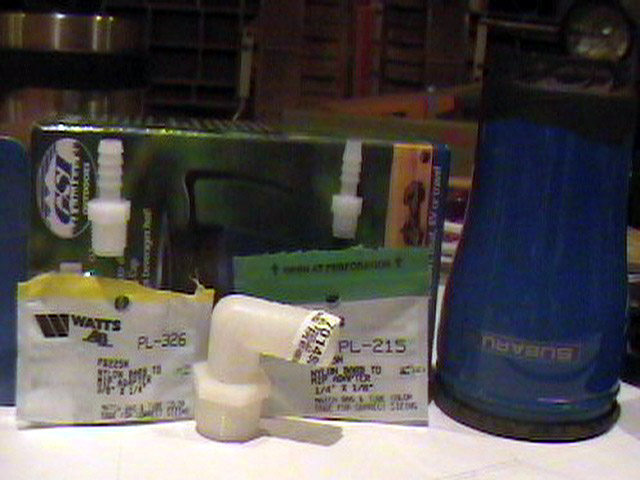
for those of you willing to build one for your car here is what you will need: 1/4"x1/8" nylon barb to mip adapters,watts#pl- 215
3/8"x1/4" " "" "" '' ,watts#pl-326
3/4"x3/4" nylon hose barb 90 degree elbow ny220ljj 701490
drill bits: 11/32" for the 1/4x1/8 fitting
: 15/32" for the 3/8x1/4 fittting
: 15/16" for the 3/4x3/4 barbed elbow
:2 1/8" bimetal hole saw milwaukee#49-56-0125
cuttting oil for the hole saw is a big help
also remember to use a small drill bit to start a pilot hole for the pvc fittings with just enough of the bit exposed out of the chuck to go thru to the liner of the mug. this helps to keep the bit on track and not wander on the very tough thin wall stainless shell. then work your way up to the final size bit needed for the fittings. you have to be very carefull in keeping the drill bit in line so the innner and outer holes are inline with each other.
you will also need a tube of " automotive goop "[tm] or the "plumbers goop" [tm] both work with pvc and metal. the stainless steel travel mug needs to be no longer than 6 1/2" and 3 1/8" top. the rubber elbow off the maf will expand to fit most mug tops within a range close to that. more to come later have to go help my son get his car started and get him off to school
91 Pearl White Sport Sedan
04 Java Black Pearl Forester XT
2014 Volvo S60 T5
18 KTM 1290 Adventure S
87 Grey GL-10 Sedan (so long old buddy) - donated
97 Toyota 4Runner SR5 - sold
2002 BMW r1150rt-p - sold
2004 BMW r1200ST - sold
2016 BMW r1200RS - sold
yea you shuda seen my buddie at the local subie parts counter, i had him rolling i am working on the subaru mug one right now as it seems that is the best bet for a proper fit and its that cool subarublue with a logo no less. if i can i will take pics of the oem resonator box taken apart to reveal the strange but true subaru engineering. and yes it is less restrictive plus i just got tired of working around that thing whenever i was working on the motor. the other good upgrade is to remove the aluminum 90deg elbow on the turbo and knife edge the inlet and smooth out the inner walls to a nice buffed surface, and then do the same thing to maf housing[after you remove the sensor from the housing very carefully] then dont stop there ,finish the outside as it should have come from the factory. as far as making some to sell... maybe if i can get the subaru mugs to work as they seem to be a lot sturdier at the top and bottoms due to a nice roll bead. the metal in/out shell mugs are a lot of work and i need to see if i can get the ends rolled to size
just to let ya know i have been working on my teens lsi wagon,he sez dad i heard this funny noise coming from under the car, fo sho it was noisy but not funny..rt rear bearings fubared and wheel very close to coming off so its under the car and replacing all the rotted crap. i will post pics of the "subaru intake " in a day or so after i get him back on the road
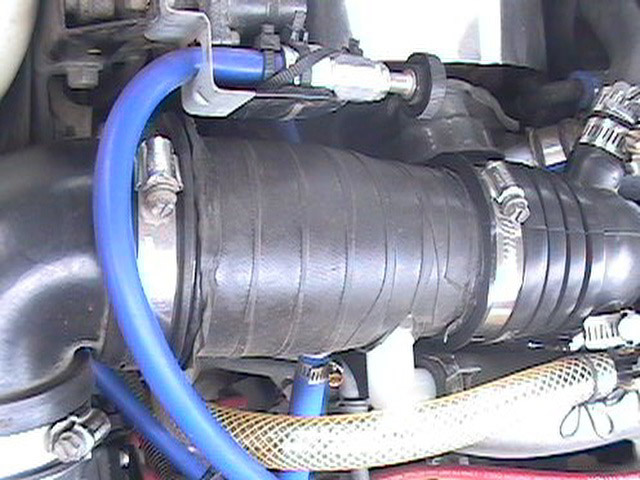
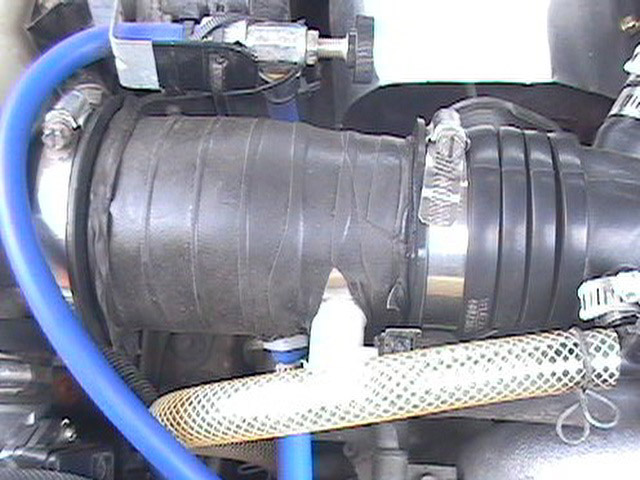
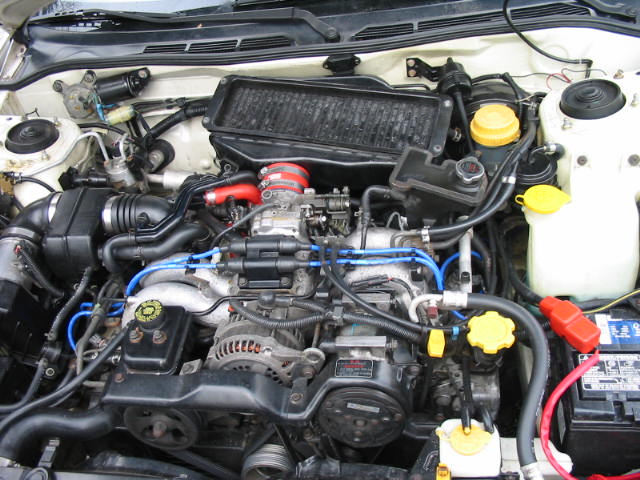
If you look just past the MAF sensor you'll see a 90 degree bend that feeds into a black box thingy. That's the part that's being replaced by legazee's innovative coffee mug tube. The air will be very turbulent around this area and a freer-flow tube will give better spool up and throttle response. I believe this box was used for muffling sound waves in the intake, similar to the resonator in the fenderwell.
legazee, can you comment on the changes in sound due to this mod?
its not that much louder than the resonator box but i do hear the turbo spool up a lot more. i am sure the air is flowing a lot better, especially after taking the box apart and looking at how it is configured. the next mod i want to do to the intake is straighten the flow path. i have it mapped out but i need to learn how to make silicone hose, in particular a reducing elbow similar to the one on the inlet to the turbo. i have a newer legacy air filter box hood or top, that is angled towards the turbo. thats easy enough to buy a straight section from baker precision to connect the maf to the new intake part and they even have a reduction coupling for the size needed but i would have to come up with a connector pc. to mate up with the 90deg elbow that goes onthe turbo inlet elbow. then i could move the bov pipe further away from its present location in the oem black rubber reducing elbow. i do have pics of the guts to the resonator box i will try to get posted
ej22t you will need to drill 3 holes; one for the iac valve hose[15/16 hole saw], one for the line off the charcoal cannister[15/32] and one for the hose off the bottom of the oem map sensor/boost control,11/32, [it has 3 lines out, 2out the side one off the bottom pointing straight down..thats the one that goes to the oem resonator box and the one to use on the repalcement intake] i have some digis i will send to boostjunkie of the pvc parts and maybe he will be kind enuff to post them
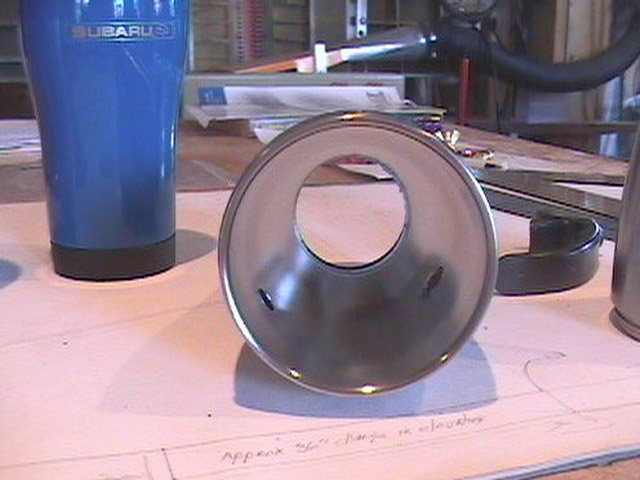
thanks boostjunkie for posting those pics, hope they were a little easier to handle. the pisc shows the intake[larger ring] then a center section that friction fits into the smaller outflow ring. the spacing between the intake / outflow approximates how it actually occurs in the resonator box. it is interesting to note how much it is reduced down after the initial 3"plus intake side of the box. i cut off all the ports on the box and went to the local hardware store so i could match up the size with the new pvc fittings.the other pics show the actual pvc parts that were available locally. the parts guy told me there are alot more available in different configurations from different companies so anyone could probably go online and find what they needed. one of the main reasons i wanted to build my own was not being able to find an inexpensive replacement.after looking at a bpm silicone intake first hand and doing some measuring i realized i did not have to spend $250-300 on a silicone intake. although you could get one for a wrx and slice it into 2 pcs. and fit it together with connector rings and hose clamps. but then that takes away from the chips and beer money