Page 3 of 6
Posted: Thu Nov 18, 2004 1:23 am
by vrg3
I don't know much about the different types of clear coat you can get, but it makes sense that a glossy coat would reflect some light back instead of transmitting it. But if the matte coat diffuses the light at all, that'd be undesirable too.
Posted: Thu Nov 18, 2004 1:25 am
by scottzg
trouble is that the heat from your headlights melt the wax. So they look great, just dont use them
Posted: Thu Nov 18, 2004 1:27 am
by 93Leg-c
Posted: Fri Apr 15, 2005 6:11 am
by kidwired
I used rubbing compound, it worked well. Then I treated w/ 303 UV block.
Posted: Fri Apr 15, 2005 8:51 am
by 93Leg-c
What's 303 UV block? How much UV- A, B, and C does it cut out? Where can it be purchased?
Posted: Fri Apr 15, 2005 4:32 pm
by kidwired
303 from NAPA auto parts, also try Marine and Aviation supplies. SPF 40, I use it on EVERYTHING, plastic, vinyl, leather, cloth seats etc.
Posted: Wed Apr 20, 2005 3:13 am
by 93Leg-c
Thx for the info.
Posted: Sun Apr 24, 2005 7:46 am
by jamal
Well, I had my headlights off today because I'm reworking my driving light mounts, and decided to try this out. The first time was okay, but the clear coat "orange-peeled," I guess. They're nice and clear, though. Then I sanded them again to take off the clear, and tried it again. It looks worse now. I figure I didn't sand them well enough, and/or I'm not putting the clearcoat on right. There's also a little cloudy part. Any suggestions? Should I just sand them down and try again? I put them in the fridge for awhile to dry, too.
Posted: Mon Apr 25, 2005 2:23 am
by Legacy777
Did you take acetone to them before hand?
You really need to work the wet fine grit sand paper to as smooth/clear as you can.
Put the light in the freezer before you paint the lights. Do a lighter coat, and then a heavy coat.
Posted: Mon Apr 25, 2005 5:42 am
by jamal
No, I didn't use acetone. Is it necessary? I'm happy with how clear they are now, there's just a little bit of clouding on one and some orange peel. I guess I'll go over them again tomorrow evening.
Posted: Mon Apr 25, 2005 6:38 am
by scottzg
sanding through the clearcoat is a PITA if you do it a second time, dont use a harsh grit because it will mess the plastic up once you get through the clear.
Posted: Mon Apr 25, 2005 2:47 pm
by Legacy777
What I found out was that even with sanding, there was an underlying yellow that just didn't seem to go away. What the acetone did was eat through the plastic, and get me to clear plastic.
When I was wiping the lenses with the acetone, the paper towel would turn yellow. I'd just keep doing this until I got no more yellow.
The only issue with using acetone is that you have a lot more sanding to do since the acetone effectively makes the plastic cloudier. So if you're happy with things now, just leave it.
Posted: Thu Apr 28, 2005 4:01 am
by IronMonkeyL255
I sanded the crap out of mine and clearcoated them a while ago.
They look good. No more yellow. I had a bit of orange peel in the clear, but a bit of rubbing compound did the trick.
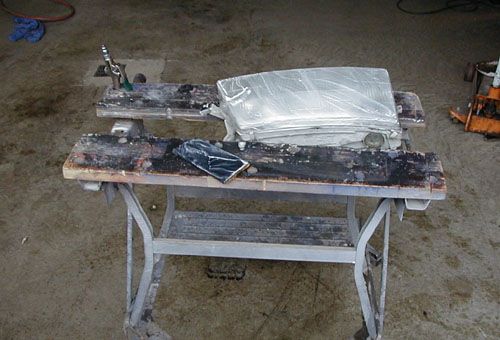
Posted: Tue Jun 14, 2005 1:40 am
by Warp3
Sandpaper, clear coat, and Meguiar's clear plastic cleaner/polish purchased. Headlights removed and ready for surgery!

(The car looks kinda funny with no grill or headlights...

)
(NOTE: To anyone who uses the Subaru service manual for grill removal...there are SEVEN clips on the '91 turbo grill, not four like they show in the manual. There are four on top (as in the FSM), one in the bottom middle and one on each side on the bottom. The bottom middle one is best accessed through the top middle area and is a "push down style" clip like the top ones. The bottom side ones are
reversed from the others, so the clip needs pushed UP not down to release!

)
Posted: Tue Jun 14, 2005 4:35 am
by IronMonkeyL255
I think my middle bottom clip is broken. It slots into place, but doesn't clip into it. It just comes right off.
Also, the Haynes manual doesn't show how to adjust a '91 Legacy's headlights. It only shows for '92 on. It's pretty easy to figure out, but still......
Posted: Tue Jun 14, 2005 6:53 am
by LaureltheQueen
lol, my 91L had like 2 working clips on the grill. One in the middleish area and 1 on one side.
Posted: Tue Jun 14, 2005 2:30 pm
by Warp3
IronMonkeyL255 wrote:Also, the Haynes manual doesn't show how to adjust a '91 Legacy's headlights. It only shows for '92 on. It's pretty easy to figure out, but still......
Yeah, I've got the Haynes manual as well (came with the car) but only recently picked up the FSM set from the dealer. Sad thing is the Haynes better is actually better for a few tasks like certain part removal/installation steps. The FSM definitely has the edge for exploded views, torque specs and sheer volume of information, though.
Got one of the headlamps mostly done last night and plan to finish the job completely tonight. Hopefully I'll remember to borrow my friend's digital camera after work today, so I can take some before/after pics (as the passenger lens is still untouched).
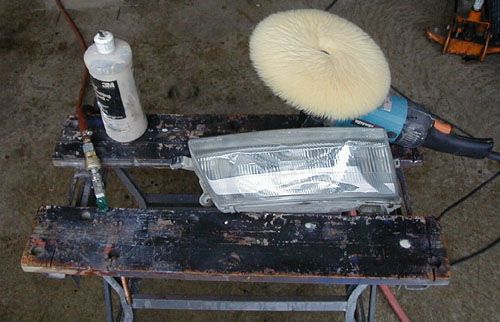
Posted: Thu Jun 16, 2005 8:05 pm
by All_talk
I did the one on my '92 SS a while back, wet sanded with 400 grit to remove the damaged (yellow) layer, then on to 600. 1000, 1500 grits, finished with polishing compound with the buffer, just like finishing clearcoat, after all cured clearcoat is just clear plastic. Came out clear and beautiful, I didn't coat them with anything but it might not be a bad idea to protect them from more UV damage. I figure I'll just hit them with the 1500 and the buffer from time to time. One note, they are much easier to work with off the car.
Gary
P.S. I have some pics (before, durring, after) if anybody wants to see.
Posted: Thu Jun 16, 2005 8:56 pm
by Warp3
Never did get pics of mine (doh), but I did get them finished and reinstalled last night. I wet-sanded with 220, 400, 800, then 1000 grit (the four types that come in the 3M variety pack at Advance Auto Parts
), then did a thin coat of DupliColor clearcoat, followed by a thicker coat of it.
While it isn't quite as "white/clear" as the corner lenses, it is definitely light years better than previously (as noted by my still yellowed bumper turn signals, which matched the headlamps when I started but now are nowhere close).
Posted: Fri Jun 17, 2005 3:56 am
by Legacy777
yeah....let's see some pics
Posted: Fri Jun 17, 2005 5:55 am
by All_talk
mine are as clear as my sidemarkers...
Gary
Posted: Fri Jun 17, 2005 2:42 pm
by Legacy777
Nice.....you had the buffer out

Posted: Sat Jun 18, 2005 8:18 pm
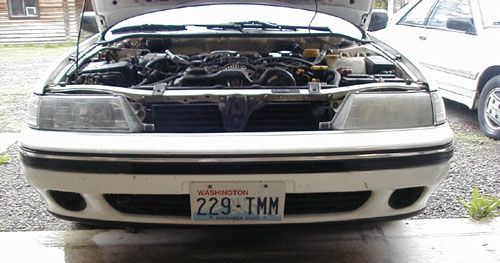
by Warp3
Ok, finally got some pics (unfortunately, no before pics, though).
Two things of note:
1) Note the color of the bumper turn signals. This is very similar to what the headlights looked like originally.
2) The passenger side lens is now MUCH clearer than the driver side lens. I suspect this is because there was still some moisture in the passenger lens when I reinstalled them, so it appears to have steam-cleaned the inside of them!

Overall view (note the comparison with the still yellowed turn signals):

Driver side closeup:

Passenger side closeup:

Posted: Fri Jul 29, 2005 9:13 pm
by josh9227
very clear lights what to know how I got them so clear

I got JDM glass head lights
Posted: Fri Jul 29, 2005 9:31 pm
by Manarius
josh9227 wrote:I got JDM glass head lights
You cheated.
I got my headlights back to full complexion (Mine look like that silver legacy above). My problem is now how to get them back to pointing the right direction.