
Custom Grille v3.0
Moderators: Helpinators, Moderators
-
originalcyn
- Fourth Gear
- Posts: 1627
- Joined: Fri Aug 20, 2010 7:00 am
- Location: Everett, WA
Re: Custom Grille v3.0
Thanks for the input everyone. So i guess the question is, while it looks unique, that's not necessarily the same as good. Do you guys like it without the trim at all, or with the trim in front of the mesh, or in the small surround channel? I can't think of another place to put it honestly. it'd be nice to figure out how to get it behind the mesh.
-
originalcyn
- Fourth Gear
- Posts: 1627
- Joined: Fri Aug 20, 2010 7:00 am
- Location: Everett, WA
Re: Custom Grille v3.0
Procuring materials:
-
beatersubi
- Fifth Gear
- Posts: 2385
- Joined: Tue Mar 13, 2007 12:56 am
- Location: 10-9-oh(!), wa
Re: Custom Grille v3.0
I think it wouldn't show up enough to be noticeable behind the mesh. Have you considered any other colors? Like a silver or grey maybe.
93 legacy wagon L, 22T swapped (TW imitator) now with five forward speeds. (Gone, but never forgotten)
johndrivesabox wrote: Rally, my kyboard is brok, his has nohing o do wih h liquor.
Originalcyn wrote:Apparently everyone hates Gabe.
-
originalcyn
- Fourth Gear
- Posts: 1627
- Joined: Fri Aug 20, 2010 7:00 am
- Location: Everett, WA
Re: Custom Grille v3.0
beatersubi wrote:I think it wouldn't show up enough to be noticeable behind the mesh. Have you considered any other colors? Like a silver or grey maybe.
Red is a little ricer i guess. But cause my badge and calipers and sways i kinda want to stick with red.
here's where we're at:
Finished my sanding. looked ok:


Turns out I can't tell what's good and not and also have zero depth perception. When I added a layer of plastidip to look to see how wavy it was, well...it was pretty wavy.


Anyways, the solution might be (besides learning how to actually do this) glazing putty. I picked some up, along with some body filling primer today. I'm always curious what these kinds of projects end up actually costing.


-
originalcyn
- Fourth Gear
- Posts: 1627
- Joined: Fri Aug 20, 2010 7:00 am
- Location: Everett, WA
Re: Custom Grille v3.0
Primered it the other day. It's hard to tell in the pictures, but it's still kind of wavy. I need some serious practice learning how to sand.


Right now I have some glazing putty to put on, and some more sanding. But this looks like it will be the last bit of body work to the plastic before the final primer and paint. I still need to put the mesh in obviously.
Right now I have some glazing putty to put on, and some more sanding. But this looks like it will be the last bit of body work to the plastic before the final primer and paint. I still need to put the mesh in obviously.
-
cj91legss
- Fifth Gear
- Posts: 6322
- Joined: Fri Jun 20, 2008 8:17 am
- Location: Lakewood, Wa 98439
- Contact:
Re: Custom Grille v3.0
Looking good. Where did you get the mesh?
91 L-TW Wagon with a full Swap -RIP
92 SS Prefaced, GD dash swapped, 22T/205 Hybrid 20 psi - BEAST!
93 SS Bone Stock Gone!
94 TW Bone Stock Gone!
91 SS 4EAT Sold!
98 LGT 4EAT
98 LGT Wagon 4EAT
92 SS Prefaced, GD dash swapped, 22T/205 Hybrid 20 psi - BEAST!
93 SS Bone Stock Gone!
94 TW Bone Stock Gone!
91 SS 4EAT Sold!
98 LGT 4EAT
98 LGT Wagon 4EAT
-
originalcyn
- Fourth Gear
- Posts: 1627
- Joined: Fri Aug 20, 2010 7:00 am
- Location: Everett, WA
-
mike-tracy
- Moderator

- Posts: 5000
- Joined: Tue Aug 25, 2009 7:52 am
- Location: Des Moines, Wa
Re: Custom Grille v3.0
Good one K 
-
originalcyn
- Fourth Gear
- Posts: 1627
- Joined: Fri Aug 20, 2010 7:00 am
- Location: Everett, WA
Re: Custom Grille v3.0
So not intentional. i had to go back and edit the comment so people knew i wasn't making a terrible terrible pun. lol.
-
kimokalihi
- Fifth Gear
- Posts: 8360
- Joined: Mon Nov 06, 2006 3:41 am
- Location: Tenino, WA
Re: Custom Grille v3.0
To get the wavyness out you probably need a sanding block. If you use something soft like your fingers you're going to sand both the peaks and the valleys and you won't get very far.
98 Metro Hatch Daily Driver :)
91 SS EJ20G Engine/Tranny/Diff Swap Build Thread Here
"Your testes are close to your bottom but you still play with them all the time." Jeremy Clarkson
91 SS EJ20G Engine/Tranny/Diff Swap Build Thread Here
"Your testes are close to your bottom but you still play with them all the time." Jeremy Clarkson
Re: Custom Grille v3.0
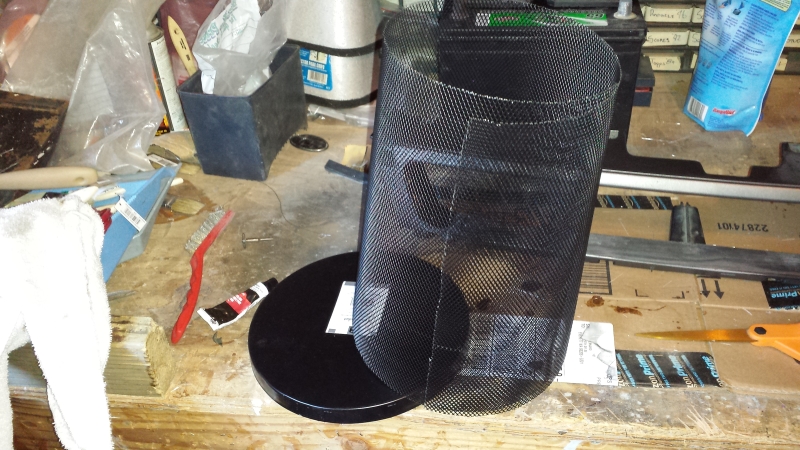
I've been looking for the good old stand by of aluminum gutter guard but everywhere I look (Lowes, Home Depot, True Value, Ace, etc.) they only sell the nylon crap. Guess I'll be utilizing the garbage can mod as well. 
'92 Legacy Sport - Daily Driver & SCCA AutoX (Class: SM)
"When in doubt, flat out!" Colin McRae 1968-2007
"When in doubt, flat out!" Colin McRae 1968-2007
-
originalcyn
- Fourth Gear
- Posts: 1627
- Joined: Fri Aug 20, 2010 7:00 am
- Location: Everett, WA
Re: Custom Grille v3.0
Thanks Kimo, I was using those sponge blocks, but they didn't help that much. Maybe i need to buy the real blocks. But it's hard to get those in there with such little space.
Lego22T, Honestly, the gutter mesh is too open (personally). I started with that stuff. The garbage can mesh is way better, finer mesh, feels higher quality too, and shapes better.
Lego22T, Honestly, the gutter mesh is too open (personally). I started with that stuff. The garbage can mesh is way better, finer mesh, feels higher quality too, and shapes better.
-
originalcyn
- Fourth Gear
- Posts: 1627
- Joined: Fri Aug 20, 2010 7:00 am
- Location: Everett, WA
Re: Custom Grille v3.0
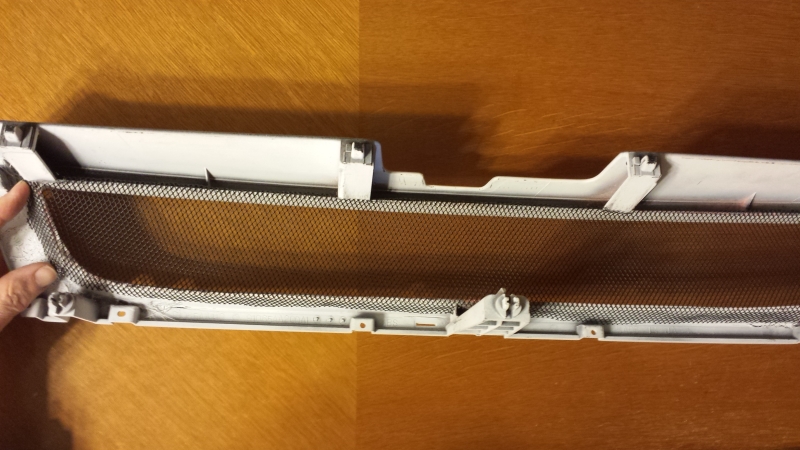
Finally had time to do some more work. Here's where we're at:

Finally it got it smooth enough that I was marginally happy with results.

The mesh isn't fastened in yet, I'm still trying to figure out my system for that. But it helps me to cut out notches for the posts and then tighten the mesh down around the posts and the underside.

Once I do that, i try to pull the mesh out again and look at the front facing surface of the mesh. I like it to kind of be convex coming out of the front of the grille. Doing that however can leave uneven surfaces. So pulling it out again kind of gets me a perspective of where i need to smooth it out.


Then, putting it back in and trying to push the mesh around the frame as much as possible. Leaving enough of the mesh to fold around the grille works best for me. Not only do those places create friction to hold the mesh in, it's also where i would use some kind of adhesive to keep the mesh in place permanently.


Finally it got it smooth enough that I was marginally happy with results.
The mesh isn't fastened in yet, I'm still trying to figure out my system for that. But it helps me to cut out notches for the posts and then tighten the mesh down around the posts and the underside.
Once I do that, i try to pull the mesh out again and look at the front facing surface of the mesh. I like it to kind of be convex coming out of the front of the grille. Doing that however can leave uneven surfaces. So pulling it out again kind of gets me a perspective of where i need to smooth it out.
Then, putting it back in and trying to push the mesh around the frame as much as possible. Leaving enough of the mesh to fold around the grille works best for me. Not only do those places create friction to hold the mesh in, it's also where i would use some kind of adhesive to keep the mesh in place permanently.

Re: Custom Grille v3.0
It's looking good!
Josh
surrealmirage.com/subaru
1990 Legacy (AWD, 6MT, & EJ22T Swap)
2020 Outback Limted XT
If you need to get a hold of me please email me rather then pm
surrealmirage.com/subaru
1990 Legacy (AWD, 6MT, & EJ22T Swap)
2020 Outback Limted XT
If you need to get a hold of me please email me rather then pm
Re: Custom Grille v3.0
Scuff the backside with a 40-80 grit sand paper and sandwich the mesh into a layer of Bondo. That is a technique that has been used on aftermarket bumpers for many years. I've done that in the past on several projects with good success.
'92 Legacy Sport - Daily Driver & SCCA AutoX (Class: SM)
"When in doubt, flat out!" Colin McRae 1968-2007
"When in doubt, flat out!" Colin McRae 1968-2007
-
originalcyn
- Fourth Gear
- Posts: 1627
- Joined: Fri Aug 20, 2010 7:00 am
- Location: Everett, WA
Re: Custom Grille v3.0
Thanks Josh!
Lego22t, so that's how they do mesh in aftermarket parts? What I'll probably end up doing is spotting it down with 5 minute epoxy and then fiberglassing over the back. I've had bad luck with bondo on previous reiterations of this specific project, so i'm a little reluctant to try again. I'm positive i used it in the wrong application, but fiberglass just seems so much more solid.
Lego22t, so that's how they do mesh in aftermarket parts? What I'll probably end up doing is spotting it down with 5 minute epoxy and then fiberglassing over the back. I've had bad luck with bondo on previous reiterations of this specific project, so i'm a little reluctant to try again. I'm positive i used it in the wrong application, but fiberglass just seems so much more solid.
-
kimokalihi
- Fifth Gear
- Posts: 8360
- Joined: Mon Nov 06, 2006 3:41 am
- Location: Tenino, WA
Re: Custom Grille v3.0
Bondo sucks when you use it in ways its not meant to be used and that would be one of those ways. It'll crack and come off. Use epoxy instead. Strong and it'll last forever.
98 Metro Hatch Daily Driver :)
91 SS EJ20G Engine/Tranny/Diff Swap Build Thread Here
"Your testes are close to your bottom but you still play with them all the time." Jeremy Clarkson
91 SS EJ20G Engine/Tranny/Diff Swap Build Thread Here
"Your testes are close to your bottom but you still play with them all the time." Jeremy Clarkson
-
originalcyn
- Fourth Gear
- Posts: 1627
- Joined: Fri Aug 20, 2010 7:00 am
- Location: Everett, WA
Re: Custom Grille v3.0
Yeah, i've had bad luck with bondo. Epoxy seems to be the way to go, or resin for fiberglass. Either way, I'm starting with epoxy.
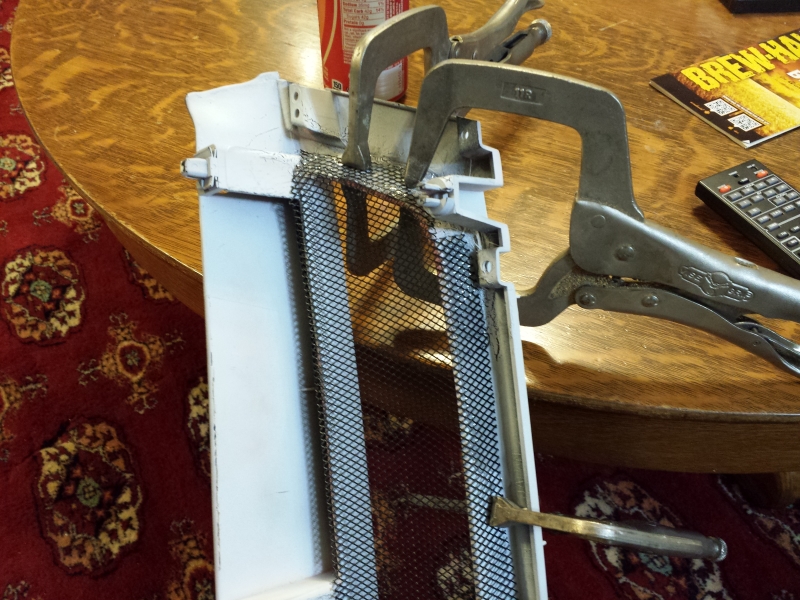
Of course the clamps messed up the surface, so i had to glazing putty again. but that's all in the past.
Of course the clamps messed up the surface, so i had to glazing putty again. but that's all in the past.
-
beatersubi
- Fifth Gear
- Posts: 2385
- Joined: Tue Mar 13, 2007 12:56 am
- Location: 10-9-oh(!), wa
Re: Custom Grille v3.0
Welding clamps for bodywork FTW!
93 legacy wagon L, 22T swapped (TW imitator) now with five forward speeds. (Gone, but never forgotten)
johndrivesabox wrote: Rally, my kyboard is brok, his has nohing o do wih h liquor.
Originalcyn wrote:Apparently everyone hates Gabe.
-
originalcyn
- Fourth Gear
- Posts: 1627
- Joined: Fri Aug 20, 2010 7:00 am
- Location: Everett, WA
Re: Custom Grille v3.0
haha yeah.
Legacy Central - Make Due With What You've Got.
Legacy Central - Make Due With What You've Got.
-
originalcyn
- Fourth Gear
- Posts: 1627
- Joined: Fri Aug 20, 2010 7:00 am
- Location: Everett, WA
Re: Custom Grille v3.0
I've gotten a little behind on this, but here's several days of updates:
Fiberglass support around the mesh finished


Paint of the final product minus the chrome strip that goes in front (oddly I only have one in good condition even though I have 4 or 5 grilles laying around).


Fiberglass support around the mesh finished
Paint of the final product minus the chrome strip that goes in front (oddly I only have one in good condition even though I have 4 or 5 grilles laying around).
-
originalcyn
- Fourth Gear
- Posts: 1627
- Joined: Fri Aug 20, 2010 7:00 am
- Location: Everett, WA
Re: Custom Grille v3.0
I painted the LS badge before, and it had turned out...alright. Heartened by the experience, and figuring I could do better this time around, I gave it another go.

Only for it to end in utter disaster.

Pushing forward, thinking that plastidip might be the solution, and provide easy clean up for when I screwed up, I arrived at this.

Of course, that didn't work either. Why should it? I was being lazy and didn't want to prep the badge yet again. But ultimately it came down to it anyways. The local hobby store is apparently a nice solution. So the badge is stripped down completely (again). Enamel paint was recommended for durability, and it's what I had used last time anyways, at least for the lettering.

So several layers of black enamel, and 48 hours of drying left me with this.

'course, it looks like garbage again once I start hand brushing in the letters. I will say that the pictures make it look a lot worse. The hand brushing is apparently the option for me that works best though.

Only for it to end in utter disaster.
Pushing forward, thinking that plastidip might be the solution, and provide easy clean up for when I screwed up, I arrived at this.
Of course, that didn't work either. Why should it? I was being lazy and didn't want to prep the badge yet again. But ultimately it came down to it anyways. The local hobby store is apparently a nice solution. So the badge is stripped down completely (again). Enamel paint was recommended for durability, and it's what I had used last time anyways, at least for the lettering.
So several layers of black enamel, and 48 hours of drying left me with this.
'course, it looks like garbage again once I start hand brushing in the letters. I will say that the pictures make it look a lot worse. The hand brushing is apparently the option for me that works best though.
Re: Custom Grille v3.0
Painting is all about the prep work. If you don't prep properly, it has a less likely chance of turning out well.
Josh
surrealmirage.com/subaru
1990 Legacy (AWD, 6MT, & EJ22T Swap)
2020 Outback Limted XT
If you need to get a hold of me please email me rather then pm
surrealmirage.com/subaru
1990 Legacy (AWD, 6MT, & EJ22T Swap)
2020 Outback Limted XT
If you need to get a hold of me please email me rather then pm
-
originalcyn
- Fourth Gear
- Posts: 1627
- Joined: Fri Aug 20, 2010 7:00 am
- Location: Everett, WA
Re: Custom Grille v3.0
blarg i just have so little patience. haha. the badge is shaping up nicely (5 ft or greater distance) so hopefully i can put it on the new grille soon.
-
originalcyn
- Fourth Gear
- Posts: 1627
- Joined: Fri Aug 20, 2010 7:00 am
- Location: Everett, WA
Re: Custom Grille v3.0
Well, after an extended hiatus, and a long arduous journey of self discovery, I've finally resumed work on grille v3.0.
First step was to pull out my old grille. For as many grille as I have laying around, I have practically no chrome trim pieces. The only intact one was on grille v2.0 (and I even managed to break it a little bit).

Hit it with like 6 coats of plastidip. Plastidip seems to be the only moderately decently solution for the chrome, at least that I've come up with, which i guess isn't saying much.

Finally all back together.


Final paint - layer of plastidip on the mesh. Just a fyi. I painted the mesh on grille v2.0 with a bajillion different things. Almost always ended up chipping out. Save yourself some effort if you're going the mesh route and just plastidip it. Holds up remarkably well to whatever hits it on the road.

I should be able to start adding the final pieces tomorrow! or maybe later...
First step was to pull out my old grille. For as many grille as I have laying around, I have practically no chrome trim pieces. The only intact one was on grille v2.0 (and I even managed to break it a little bit).
Hit it with like 6 coats of plastidip. Plastidip seems to be the only moderately decently solution for the chrome, at least that I've come up with, which i guess isn't saying much.
Finally all back together.
Final paint - layer of plastidip on the mesh. Just a fyi. I painted the mesh on grille v2.0 with a bajillion different things. Almost always ended up chipping out. Save yourself some effort if you're going the mesh route and just plastidip it. Holds up remarkably well to whatever hits it on the road.
I should be able to start adding the final pieces tomorrow! or maybe later...