Page 5 of 8

Posted: Mon Jun 27, 2005 6:59 am
by IronMonkeyL255
Can you get a replacement seal for the edge of the glass?

Mine is gettong kindof worn, and I wondered how much it might be.

Posted: Fri Jul 01, 2005 5:28 pm
by turbonator
All_talk wrote:Yep, glass should come out, the nuts that hold the glass are under the covers on the left and right sides, push the center buttons on the plastic rivits to remove the covers (look at my second pic). Take note of the shims between the glass and frame (best to wright it down).

Gary
Sorry I'm a newb but I cant find what your talking about.

Posted: Sat Jul 02, 2005 8:56 am
by All_talk
On the under side of the glass on the sides there are black plastic trim pieces, each with two plastic rivets with small buttons (about 1/8") in the center of them, push the little buttons in to release the trim. Under the trim you will find the nuts that hold the glass to the frame, again note the number and location of the shims, these shim may need to be adjusted after you reinstall the tray to get the glass level with the roof in the closed position.

Note: The rivet buttons have three positions, button popped up for installation, button flush installed, button pushed in for removal. Really its a pretty cool little part.

Trim

Image


Nuts

Image


Shims

Image


Monkey, I believe the edge seal is part of the glass assembly and is not replaceable separately, but a check with dealer or a glass shop will tell for sure.

Gary

Posted: Thu Aug 11, 2005 4:16 am
by A_DuB
JasonGrahn wrote:remove trim A, B, and C column trim pieces.
C) Remove headliner
Not exactly sure as to what Jason was refering to when he said this but from looking at the inside of the legacy I would guess that I remove the trim that overlaps the headliner from back to front possibly with a flat head scewdriver?

EDIT:
If your having trouble getting the headliner out look at this thread. http://bbs.legacycentral.org/viewtopic. ... ht=sunroof

Posted: Fri Aug 12, 2005 2:08 am
by turbonator
Thanks..

I got it all apart but was to lazy to remove the tracks.. So I just siloconed around the tracks on both sides.

A few drops came in when it rained like crazy but otherwise it's working.

Friggin' leak!

Posted: Sun Oct 16, 2005 4:55 pm
by tonflo
My moonroof is leaking! The passenger side seat is wet. The front & rear passenger carpets are soaked. I had to take the seat out & I have a small electric heater under the carpet to dry out the padding underneath. It is drenched. While it was leaking you could see water dripping out of the psgr side kick panel.

My question is: where is the problem gasket situated? Between the top of moonroof frame & bottom of car roof or under where the glass sits and seals to the frame? I'm sure it will be obvious when I rip it apart, but I am curious. My moonroof is cracked so no point just ripping it out & caulking, need to find a good one. Just needed to vent since it has rained here the past 9 days except today is dry finally. But car has a fishpond under carpet.

Posted: Sun Oct 16, 2005 6:30 pm
by Subtle
No leaks in mine----except for when the car is parked on uneven terrain. If there is a twisting moment on the body
shell and the moonroof is then closed, it doesn't seal
properly and leaks.

Park the car on the flat, open and close the roof--no problem. :-)

Posted: Sun Oct 16, 2005 9:17 pm
by tonflo
Don't have a choice. Driveway has a slight slope & NSX stays in garage for obvious reasons. Getting really fed up with this %^$$#@*(! car.

Fixed mine (I think)

Posted: Sat Oct 22, 2005 3:29 am
by tonflo
1st off this is a shitty job to do. Second, I would recommend turning it into a 3 day job if you can. 1st day, remove headliner. 2nd day remove, repair & replace moonroof. Wait a few days for a good rain to make sure it isn't leaking. Do you really want to repeat the headliner removal if you missed a spot? 3rd day, put in headliner once you're sure it's all fixed. Use some of the down time to clean all the various stains on your headliner. If you find a black mystery wire in the driver's side a-pillar with the free end up high, ignore it. If you figure out what it does, please tell us!

Ahead of time lay in (2) 3 oz tubes of silicone RTV adhesive caulk. I used Permatex. 1 tube is definitely not enough. Also some good cleaner & if you have it a long bristled brush to get in all the nooks & crannies that collect all the crap. One of those round parts cleaner ones would be nice. Get lots of rags- the black crap is messy & the silcone gets all over your hands & makes a mess. Use a 5mm (I think) allen head socket to turn the motor directly to allow access to the full length of the rails.Have some spray on grease or lube to lube the tracks before you put it back in the car. As stated above, you will need a vacuum cleaner for all the cracked, dried out, useless Subaru caulk & assistance to get it back in.

I did test by using a squeeze bottle of water, but I'm waiting for the real thing to be sure. I also blew in the drain tubes with my mouth & got no resistance.

Posted: Wed Nov 09, 2005 11:55 pm
by tonflo
:mad: How much fucking caulk does it take to seal this thing!!?? I have had mine out twice now. 1st time it leaked on both sides after. Now it is only (so far) leaking on the passenger side. I ran a HEAVY bead of caulk under the rails & then a bead down each side of each rain & smoothed it in. The ends were also caulked under & around & over. The caulk from the 1st time was so stong I bent the pans in places pulling the rails off to do it the 2nd time. Any ideas? I am getting really sick of this car leaking stuff & eating money & drinking gas. Time to get a putt-putt with no friggin' shit moonroof.

Posted: Thu Nov 17, 2005 4:16 pm
by Arturo
:? i have this leaking problem too if i take of the factory rubber that is around the glass what can i put around as a replacement mine is leaking arond it. :razz:

Posted: Tue Nov 22, 2005 9:17 pm
by tonflo
Arturo, it's not the seal on the glass, it's the caulk under the silver aluminum rails that's the problem. Although I suppose sealing the crap out of the glass would stop it from leaking as long as you never open it.

Posted: Tue Dec 20, 2005 9:53 am
by kidatari
Has anyone completely sealed their sunroof? As in 'I don't want to open it any more' sealed it? Because that's what I'm about to do.

My girifriend bought me a new 91 5MT SS (yes, she's awesome), but the sunroof leaks like crazy, worse than my last SS. All I want to do is completely seal the assembly, I don't care about being able to open it any more. Anyone done this yet?

Posted: Thu Dec 22, 2005 7:57 am
by eastbaysubaru
It should be a lot easier to do in a sedan. It's a lot more difficult with a wagon because the headliner is Much bigger. I'd really just sack up and pull the headliner and fix it the right way :D

-Brian

Posted: Wed Jan 04, 2006 11:46 pm
by kidatari
eastbaysubaru wrote:It should be a lot easier to do in a sedan. It's a lot more difficult with a wagon because the headliner is Much bigger. I'd really just sack up and pull the headliner and fix it the right way :D

-Brian
Well, I finally got around to pulling the headliner. Took about 45 mins, and I only broke two clips ;)

Apparently the drivers' side drain tube was completely disconnected from the sunroof tray. Now I get to go check and see if I actually need to remove the sunroof assembly, or not. Tearing apart a car in a parking space sucks :p

Edit: Oh yes, the sealant around the rails is most definately leaking. In two seperate places on the drivers' side. Shit.

One More

Posted: Sun Jan 15, 2006 2:50 am
by simbey1982
I took on this project after i got tired of a wet seat all the time.

It took awhile to do so be prepared to dedicate some time to it. And be smarter than me and silicone it GOOD before you put it back on :roll:

Also i took the opportunity to grease up the rails and snake gears and also i found that the snake gears had jumped a few teeth.

Works great and NO MORE LEAKS :wink:

Do it you wont regret it

part is obsoleted

Posted: Tue Jan 24, 2006 7:25 pm
by tonflo
I called Liberty Subaru in NJ today. (I originally saw their ad in Autoweek many years ago & get stuff as I need it. Decent discounts.) I wanted to see about price (I know it would be 2 arms & a leg) on an entire replacement moonroof assembly. Guess what, it's obsoleted. So start scavenging.

Posted: Sun May 28, 2006 12:39 am
by Murphy
I am currently in the process of resealing my sun roof, i am using the directions from Jason Ghrans post on page 1.

I was expecting it to be much more dificult when reading these post but i think once i figure out that all the trim just snaps on and off it only took me 1 1/2 hour to get the head liner down and now i have the tracks off of the sun roof assembly and just got done cleaning them, i found that Scotch Brite pads work best for cleaning them with a Shop Vac as well.
Probably will have the the assembly back in tomorrow after noon but i wont put the head liner back until i get a chance to test the new sealant.

i have a ton of pics if any of you want me to post them

Posted: Fri Jun 02, 2006 2:06 pm
by frood
Testamonial - This Fixed my leak

The original solution, posted by JasonGrahn on the first page, fixed my leak completely. I worked at a steady pace but not hurried (don't want to break/lose things) and it took me nearly 6 hours.

I bet it could be done faster with someone more familiar with the way the trim pieces fit together.

I do remember worrying at one point about pulling the cable too much, but it must self-adjust or some such because it worked fine when replaced.

Cheers,
Chris, Pittsburgh
93 LS Wagon

Posted: Fri Nov 17, 2006 3:35 am
by John Drivesabox
This whole job can be done in about 4 hours actual WORK time. Check out my process (pics to come soon). This is a '91 Sedan, I know the wagon and even 92up is slightly different.

1) Remove headliner, map lights, "oh s***" handles, rear view mirror (basic mechanical knowledge is required)

2) unbolt all frames around the moonroof assembly (this will not drop the roof, it will just allow access to all bolts).

3) remove all drain hoses, there's one at each corner.

4) remove roof motor ground wire from rear above window. disconnect moonroof harness above drivers head.

5) Begin unbolting nuts around assembly frame. Now the roof will start dropping and you'll need a friend or the top of the seats as support. Don't let the roof drop too far without all nuts un-attached, that's how s*** gets bent.

Now you should have this... (if you have anything else, you're probably not driving a Subaru, go to another forum)
Image

6) slide the assembly over the rear seats towards the back window. Here's where you need to be careful as to not smash the window out or scratch your tint (like me).

7) tilt and slide your seats forward and lower the front of the assy. towards the floor. Pull it out the back door as carefully as you can, unless you like scratched door jambs and ripped weatherstripping. I didn't do it but I can imagine.

8 ) place the assembly on a large flat work surface (duh)

For me it did't matter if the roof was open or closed, you can put a hex driver in the motor and open/close it manually.

9) open position. remove the front screws holding down the rails (everything here is a little cloudy, I did this a month ago, trying my best to remember) There are very few bolts that actually hold down this assy., I think 6 at most.
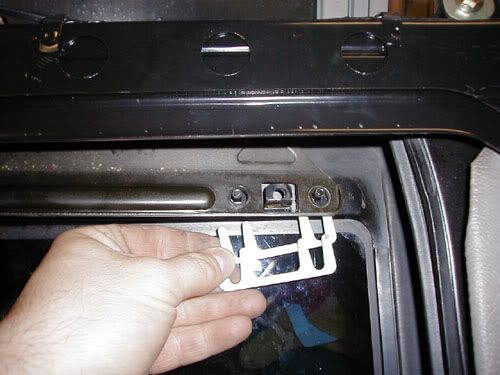
9) closed position. remove the small brackets holding down each roof cable, then pull the cables out a cM or 2. Then remove the small nuts holding the "stop steps" onto the top of the rails, just in front of the cables.

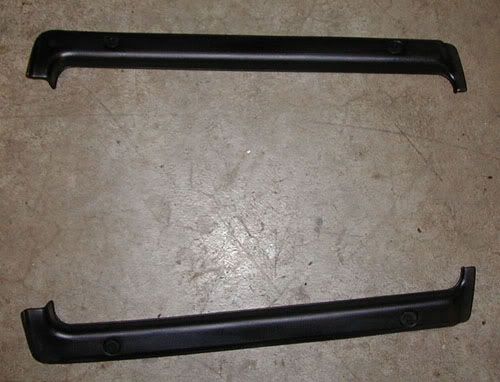
10) pick and pry (gently) under the rails until the front comes up and the rails are seperated from the pan.

now you should have this...

Image


11) using the items seen above, scrape ALL of the crusty black junk out from underneath the rails and where they meet the pan. This crap'll hit you in the eyes on its way up if you're not careful, wear protection (of the eye variety). Make it as smooth and crap free as you can. Then take 80-240 grit sandpaper if you like, I didn't but it can't hurt , to remove any excess.

Image
Use your shopvac throughout, this junk gets everywhere.

12) Get some good medium reducer or rubbing alcohol or even brake cleaner (anything that will evaporate well) and clean the s*** out of that area you just scraped up. Use a rugged towel, no paper, this should be as clean as you can get it.

Now, this is what I used. I hate doing long jobs and I hate doing them more than once even worse. I wanted to be able to put this car at the bottom of the ocean and have the roof break before it would leak, I think I did that. Use what you like but it needs to be all weather and waterproof (what else does all weather mean?).
Image


13) I laid 3 beads of the stripping and 2 beads of the caulk. Towards the front I followed the contours of the lines on the pan and filled all voids with caulk. Of course I split the center bead where the bolts in the pan are but I kept everything close and snug. After this picture I gently squeezed the whole mess closer together so that the stripping was just adhered to the caulk. The caulk beads are pretty thick too.

Image

I let it dry for 2 days, just to make sure there were no problems. Then I reassembled with the following exceptions.
Image

I left out the "stop steps" as I couldn't get the nuts on as the rails were just too high. No matter, the roof works great without 'em. I just put the nuts on.

I ended up breaking the front nuts so I drilled slightly larger holes in the wind deflector arms (not a lot of room for error, be careful) and put a new bolt on each side. If they are in different spots the deflector will look funny when it's up, so keep them at the same distance on each side.

bolt that thing back together as best you can. If you have to improvise just remember to keep any new hardware away from where the middle of the moonroof passes over, there isn't much clearance except for the far front and back.


If you're in the PNW then you know about our recent storms, plus hey, we live in the NorthWest. Not a droplet, need I say more.

Posted: Fri Nov 17, 2006 6:14 am
by BSOD2600
Great info, looks like I'll be doing this replacement over my winter break. Don't have wet seats, but I can feel water up there around the sunroof and notice the insides of the windows fill up with water vapor.

Posted: Fri Nov 24, 2006 1:38 am
by neonglh
Sorry for the ignoratn question, but you still need to hook up the drain lines even when its completey caulked up like this, correct?

I am starting this procedure when I get back from florida.

--mark

Posted: Fri Nov 24, 2006 11:21 pm
by Brims
Great info, I am also one who needs this done, hahaha. I haven't had a chance to check the drain pipes, but I'm pretty sure they might be clogged up.

The car was sitting in a wooden barn for almost a year and there were squirrels.. Damn those little things, eating their nuts and throwing the crap in every nook and cranny of the car! At least they didn't chew through any hoses, hah.

Just took the wind deflector off today, I like the look of it a lot better now without it, and it might help with some of the leaking as it was trapping water up in the front of it.

Posted: Sat Nov 25, 2006 1:04 am
by John Drivesabox
neonglh wrote:Sorry for the ignoratn question, but you still need to hook up the drain lines even when its completey caulked up like this, correct?

I am starting this procedure when I get back from florida.

--mark
Yes, because if they weren't, then that water would be all over you worse than before. If the water were to go out the drain holes but not down some tubes it would just fill your headliner.

Posted: Sat Nov 25, 2006 1:10 am
by neonglh
OK, I have mine all ripped apart. I am in the process of scraping all the old stuff out, and now I understand how the hoses work, so yes, i deffinatly will be checking to make sure they are not clogged, and taking care of that.

I do want to confirm the sealing with the weather stripping before I do it though. Once I scrape all the old stuff off (there is tons here still!!!), I am only sealing under the rails correct? I think one other person said you can channel the water into the drains, but all you have to do is seal under the rails.

I just want to confirm this before I actually lay down the sealant.

Thanks guys!

--mark