Page 5 of 5
Re: Rob's 4to2 Igntion Converter
Posted: Fri Aug 19, 2011 6:24 pm
by wtdash
Per Rob (6/24/2011):
I am working on install pictures. (Refer to the opening post of this thread for a diagram.)
It will be easy. Power will be switched with ECU power. They won't be labeled, but instead match up color-wise.
Install of converter:
- Depin the 2 stock ignition wires
- Add 4 wires to ECU - 2 are replacements for stock.
- Connect 2 output wires to the leads to the igniter.
- Connect 12v and Ground.
TD
Re: Rob's 4to2 Igntion Converter
Posted: Fri Sep 16, 2011 5:01 am
by farfrumwork
Thanks,
So it is all clear except for the 2 ADDED wires to the connector... does it matter which goes in F47 7 & 8. That is, does the "new" green go in location 7 or in 8?? and then the "new" yellow goes in the other.
it seems as though it maters or both would be the same color wire... or maybe it doesn't

I just started (finally) insatlling my Rob-kit tonight and this is the only thing hanging me up.
-Chad
Re: Rob's 4to2 Igntion Converter
Posted: Fri Sep 16, 2011 6:22 am
by wtdash
Install notes:
NOTE: This is only to install the 4-to-2 Ignition adapter/convert. There are more steps to make the EJ20G ECU function correctly -
LINK.
Disconnect the Battery's Neg. terminal, remove the ECU from under the dash, and unplug the 4 connectors.
Install of converter:
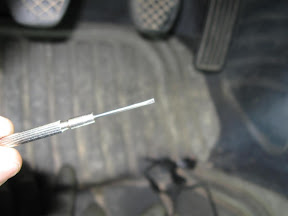
-1. Depin the 2 stock ignition wires. Using a very small jeweler-type flathead screwdriver (mine is labeled 1.4mm), CAREFULLY insert into the end opposite the wire. It takes very little force to lift the plastic tab that keep the pins intact.....it's possible to 'round off' the tab so it won't release.

2. Add 4 wires to ECU (they come ready to put in the ECU's connector w/the special pins) - 2 are replacements for stock. As noted below, the 4 Ignition coil wires are EITHER (doesn't matter) G-Y-G-Y or Y-G-Y-G (alternating).
3. Connect 2 output wires to the leads to the igniter. The 2 wires to the stock igniter match the adapter's.
4. Connect 12v and Ground. ENSURE the 12V source is NOT switched w/the key - 12V must flow to the adapter whenever the key is in the ON and START position. I used PIN 2 on the B48 connector -
LEGACY ECU Pinout. It's a Yellow/Red wire, IIRC.
Misc:
I found this on
NASIOC -post #215- that might help.....I plan on installing mine next week, too.
Re: Rob's 4to2 Igntion Converter
Posted: Fri Sep 16, 2011 6:34 pm
by farfrumwork
Per Rob, the connector wiring is either G-Y-G-Y or Y-G-Y-G (alternating)
I'm not under the dash right now (at work) so I'm not sure which it is, but alternating is correct following the 2 original wires in positions 9 & 10.
yea-haw, I'll be up and running this weekend! Then off to the drag strip ASAP before they close for the season, and finally to the dyno to see what she puts down. should be interesting.
Re: Rob's 4to2 Igntion Converter
Posted: Fri Sep 23, 2011 11:17 pm
by rob
Thanks for sharing your install details guys. I have been woefully delinquent in posting the official install instructions. I had taken a bunch of pictures of the Mule install, but after a very impressive chain of events, they were lost forever off my PC. After that things got busy. It is good to hear the reports that some of the early units are installed and working as intended!
I have posted my instructions to the first post and will repeat in the next.
-Rob
Re: Rob's 4to2 Igntion Converter
Posted: Fri Sep 23, 2011 11:18 pm
by rob
INSTALLATION
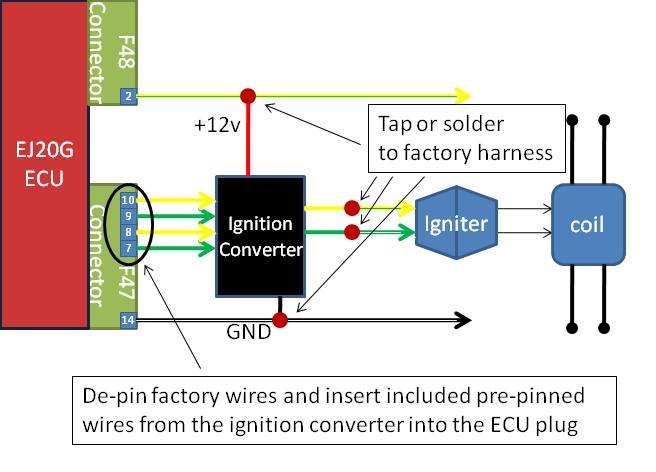
Installation is pretty straight forward. Use this connector pinout as reference. The color of the circle represents the color of the wire from the converter box.

1) De-pin the original two wires that go to the igniter. These are on connector F47.10 (yellow-green) and F47.9 (green-white)
2) Insert the pre-pinned wires from the converter; F47.10 (yellow), F47.9 (green), F47.8 (yellow), F47.7 (green). The pinned yellow wires are interchangeable with each other as well are the pinned green wires with each other.
3) Tap or solder the non pinned yellow wire to the yellow-green wire removed from F47.10. Do the same for the green wire to the green-white wire depinned from F47.9
4) Tap or solder the black ground wire to F47.14 (black-white)
5) Tap or solder the red power wire to F48.2 (yellow-blue)
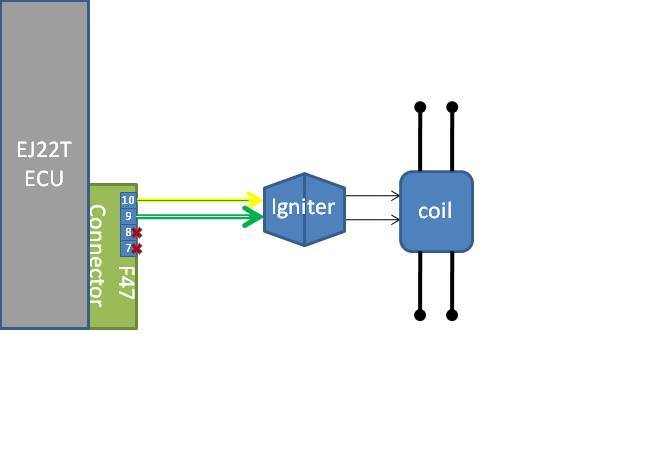
This picture represents the stock setup before adding the converter.
Here is what it will look with the ignition converter in place after adding the EJ20G ECU.
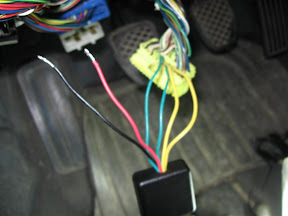
Here is a picture that shows all connections to the F47 plug. You can see in step 3 that I soldered directly to the pins of the factory wires.

Re: Rob's 4to2 Igntion Converter
Posted: Mon Sep 26, 2011 9:49 pm
by farfrumwork
Cool. Mine is working... except for the IAC control.
Am I the only one to install the Rob chipped ECU and converter to a EJ22T longblock (with stock heads/sensors)? It seems like most reports are from EJ22T/DOHC combo's.
Any other issues out there with the IAC control?
Basically it acts like the IAC is reacting absolutely backwards. It won't idle well (very low, fighting to stay alive) cold OR hot, and can feel like a vac leak under normal driving. I get an immediate and constant Code 24 (IAC), which I never had previous to the EJ20 ECU install.
I've been looking through all the IAC and EJ20 posts here and have found some mention of switching the IAC leads when using the EJ20 ECU with the EJ22T engine/sensors. I may bullet the leads by the connector bank at the battery and see if switching them works...
Thoughts?
-Chad
Mod edit: IAC discussion continued here
Re: Rob's 4to2 Igntion Converter
Posted: Tue Jul 03, 2012 6:43 am
by cj91legss
If you think the IAC wires are backwards, it shouldn't be that way, at least on a turbo legacy ecu if the leads are backwards, the car will simply die when you start it, therefor not drive. I don't know how a 20G ecu would react with the wires backwards tho.
Re: Rob's 4to2 Igntion Converter
Posted: Tue Jul 03, 2012 4:12 pm
by wtdash
^ He fixed this by replacing the ECU..and the post is from Sept. 2011. You have more posts than me....having an off day?

For future reference:
Here are the only wiring issues I'm aware of w/the EJ20G ECU running an EJ22T, and it doesn't matter if it's stock SOHC heads or DOHC - use the same Throttle Body/TPS/IAC:
Wiring
#1
The EJ20G used a Coil on Plug (CoP) arrangement. This means there is no central coil pack as on the USDM Legacy, but an individual coil @ each spark plug. There are also 2 additional wires in the harness that run to the ECU connector for the EJ20G's ignition system. The EJ20 has a double-igniter/ignitor for the extra 2 channels, too.
NO - you DO NOT need to start looking for CoPs - the existing system can be used with a bit of adaption.....keep on reading.
Check out Rob's 4to2 Igntion Converter that will simplify this task by installing a converter in the EJ22T's system that will work w/the EJ20G ECU.
If you want to save a few $$ and wire it yourself, check out the How To Make 2-Channel Ignition = 4-Channel Ignition post below.
#2
The ignition differences are described above, but the MAP sensor also needs addressed. Otherwise, it'll throw a code - 45. The solution is to remove pin 5 on B48 and join it with pin 21 on B48 @ the ECU connector.
Ignition adapter
From my thread
HERE.
TD
Re: Rob's 4to2 Igntion Converter
Posted: Tue Jul 03, 2012 4:33 pm
by cj91legss
Haha, I think I had a few beers in me, plus it being after a 12 hour day working... I guess I was having an off night...
Re: Rob's 4to2 Igntion Converter
Posted: Sun Sep 15, 2013 3:32 am
by free5ty1e
Are these still being made?
(I also just emailed Rob, will post results here)
Re: Rob's 4to2 Igntion Converter
Posted: Sun Sep 15, 2013 3:50 am
by wtdash
Bought one in July, so should be. Remember (or be aware) that Rob is a busy guy and his response times reflect this....but he'll get back to you.
You can order one on the robtune.com site, too.
GL
TD
Re: Rob's 4to2 Igntion Converter
Posted: Sun Sep 15, 2013 5:56 pm
by free5ty1e
Sweet, thanks!
Sent from my SAMSUNG-SGH-I337 using Tapatalk 4
Re: Rob's 4to2 Igntion Converter
Posted: Mon Sep 16, 2013 8:16 pm
by free5ty1e
Yep, confirmed with Rob today and ordered. I'm now in line
Re: Rob's 4to2 Igntion Converter
Posted: Sat Oct 19, 2013 2:23 am
by free5ty1e
Re: Rob's 4to2 Igntion Converter
Posted: Wed Jul 03, 2024 6:36 pm
by Turbone
Does anyone know if Rob is still making the converter, or how to get a hold of him? Maybe someone has one laying around they want to sell?
Re: Rob's 4to2 Igntion Converter
Posted: Wed Jul 03, 2024 6:48 pm
by wtdash
I reached out a year ago and never heard back. I'd guess he's 'moved on'. You can try his still active website:
https://www.robtune.com/ (not to be confused with robtuneD.com)