How to: Walbro Fuel Pump Install
Posted: Tue May 23, 2006 5:40 am
Well after many many weeks of having it in and having no problems i am finally writting up a step by step install of the Walbro Fuel Pump. This all made possible with help from The Man, Vikash.
To install you will need;
Walbro 255 Fuel Pump install kit (I emphasize the word kit because buying just the pump wont work since the kit includes the right wiring components) Link to good example: http://cgi.ebay.com/ebaymotors/ws/eBayI ... AMEWN%3AIT
Ratchet and sockets size 4.5mm - 8mm
Flat head and Phillips screw drivers
Pliers
Some zip ties
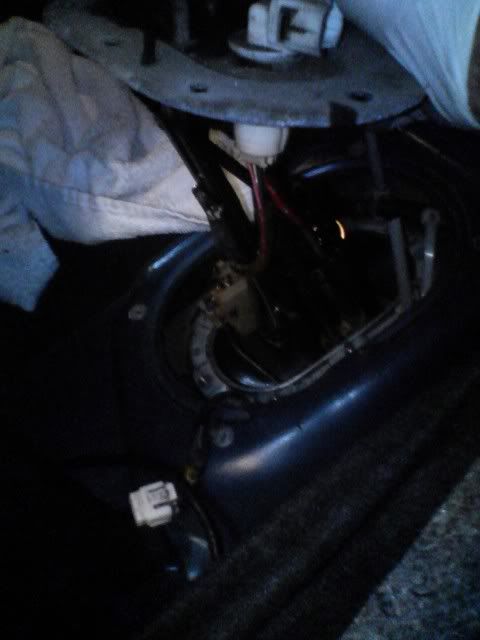
Location of the fuel pump. It is in the trunk on the passenger side closer to the back seat than in the trunk.
1) Fold the rear seats down.
2) Use a Phillips-head screwdriver to remove the little plastic trim
panels that hold the trunk carpet to the seat backs. 2 screws on one
side, 3 on the other.
3) Now that the carpet is free, peel it towards the back of the car or
just remove it.
**Alternatively instead of removing the cover you can just roll it up inside the car with out removing any screws. Just roll from the back of the trunk and tuck it in neatly inside the cabin.
4) On the passenger side you will then see an oval-shaped cover held
in place with four Phillips-head screws. (There's a circle-shaped one
in the corresponding position on the driver's side). Remove the four
screws evenly (keep switching screws, loosening little by little) and
then remove the cover. There's a rubber seal between the cover and the
car's pan; don't lose it.
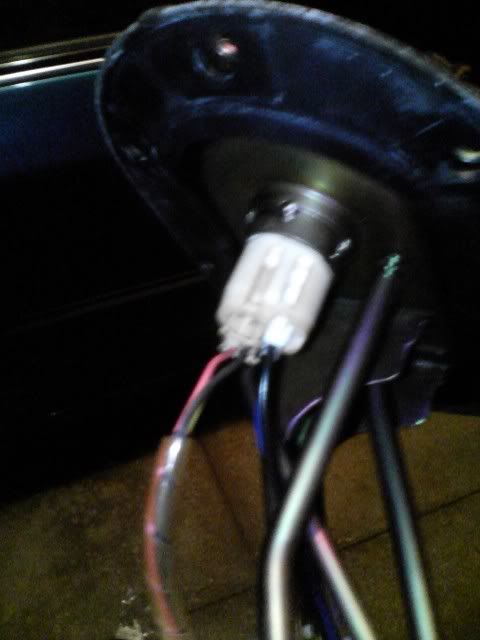
5) Now you see the top of the fuel pump assembly. There are three
hoses going to it and one electrical harness connector. Disconnect the
harness connector.
6) Crank the engine. If it starts, let it idle until it dies and then
crank it for 5 more seconds. If it doesn't start, just crank for 5
seconds. This will relieve the pressure in the fuel lines.
**After this step it is best to remove the terminals from the battery, better safe than sorry.
7) Now disconnect the three hoses from the fuel pump assembly. Label
them somehow so you remember which is which. Do not mix up the clamps;
there are 3 different hoses with 3 different clamps. These hoses may
be a pain to remove. Hose pinch-off pliers (the kind with rounded
jaws) may help since they let you grip the hose without damaging it.
The trick is to twist the hose a tiny bit first to break its grip on
the pipe. Take note of how far the hoses are pushed onto the pipes,
since you need to reinstall them in about the same position.
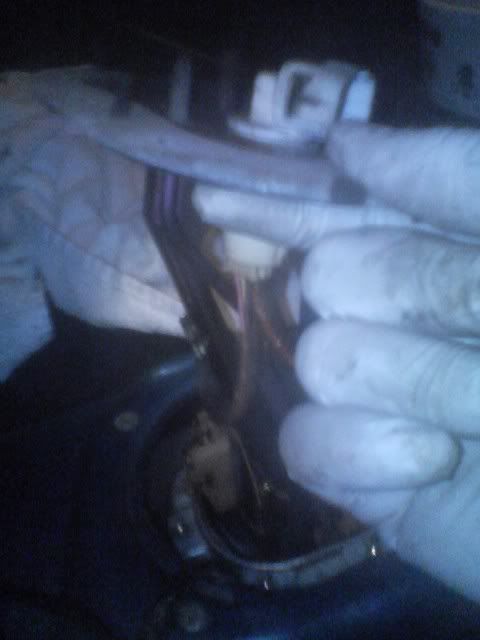
 Now use an 8mm socket to remove the eight nuts
holding the fuel pump assembly onto the fuel tank. Like before, loosen
them evenly so you don't damage the rubber seal. The seal should stay
stuck to the top of the assembly because it has little retaining
doohickeys.
9) At this point you should be able to just pull the assembly out of
the tank. You'll have to do a little bit of maneuvering, since the
float for the gas gauge bends. Be careful and don't force anything. It is just a couple of twists and turns to get it free, remember not to force as it should be easy pulling it out.
10) Now that you have the assembly out, you have to install the new pump in the stock location. This is actually very easy.
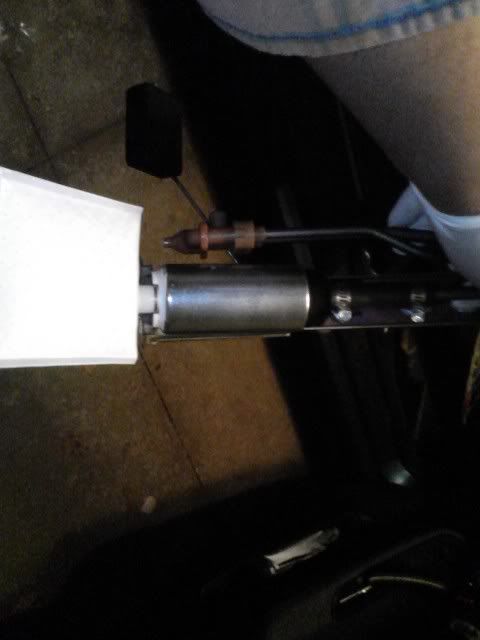
Removing the old assembly from the tank.
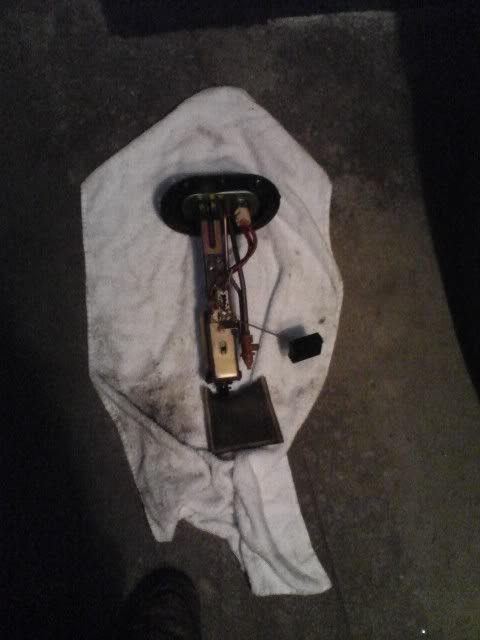 Picture of the stock assembly out of the tank.
You have to remove the screws holding the bracket to the main housing.
You should then be able to free the pump from the unit after disconnecting the hose and wires.
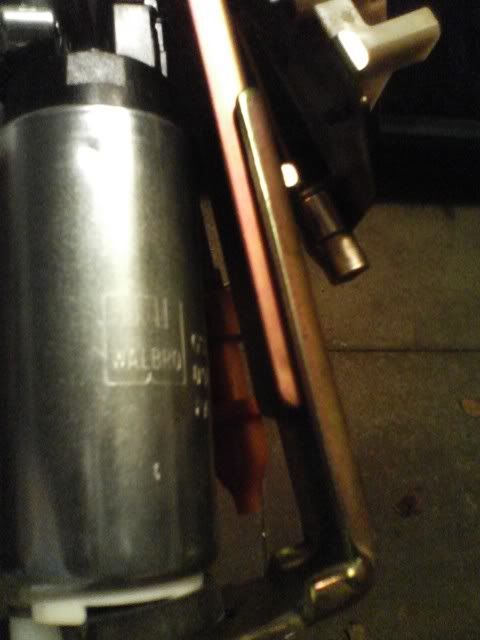
Then there should be a hose that comes with the kit, cut that sparingly but not too long as it will affect the fitting, make it as close to the stock length as possible.
After that just assemble the new unit, it is very easy and straight forward.
Take not of the tiny retaining ring as it is use to hold the filter bag onto the pump.
The new wiring connectors fit perfectly so there is no need to cut any wires or make any joins.
Just reassemble the new pump, the way you took apart the old one.
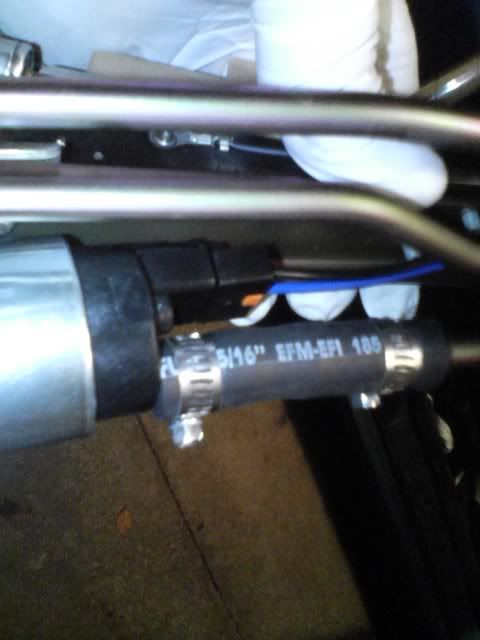
11) Installation is the reverse of removal. You already took note of
how far each hose was pushed onto each pipe, but in case you forgot,
these are the rules: If the pipe has an extra ridge further up, push
the hose all the way up to the ridge. If the pipe only has that one
bead right at the very end, push the hose about 7/8" up the pipe. In
either case, put the edge of the clamp a tenth of an inch past the
bead at the end of the pipe. Refer to
http://www.graphics.cornell.edu/~v/pics ... nstall.png for
clarification.
Once you are sure every hose is on properly and the lids are back on securely, reconnect the battery and crank it up. It might idle odd at first so give it a few minutes for it to relearn how to idle with the better flow. Then you should be ready to go.
If there's anything I missed let me know and I will update it. I hope this helps. - Jared
To install you will need;
Walbro 255 Fuel Pump install kit (I emphasize the word kit because buying just the pump wont work since the kit includes the right wiring components) Link to good example: http://cgi.ebay.com/ebaymotors/ws/eBayI ... AMEWN%3AIT
Ratchet and sockets size 4.5mm - 8mm
Flat head and Phillips screw drivers
Pliers
Some zip ties
Location of the fuel pump. It is in the trunk on the passenger side closer to the back seat than in the trunk.
1) Fold the rear seats down.
2) Use a Phillips-head screwdriver to remove the little plastic trim
panels that hold the trunk carpet to the seat backs. 2 screws on one
side, 3 on the other.
3) Now that the carpet is free, peel it towards the back of the car or
just remove it.
**Alternatively instead of removing the cover you can just roll it up inside the car with out removing any screws. Just roll from the back of the trunk and tuck it in neatly inside the cabin.
4) On the passenger side you will then see an oval-shaped cover held
in place with four Phillips-head screws. (There's a circle-shaped one
in the corresponding position on the driver's side). Remove the four
screws evenly (keep switching screws, loosening little by little) and
then remove the cover. There's a rubber seal between the cover and the
car's pan; don't lose it.
5) Now you see the top of the fuel pump assembly. There are three
hoses going to it and one electrical harness connector. Disconnect the
harness connector.
6) Crank the engine. If it starts, let it idle until it dies and then
crank it for 5 more seconds. If it doesn't start, just crank for 5
seconds. This will relieve the pressure in the fuel lines.
**After this step it is best to remove the terminals from the battery, better safe than sorry.
7) Now disconnect the three hoses from the fuel pump assembly. Label
them somehow so you remember which is which. Do not mix up the clamps;
there are 3 different hoses with 3 different clamps. These hoses may
be a pain to remove. Hose pinch-off pliers (the kind with rounded
jaws) may help since they let you grip the hose without damaging it.
The trick is to twist the hose a tiny bit first to break its grip on
the pipe. Take note of how far the hoses are pushed onto the pipes,
since you need to reinstall them in about the same position.
holding the fuel pump assembly onto the fuel tank. Like before, loosen
them evenly so you don't damage the rubber seal. The seal should stay
stuck to the top of the assembly because it has little retaining
doohickeys.
9) At this point you should be able to just pull the assembly out of
the tank. You'll have to do a little bit of maneuvering, since the
float for the gas gauge bends. Be careful and don't force anything. It is just a couple of twists and turns to get it free, remember not to force as it should be easy pulling it out.
10) Now that you have the assembly out, you have to install the new pump in the stock location. This is actually very easy.
Removing the old assembly from the tank.
Picture of the stock assembly out of the tank.You have to remove the screws holding the bracket to the main housing.
You should then be able to free the pump from the unit after disconnecting the hose and wires.
Then there should be a hose that comes with the kit, cut that sparingly but not too long as it will affect the fitting, make it as close to the stock length as possible.
After that just assemble the new unit, it is very easy and straight forward.
Take not of the tiny retaining ring as it is use to hold the filter bag onto the pump.
The new wiring connectors fit perfectly so there is no need to cut any wires or make any joins.
Just reassemble the new pump, the way you took apart the old one.
11) Installation is the reverse of removal. You already took note of
how far each hose was pushed onto each pipe, but in case you forgot,
these are the rules: If the pipe has an extra ridge further up, push
the hose all the way up to the ridge. If the pipe only has that one
bead right at the very end, push the hose about 7/8" up the pipe. In
either case, put the edge of the clamp a tenth of an inch past the
bead at the end of the pipe. Refer to
http://www.graphics.cornell.edu/~v/pics ... nstall.png for
clarification.
Once you are sure every hose is on properly and the lids are back on securely, reconnect the battery and crank it up. It might idle odd at first so give it a few minutes for it to relearn how to idle with the better flow. Then you should be ready to go.
If there's anything I missed let me know and I will update it. I hope this helps. - Jared