Blinking Seatbelt Light? Let's Get That Taken Care Of!
Posted: Wed Oct 29, 2008 2:36 am
Alright, after more than enough searching, I've decided that there was not enough information in one place on Legacy Central to help me--and clearly a couple of other people--solve the issues with their seatbelt systems.
So, you've got a blinking seatbelt light. Me too, what a bitch huh? Well, let's read the codes from the seatbelt computer. 'Seatbelt computer you say? Sounds absurd.' Yes, seatbelt computer, welcome to the future, kid. Actually this kind of thing is common on modern cars, and is most often integrated into the ECU on newer cars.
Anyway, scans from the service manual on how to check the codes are here:
http://www.main.experiencetherave.com/s ... tdiag1.jpg
http://www.main.experiencetherave.com/s ... tdiag2.jpg
http://www.main.experiencetherave.com/s ... tdiag3.jpg
Absorbed that? Confused? Me too. 'What?' Never mind. I couldn't find the test connector either (Update 4/19/09 I think the connector is the two pin connector right next to the radio connectors, you have to take the radio out.). If you do find the black test connector under the dash, connect pin terminal 2 to the local ground connector, or ground it anywhere. Turn the ignition key on, but don't start the engine, and the seatbelt light will blink a sort of Morse code as described. However, I found an easier way if you can't find the test connector (like I couldn't; fuck that thing, I spent like a whole hour looking for it); hell, I bet you it's easier even if you do know how to get to that connector.
Instead of using using the test connector, I used the wiring diagrams to trace the test connector terminal 2 wire right to the seatbelt computer itself, which is very easy to access in the trunk (that's in my sedan, I don't know how easy it is in the wagon to remove the trim covering it).
Wiring Diagrams: (You don't need to look at these yet, they're just for reference)
http://www.main.experiencetherave.com/s ... _diag1.jpg
http://www.main.experiencetherave.com/s ... _diag2.jpg
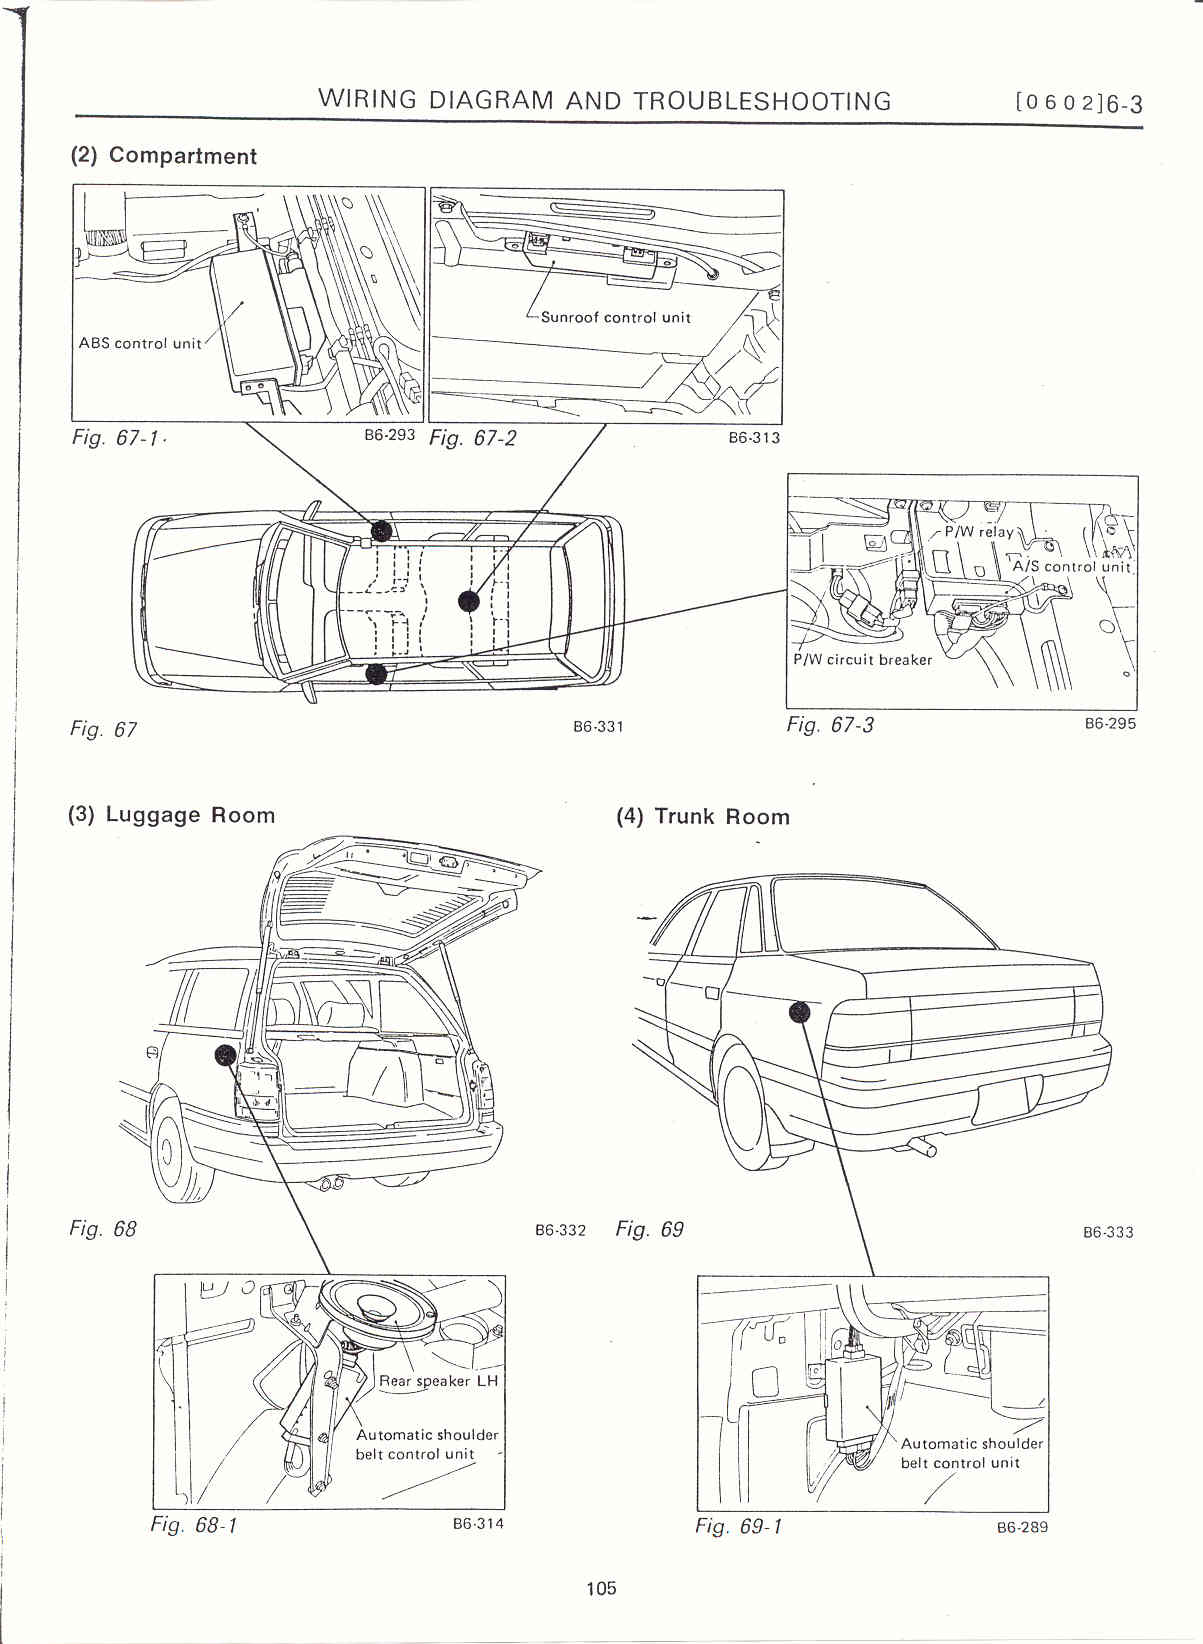
Computer Location: (Fig. 68-1 and 69-1)
http://www.surrealmirage.com/subaru/fil ... tion06.jpg
Mmmph... Mm, this cheese and crackers ... so good. Mmnnn--Okay, so! The trick here is to find the little red wire with the blue stripe that goes to the smaller of the two connectors (only 7 wires go to this connector, 6 are bigger than the one you're looking for) on the computer. When the connector's plugged in, back probe (ex. stick a folded out paperclip in behind) that wire, and connect that to ground (anywhere on bare metal on the car that's touching the car's whole chassis). Instead of finding ground on the chassis, I connected the paperclip to one of the ground terminals on a connector for the tails lights that was right there--do not try this yourself unless you first check continuity to ground from the supposed ground terminal using a multimeter, or else you could potentially fry the seatbelt computer.
Alright, you've got the codes. They tell you what's not working well. Door latch switch? Limit switch? Ignition switch? Okay, we know they're messed up, but how do we find them? Connector Locations. These are of utmost value.
Go to the wiring diagrams, next to every single connector is a letter and number in a circle. This is the name of that connector. Take for example the diagnostic connector on the second page, that's B91. On the first page of the wiring diagram there's a collection of connector pin locations at the bottom, find the circled "B91." Notice next to it, the connector color is mentioned. Below B91 is two connectors, one has 4 terminals, and one has 6 with "A/B model" below; this is for the Automatic Belt models, which applies to the US market first generation Legacies with our automatic seatbelts in front.
Let's get to the good bits: how to find the actual connector locations. First you need a service manual. COPY the link below and paste it in your browser address bar (I couldn't get it to work as a proper link).
http://www.main.experiencetherave.com/s ... and_Elect/
If that doesn't work then go here:
http://www.main.experiencetherave.com/s ... ual_scans/
Click "1992_FSM_(Engine_&_Electrical)" then download "1992_Subaru_Service_Manual-Engine_&_Wiring.zip" (right-click > Save As...).
It's not complete, but it's better than nothing. Alright, skip to page 329, that's where the connector locations begin. Scroll down to page 334. Oh look, it's connector B91! The little bastard! He's tucked away good under the dash there. Even with this diagram I couldn't find the damn thing. But whatever, I've illustrated my point; how to use connector numbers and views.
Alright kids, that's enough for today.
Now someone needs to explain to us what the hell a limit switch is and where we can find them. I'm pretty sure they're the black boxes at each end of each track for the automatic seatbelts, but I find it confusing as to which is which, and I can't figure out how to remove them.
EDIT: All of the files referenced can be downloaded in a backup .zip file here: http://www.mediafire.com/?h4mhjk4ydmj
So, you've got a blinking seatbelt light. Me too, what a bitch huh? Well, let's read the codes from the seatbelt computer. 'Seatbelt computer you say? Sounds absurd.' Yes, seatbelt computer, welcome to the future, kid. Actually this kind of thing is common on modern cars, and is most often integrated into the ECU on newer cars.
Anyway, scans from the service manual on how to check the codes are here:
http://www.main.experiencetherave.com/s ... tdiag1.jpg
http://www.main.experiencetherave.com/s ... tdiag2.jpg
http://www.main.experiencetherave.com/s ... tdiag3.jpg
Absorbed that? Confused? Me too. 'What?' Never mind. I couldn't find the test connector either (Update 4/19/09 I think the connector is the two pin connector right next to the radio connectors, you have to take the radio out.). If you do find the black test connector under the dash, connect pin terminal 2 to the local ground connector, or ground it anywhere. Turn the ignition key on, but don't start the engine, and the seatbelt light will blink a sort of Morse code as described. However, I found an easier way if you can't find the test connector (like I couldn't; fuck that thing, I spent like a whole hour looking for it); hell, I bet you it's easier even if you do know how to get to that connector.
Instead of using using the test connector, I used the wiring diagrams to trace the test connector terminal 2 wire right to the seatbelt computer itself, which is very easy to access in the trunk (that's in my sedan, I don't know how easy it is in the wagon to remove the trim covering it).
Wiring Diagrams: (You don't need to look at these yet, they're just for reference)
http://www.main.experiencetherave.com/s ... _diag1.jpg
http://www.main.experiencetherave.com/s ... _diag2.jpg
Computer Location: (Fig. 68-1 and 69-1)
http://www.surrealmirage.com/subaru/fil ... tion06.jpg
Mmmph... Mm, this cheese and crackers ... so good. Mmnnn--Okay, so! The trick here is to find the little red wire with the blue stripe that goes to the smaller of the two connectors (only 7 wires go to this connector, 6 are bigger than the one you're looking for) on the computer. When the connector's plugged in, back probe (ex. stick a folded out paperclip in behind) that wire, and connect that to ground (anywhere on bare metal on the car that's touching the car's whole chassis). Instead of finding ground on the chassis, I connected the paperclip to one of the ground terminals on a connector for the tails lights that was right there--do not try this yourself unless you first check continuity to ground from the supposed ground terminal using a multimeter, or else you could potentially fry the seatbelt computer.
Alright, you've got the codes. They tell you what's not working well. Door latch switch? Limit switch? Ignition switch? Okay, we know they're messed up, but how do we find them? Connector Locations. These are of utmost value.
Go to the wiring diagrams, next to every single connector is a letter and number in a circle. This is the name of that connector. Take for example the diagnostic connector on the second page, that's B91. On the first page of the wiring diagram there's a collection of connector pin locations at the bottom, find the circled "B91." Notice next to it, the connector color is mentioned. Below B91 is two connectors, one has 4 terminals, and one has 6 with "A/B model" below; this is for the Automatic Belt models, which applies to the US market first generation Legacies with our automatic seatbelts in front.
Let's get to the good bits: how to find the actual connector locations. First you need a service manual. COPY the link below and paste it in your browser address bar (I couldn't get it to work as a proper link).
http://www.main.experiencetherave.com/s ... and_Elect/
If that doesn't work then go here:
http://www.main.experiencetherave.com/s ... ual_scans/
Click "1992_FSM_(Engine_&_Electrical)" then download "1992_Subaru_Service_Manual-Engine_&_Wiring.zip" (right-click > Save As...).
It's not complete, but it's better than nothing. Alright, skip to page 329, that's where the connector locations begin. Scroll down to page 334. Oh look, it's connector B91! The little bastard! He's tucked away good under the dash there. Even with this diagram I couldn't find the damn thing. But whatever, I've illustrated my point; how to use connector numbers and views.
Alright kids, that's enough for today.
Now someone needs to explain to us what the hell a limit switch is and where we can find them. I'm pretty sure they're the black boxes at each end of each track for the automatic seatbelts, but I find it confusing as to which is which, and I can't figure out how to remove them.
EDIT: All of the files referenced can be downloaded in a backup .zip file here: http://www.mediafire.com/?h4mhjk4ydmj