Rear quarter rust repair in progress...

Anything and Everything about the Body, from paint to undercoating and interior, including in-car entertainment (ICE).

Moderators: Helpinators, Moderators

magicmike
Fifth Gear
Posts: 2772
Joined: Thu Nov 21, 2002 8:30 pm
Location: USA, RI

Rear quarter rust repair in progress...

Post by magicmike »

Well folks I decided to dig into the rust on my rear quarters since I'm still out of work and we just sold my girlfriends Accord and she will be driving my G35. I will be making the wagon my daily driver should I need to leave the house :roll:

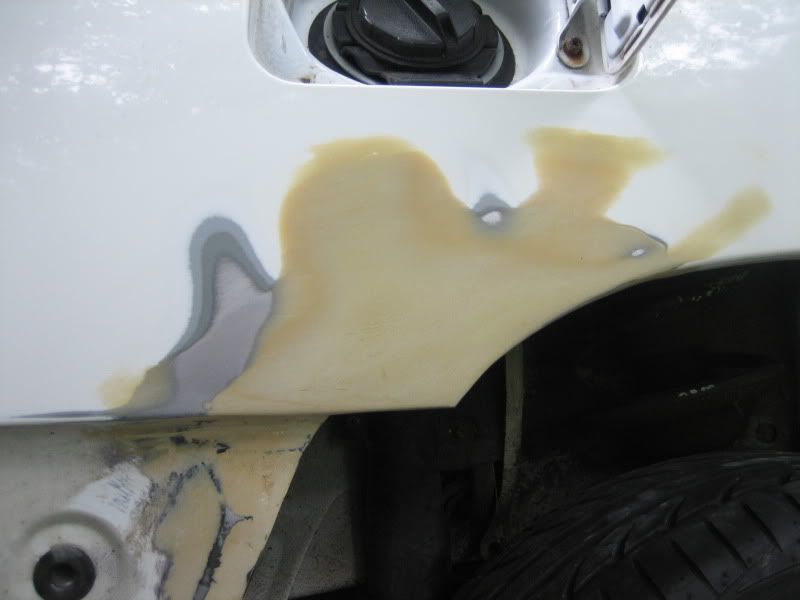
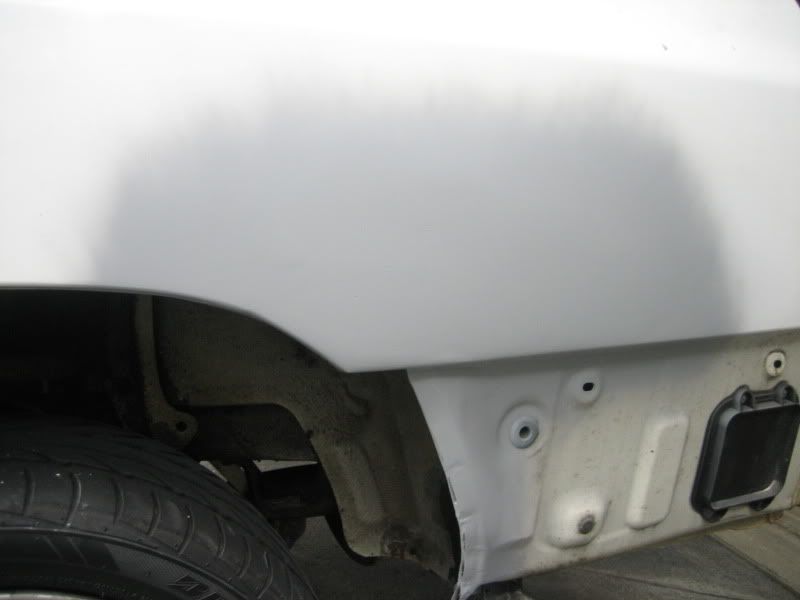
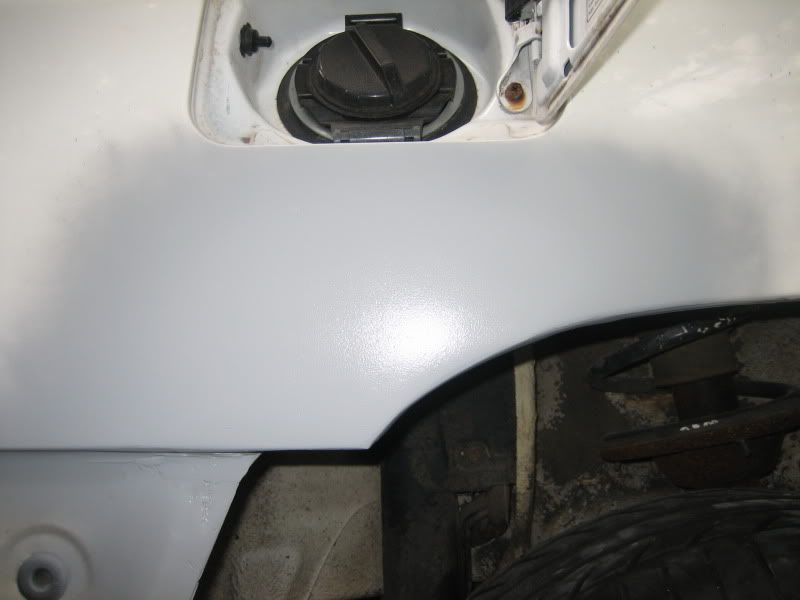
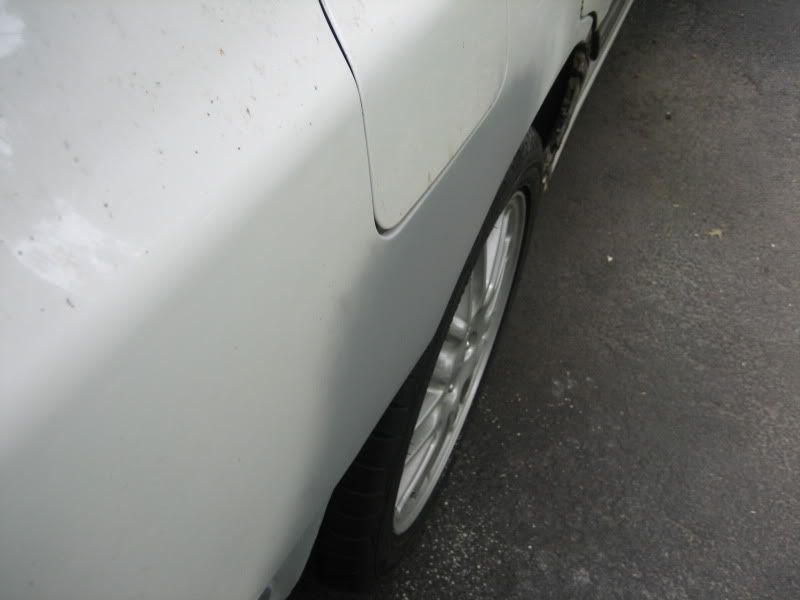
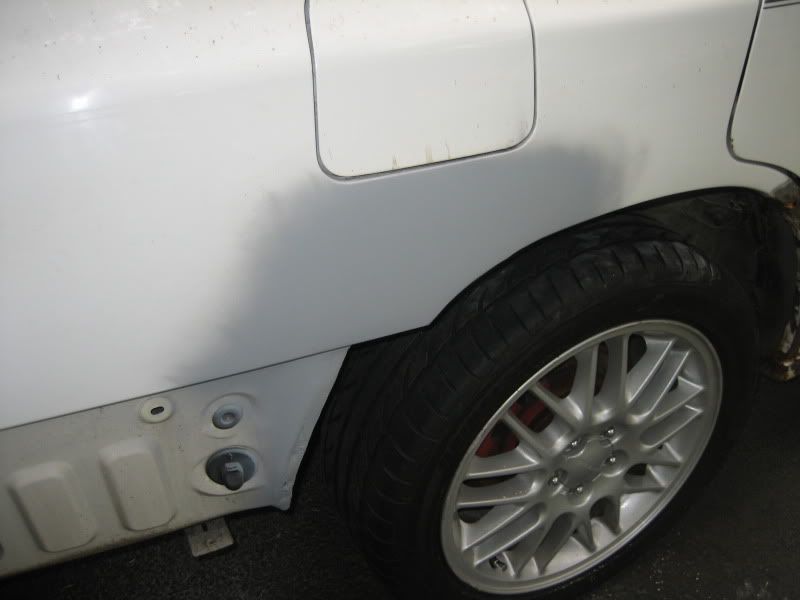
I got the bumper cover off yesterday (I can elaborate on this is needed, just ask) and today I proceeded to outline where the rust stops to get ready to cut out the cancer. I should note that when I bought this car I noticed it had been hit in the right rear quarter because the paint didn't match up. Also the right rear door factory tinted glass has a green hue while the others have a blue hue (barely noticable but I caught it).

At any rate, I am starting this post since I couldn't find one anywhere that documented how thisa has been done. It will be mainly pictures and maybe it will be a sticky.

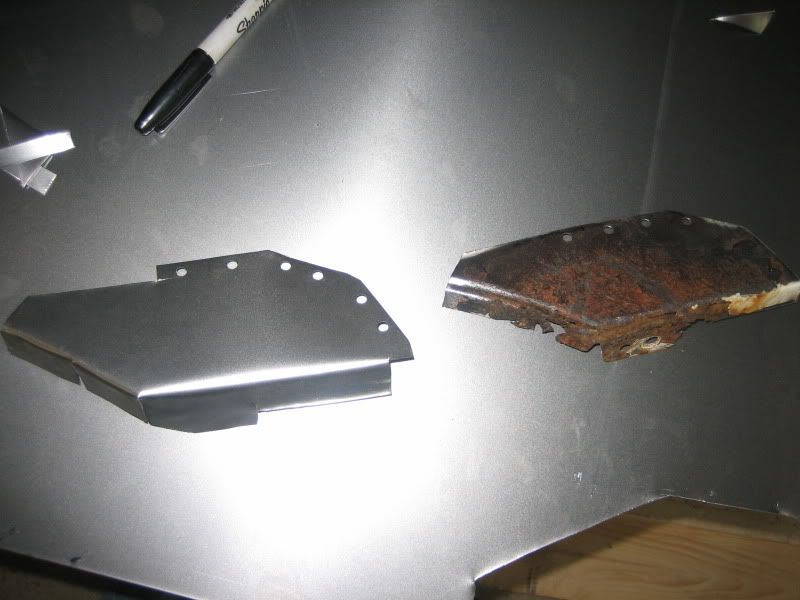
I'm not sure how I am going to fix it just yet, chances are it might be a little hack due to me not having much for metal working tools other than some hammers and a welder but we shall see. I can say that it will be better than the 1/4 inch of bondo I had to dig through on the previous repair of the right quarter.

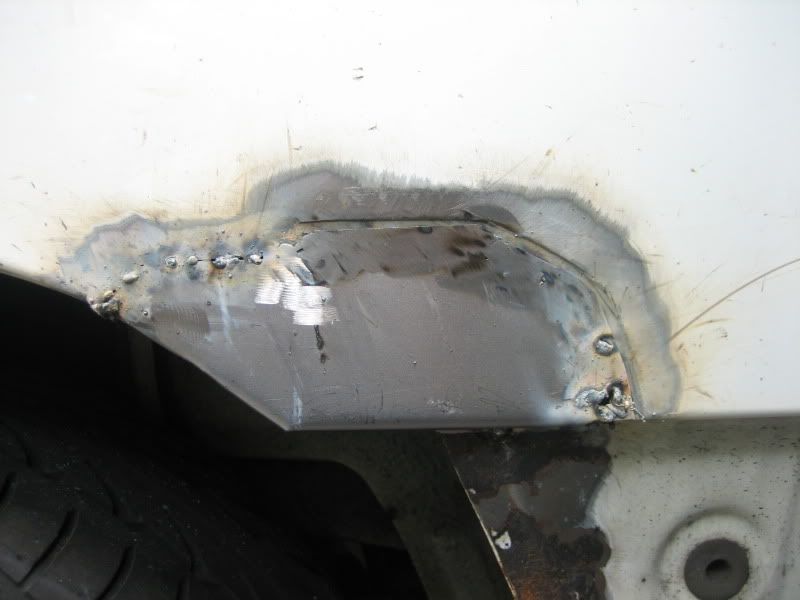
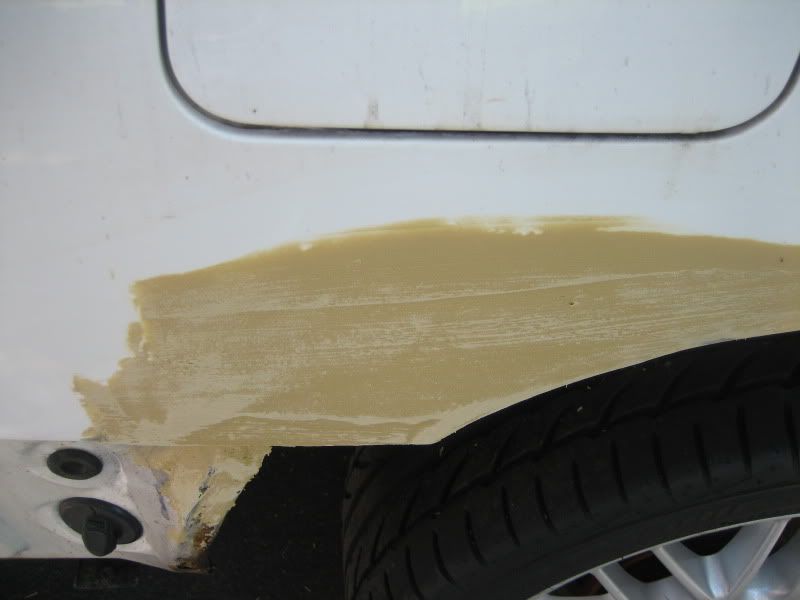
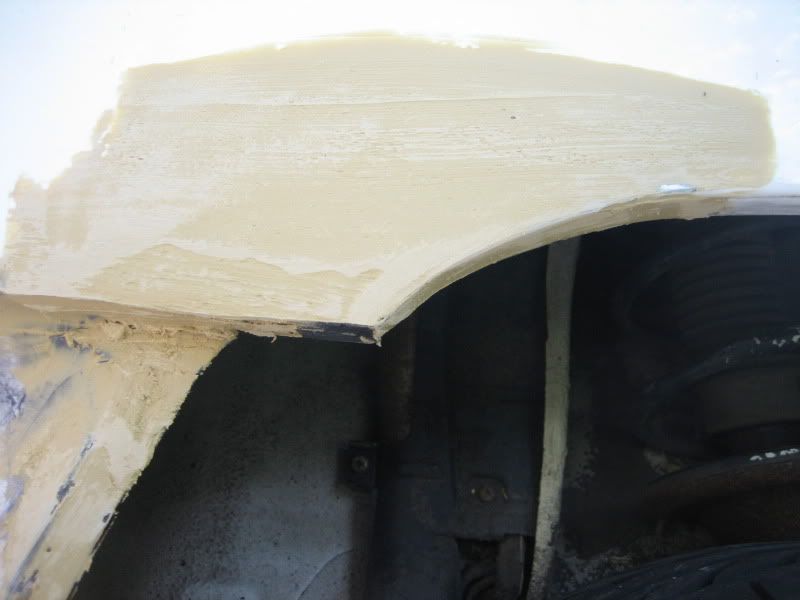
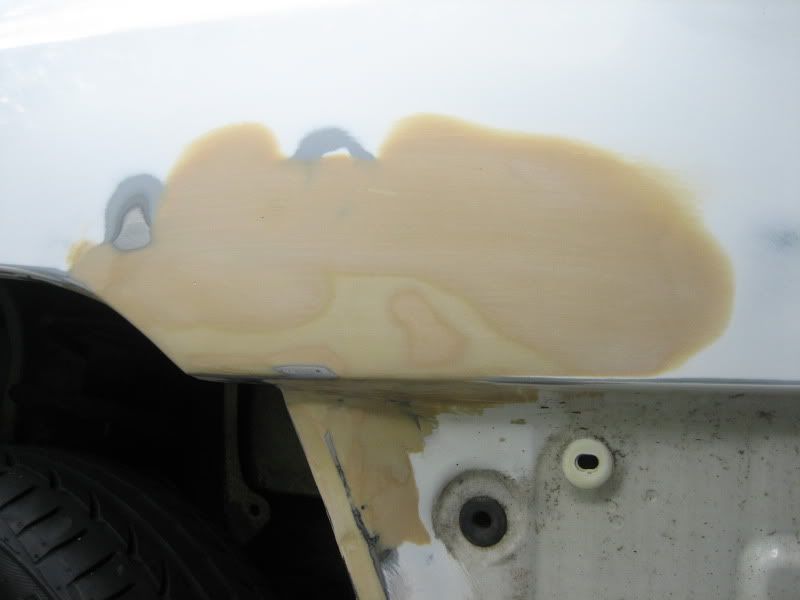
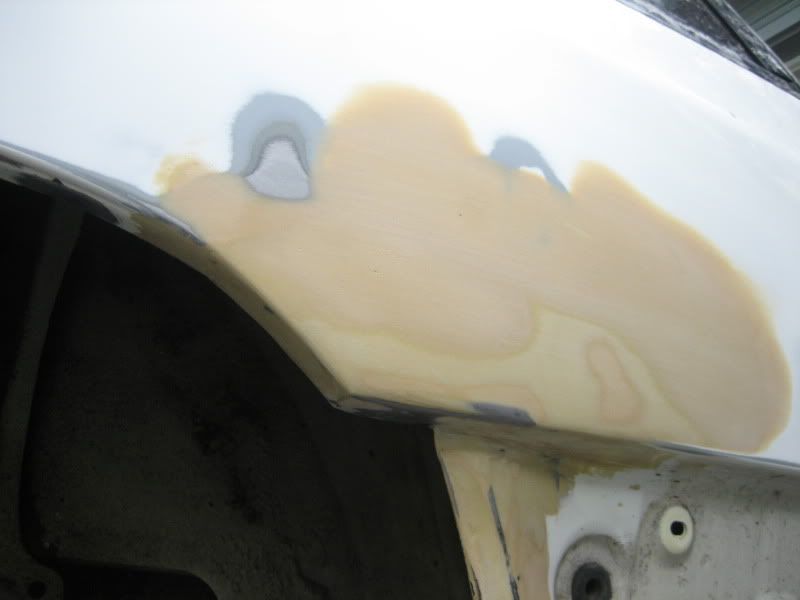
The before pictures (clickable to enlarge):
Image
Image
Image
Image
Image
Image
Image
Image

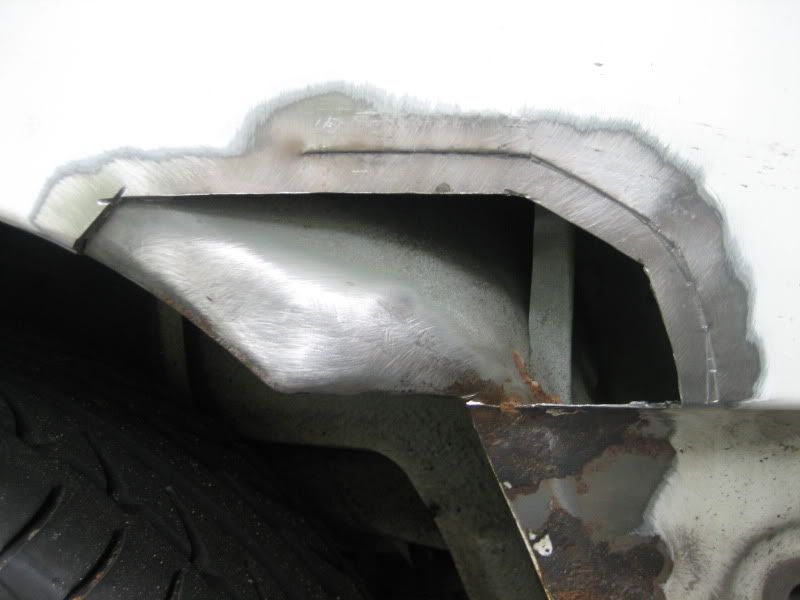
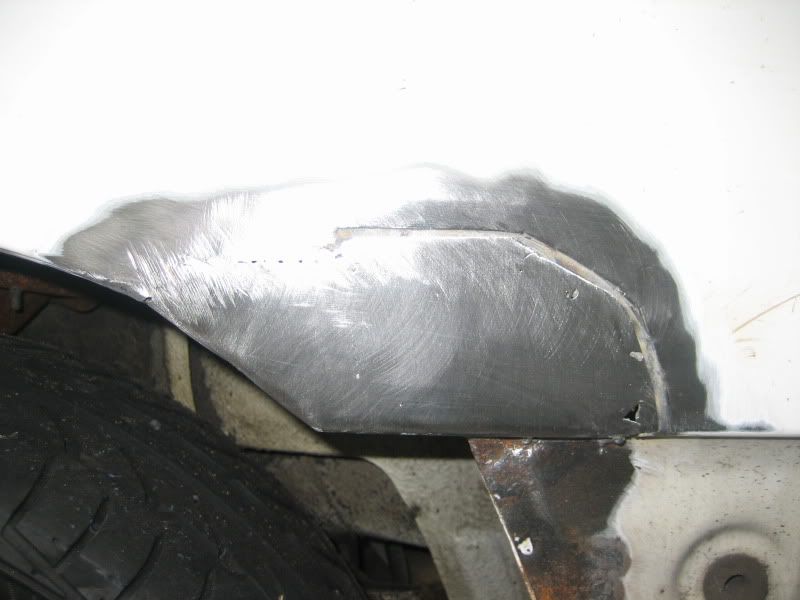
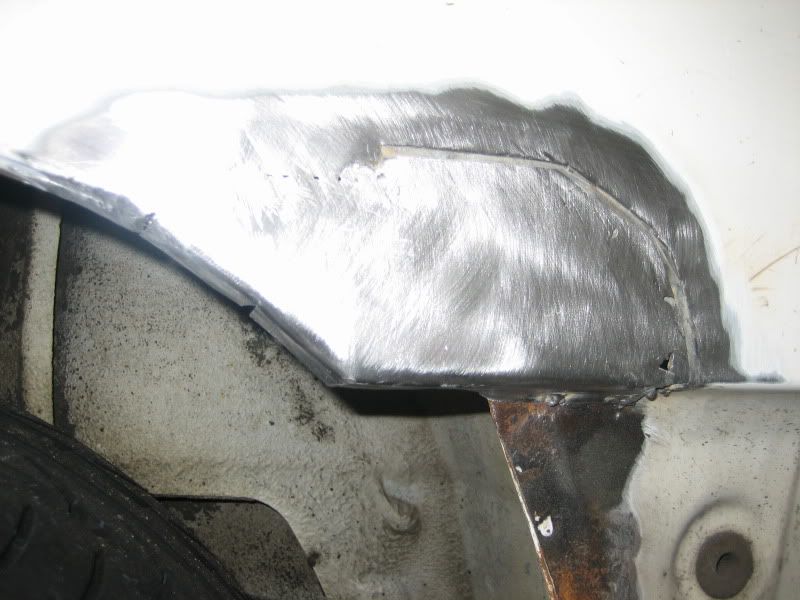
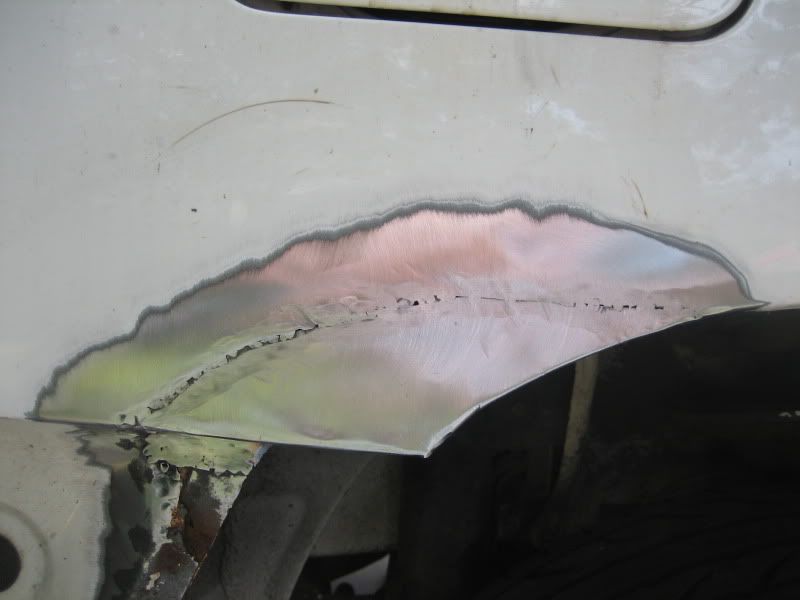
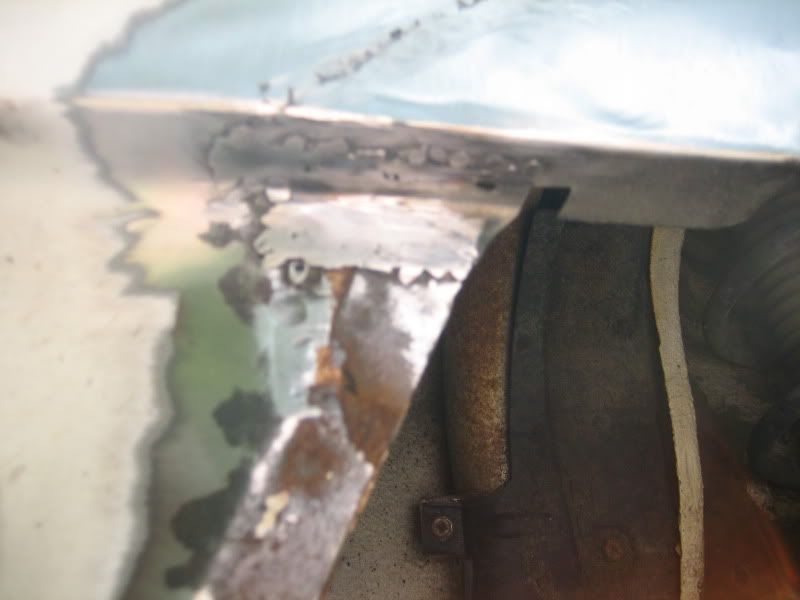
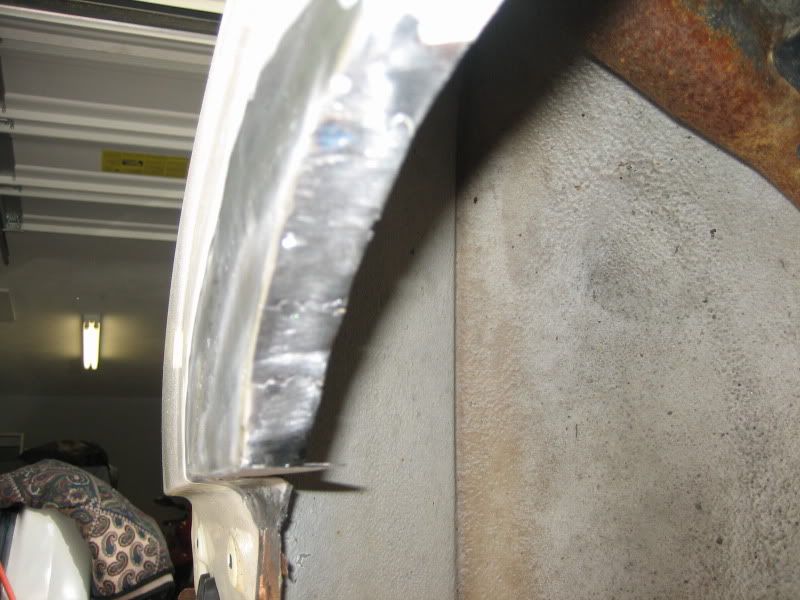
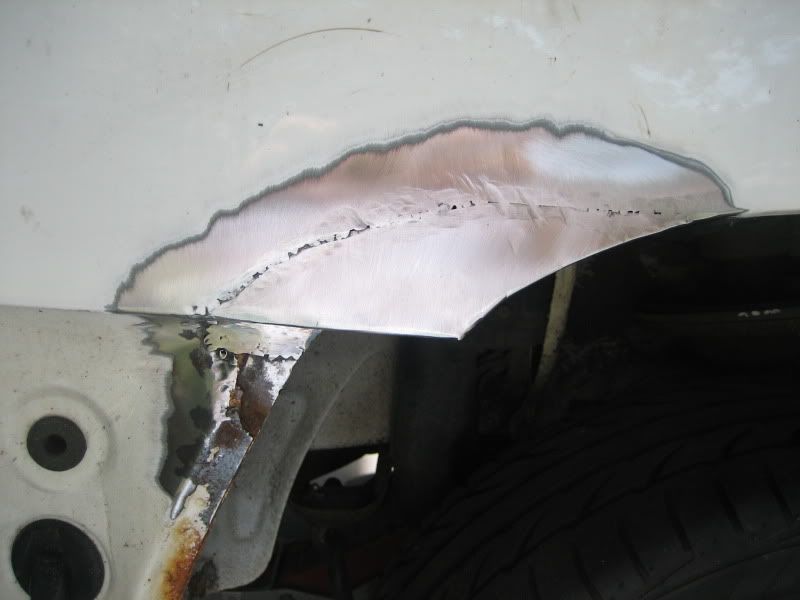
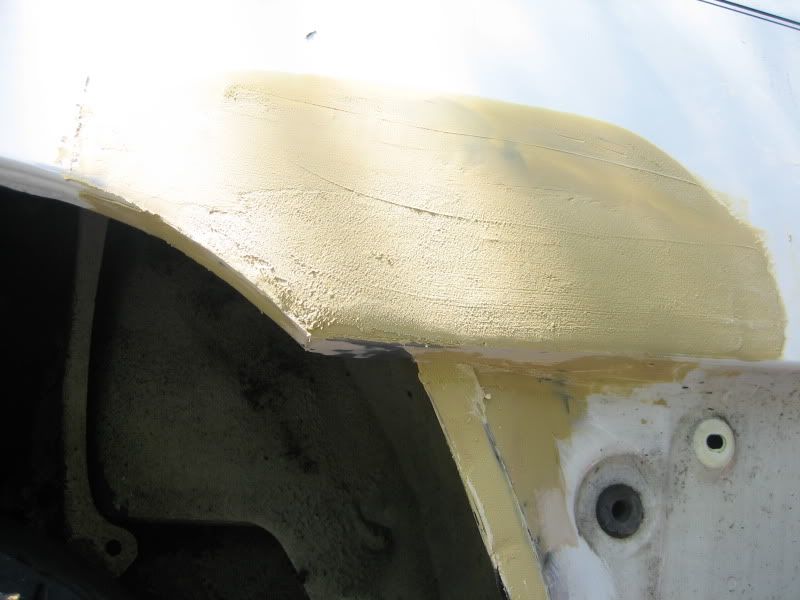
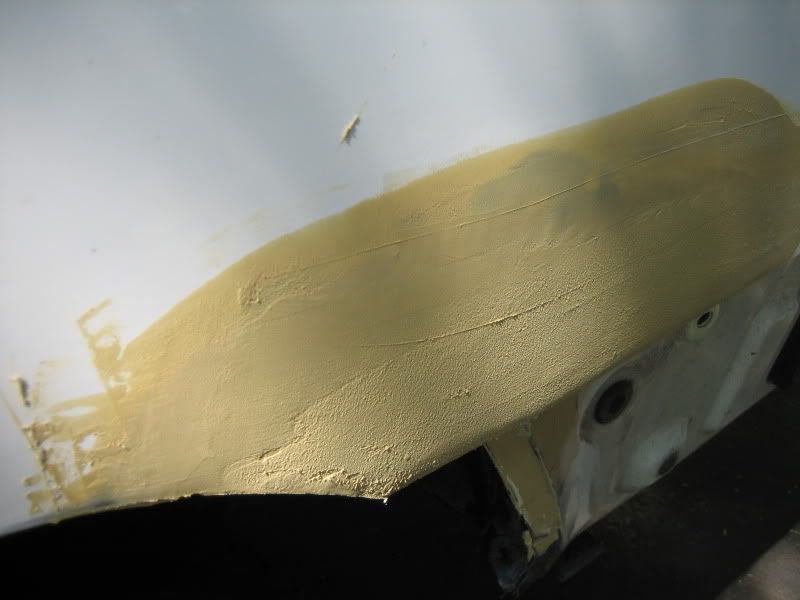
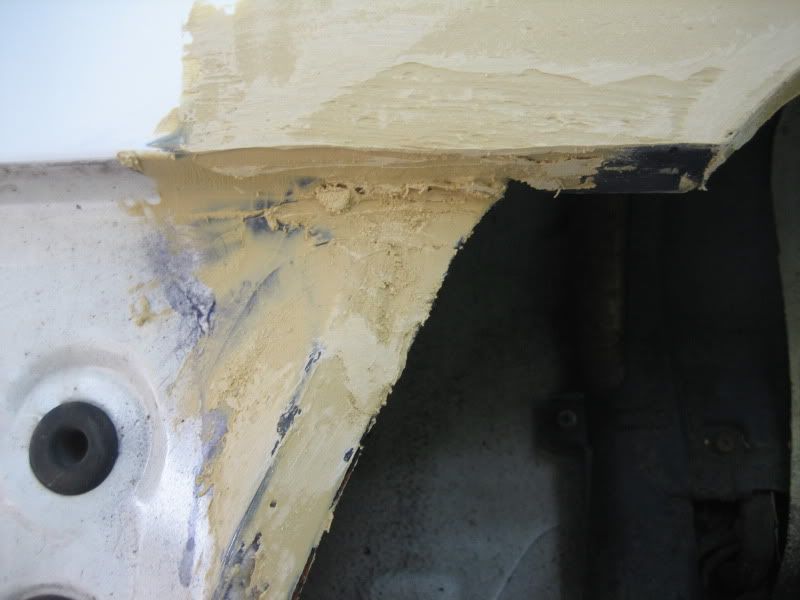
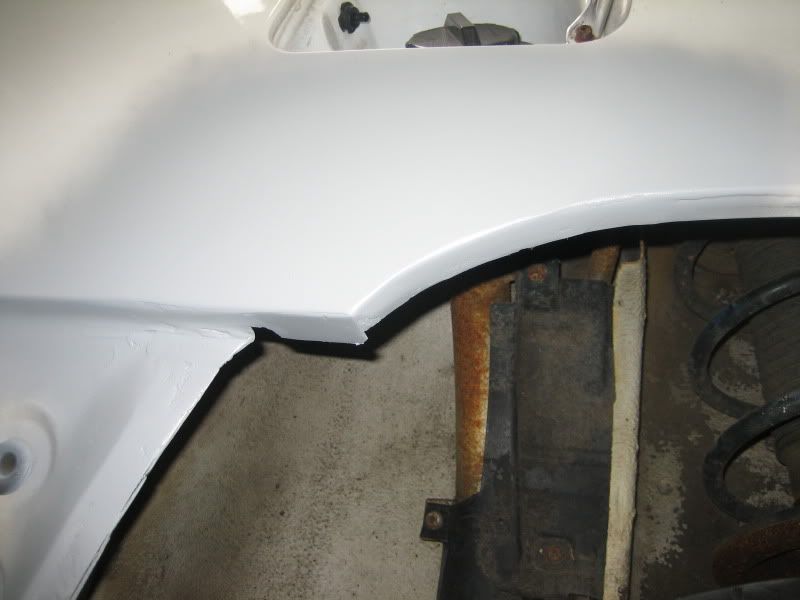
After grinding down to look for a good cut point:
Image
Image
Image
Image
Image
Image
Image
Image
Image

I'll be updating this daily as I make progress. Now back to work!
-Mike

2011 Infiniti G37x Sedan - Current
2007 Ducati 800ss - Current
1994 Subaru Legacy Sport Wagon (White)
1994 Subaru Legacy Sport Wagon (Silver)
2003 Infiniri G35
1998 Infiniti I30t
1995 Honda Civic DX
1987 Subaru GL Wagon
1987 Subaru Loyale
evolutionmovement
Knowledgeable
Knowledgeable
Posts: 9809
Joined: Mon Jun 16, 2003 11:20 pm
Location: Beverly, MA

Post by evolutionmovement »

I hate those stupid plastic pieces ahead of the rear wheels—they're a major rust trap. I fixed those previous and ditched the plastic, cutting off the black trim part and only using that, then building up the arch to match where it should have been to begin with. Your quarters don't look too horrible. I'm about to start on that myself as the front's pretty much done. Finally got the bumper beam off, just need to unclip the sides of the cover. Weird thing was, the bumper beam bolt heads, the part residing in the car interior, were rusted, but the threads inside the chassis (protected by a plastic inspection cover) were mint and I don't have a leak.

Treat the older metal with Pour 15 or Step One rust converter once you get it cleaned up and zinc spray both sides of that and the new metal, especially on any welds. Should be good for another 10 years. I also popped the sill covers and poured the converter inside. An old auto body guy told me he did that with a Datsun and the sills lasted over 20 years and were only bubbling now. I'm going to give that epoxy a shot in lieu of welding (since I don't have one). Fortunately, I've been anal about keeping track of the rust and the quarters are the by far the worst parts.
Midnight in a Perfect World on Amazon or order anywhere. The first book in a quartet chronicling the rise of a man from angry criminal to philanthropist. Midnight... is a distopic noirish novel featuring 'Duchess', a modified 1990 Subaru Legacy wagon.
n2x4
Fourth Gear
Posts: 1522
Joined: Tue Oct 18, 2005 3:52 pm
Location: Massillon, Ohio

Post by n2x4 »

Good luck with the repair. I hate body work...
SUBARUEHS Racing
fishbone79
Second Gear
Posts: 502
Joined: Fri Sep 03, 2004 3:14 am
Location: Armpit, USA

Post by fishbone79 »

Just finished this project about a month ago on my wagon... Didn't think to take pictures, but I should have. Your's actually looks pretty good, I was in much worse shape than you (the rocker-door-wheel well joint was completely gone). I managed to weld up new pieces and reconstruct the whole thing with new galvanized sheet metal, but it took forever.

I also had major holes in my wheel wells (all the way into the interior). Make sure you poke around by your top-hats for holes (facing outboard especially), and below that between the fender skin and brace. I had mega holes in those spots and it's a bitch to weld patches in the suspension box. The pass side of my car was in much worse shape (probably because thats the side of the road the plows dump crap on).

Also, once I had cleaned up, welded and treated the wheel-arch lip, I sealed it with zinc, hit it with filler-adhere, and then filled the whole gap above it with bondo glass. I tapered it so that crap could no longer sit on top of the lip. I also did away with that asinine lip in front of the wheel at the bottom of the wheel arch, and welded in a panel so crap could not sit in that spot anymore either. The panel slopes downward to the lip at a ~60* angle back towards the tire so stuff just rolls off. I don't know why it sticks out like that stock, but it's absolutely retarded.

After I reconstructed the rear corner of the wheel-well I gave it the same filling treatment.

I should mention that I made a plywood jig to reconstruct the wheel arch and fender skin where the hole was. I will post pictures of this when I get home, but basically I traced the wheel arch and back portion of the fender and cut out a plywood form with a saber saw. I laid sheet metal into the form where I needed to make the patch panel, and rolled over the whole thing with my wife's car a few times. It worked pretty well as a stamping press, and the rest of the details I could work out with a hammer and dolly. This allowed me to avoid cutting and then welding a complicated corner such that I was running a bead on an outside bend (where it would surely rust instantly).

One other thing... Make sure you put jack stands underneath your struts and not on the frame! I forgot this golden rule on one side and I got a small crack from the re-distribution of weight when I set the car back on it's wheels. You want the weight of the car sitting where it naturally sits while you do the body work to minimize the inevitable flex.

I don't mean to hijack your thread, just add any tidbits you/others may find useful. I'll post a few pics later.
Cheers,
morgan

1992 Legacy BF
1946 Ford 1.5 Ton Truck (The Beast): http://community.webshots.com/user/fishbone79
evolutionmovement
Knowledgeable
Knowledgeable
Posts: 9809
Joined: Mon Jun 16, 2003 11:20 pm
Location: Beverly, MA

Post by evolutionmovement »

I'm strangely starting to enjoy it seeing as I don't need the car to get around. I think it was encouraging to see a shell I had nearly written off for assumed rust is actually very solid underneath, the worst of it being the stuff that can be seen on the outside. Three cars lost to cancer, but nature's not getting this one quite yet. For her insolence and to salute Duchess' fallen homies, I'm dumping out a quart of oil on the ground (so it can probably get into the water supply).
Midnight in a Perfect World on Amazon or order anywhere. The first book in a quartet chronicling the rise of a man from angry criminal to philanthropist. Midnight... is a distopic noirish novel featuring 'Duchess', a modified 1990 Subaru Legacy wagon.
2.2TurboLeg
In Neutral
Posts: 11
Joined: Wed Jul 15, 2009 8:48 pm
Location: Toronto, Ontario

Post by 2.2TurboLeg »

Hi there, I'm a new Legacy owner as of last friday and was hoping to take the easy way out and just replace my rusty panels with new or used rust free ones. After lookin hard at the car I realise I cant easily remove the rear quarters as they appear to be welded on.
I notice you have pretty similar rust damage locations as my Legacy and was wonderin if you would mind me uploading a few pics to show you what I'm talking about and possibly get a few opinions on whether the damage is repairable by somebody with no body work experience (myself). Not sure about your forums here but I doubt you need a dozen threads about rusty cars so figured I would ask.
Thanks.
magicmike
Fifth Gear
Posts: 2772
Joined: Thu Nov 21, 2002 8:30 pm
Location: USA, RI

Post by magicmike »

2.2turboleg

There is no panel available for purchase for the rear quarters. Not even a wheel arch piece. The point of this thread is to show the "do it yourselfer" the steps required to fix it yourself. I would say that if you have never done any bodywork you might have trouble as the rear quarter is glued to the wheel well tub and other places, you really need to know what to cut out. Its not as simple as fixing a dent for example.

I definately encourage people to try anything you feel comfortable doing, worst case you mess it up and have to have someone fix it anyway.
-Mike

2011 Infiniti G37x Sedan - Current
2007 Ducati 800ss - Current
1994 Subaru Legacy Sport Wagon (White)
1994 Subaru Legacy Sport Wagon (Silver)
2003 Infiniri G35
1998 Infiniti I30t
1995 Honda Civic DX
1987 Subaru GL Wagon
1987 Subaru Loyale
fishbone79
Second Gear
Posts: 502
Joined: Fri Sep 03, 2004 3:14 am
Location: Armpit, USA

Post by fishbone79 »

I wish there was a prefabbed patch panel for those.... this probably deserves it's own how-to thread, but it might as well go here.

Here's what I resorted to in lieu of a patch panel. I slapped these together out of 3/4" scrap plywood from the jobsite:

Image

Image

The only key thing about this is that the strait edge at the top has a slight bevel downward so that it pushes toward the fender arch when the form is compressed... It made the corner edge on the sheet metal nice and clean.

You can kind of see the taper here:
Image


After shots (hasn't been 30 days so I haven't buffed yet):

Image

Image

Looking down from inside the wheel-well, where I tapered the lip so crap wouldn't collect:
Image

I'll see if I have some before shots.

Again, not trying to hijack your thread, just thought I'd share. Plus this little project sent me to the hospital with half a grinding wheel in my chin, so I hope someone is interested! (got pics of that too...)
Cheers,
morgan

1992 Legacy BF
1946 Ford 1.5 Ton Truck (The Beast): http://community.webshots.com/user/fishbone79
93forestpearl
Fifth Gear
Posts: 3043
Joined: Tue Jan 25, 2005 9:14 pm
Location: Twin Cities, MN

Post by 93forestpearl »

Damn, you've got a A LOT of cutting, grinding, and welding to do. The only way ensure rust won't come back in a few years is to get rid of all of it. And I mean every little smidgen of rust.

Subaru doesn't have rear quaters and wheel arches laying around anymore? Probably doesn't matter since to replace the rear quarters, wheel arches and rockers on each side would be about $1600 in sheetmetal.


When you are welding in new pieces, spray a weld-though primer on the backside. That primer sticks better when it gets hot. Be very liberal with the seam sealer too, when you are done patching.


In these kinds of situations, an english wheel would be really nice.
→Dan

piddster34 at h0tma1l d0t c0m
magicmike
Fifth Gear
Posts: 2772
Joined: Thu Nov 21, 2002 8:30 pm
Location: USA, RI

Post by magicmike »

Fishbone, this is great. It would be good to have everyones fixes documented here like the sunroof leak thread. I encourage all with pics to post them up in here and I'll add my updates as I go. In the end I can make a new post if need be with specific directions.
-Mike

2011 Infiniti G37x Sedan - Current
2007 Ducati 800ss - Current
1994 Subaru Legacy Sport Wagon (White)
1994 Subaru Legacy Sport Wagon (Silver)
2003 Infiniri G35
1998 Infiniti I30t
1995 Honda Civic DX
1987 Subaru GL Wagon
1987 Subaru Loyale
2.2TurboLeg
In Neutral
Posts: 11
Joined: Wed Jul 15, 2009 8:48 pm
Location: Toronto, Ontario

Post by 2.2TurboLeg »

Thanks for the reply, was noticing yesterday that the panel did look welded on so i kinda started gettin bummed on the car now thinking I cant fix this car up. Also noticed patches of rust forming above the windshield. I have hope that I can sand and fix a bunch of the spots before they become gaping holes assuming I can live with the already existing holes in the quarter. What methods do you tend to use after youve ground down a rusty patch to form it back up so its flush again with the clean part of the panel.
Thanks
fishbone79
Second Gear
Posts: 502
Joined: Fri Sep 03, 2004 3:14 am
Location: Armpit, USA

Post by fishbone79 »

magicmike wrote:Fishbone, this is great. It would be good to have everyones fixes documented here like the sunroof leak thread. I encourage all with pics to post them up in here and I'll add my updates as I go. In the end I can make a new post if need be with specific directions.
That would be awesome. When I embarked on this a few month's ago, I was surprised no-one had written up what they had done. Now I'm an arse for doing the same.

2.2TurboLeg: Fixing those holes in the rear quarter are not for the faint of heart, but if you're reasonably competent and read up on a few body work manuals you can definitely tackle it.
2.2TurboLeg wrote:What methods do you tend to use after youve ground down a rusty patch to form it back up so its flush again with the clean part of the panel?
Over small patches, I use a coat of etch primer, followed by several coats of high-build urethane primer, then I block it out wet with 600g paper on a good drywall sanding block ($9 at HD and well worth it.... pick a strait one).

For large repairs, or welded patch panels, I use body filler instead of primer... but I only use filler where I have more than 1/32-1/16" to fill. I never fill anything more than 1/8"-3/16", if you have that much to fill, use a hammer and dolly to work the metal out, if possible. After I've flattened the panel with filler, I block it flat with a long-board (AKA the idiot stick), starting with 60g down to 180g dry paper. Then I hit it with the DA at 220 and use glazing compound to fill the pin holes. I seal it with a few coats of sandable primer and block that out with 600g wet before basecoat and clear.

We discussed it a bit here:
http://bbs.legacycentral.org/viewtopic.php?t=40350
Cheers,
morgan

1992 Legacy BF
1946 Ford 1.5 Ton Truck (The Beast): http://community.webshots.com/user/fishbone79
evolutionmovement
Knowledgeable
Knowledgeable
Posts: 9809
Joined: Mon Jun 16, 2003 11:20 pm
Location: Beverly, MA

Post by evolutionmovement »

I'm no metal forming expert, but I think a bead roller for the sheet metal overlap and a shrinker/stretcher for the inner wheel arch beads should do quite nicely. I don't think you'd need an English wheel for the arches unless you're doing some real extensive replacement in which case, you really should question whether it's worth it. But if I'm wrong, it might be nice to have an explanation in this thread as unlikely as it is that anyone here will have access to one.
Midnight in a Perfect World on Amazon or order anywhere. The first book in a quartet chronicling the rise of a man from angry criminal to philanthropist. Midnight... is a distopic noirish novel featuring 'Duchess', a modified 1990 Subaru Legacy wagon.
magicmike
Fifth Gear
Posts: 2772
Joined: Thu Nov 21, 2002 8:30 pm
Location: USA, RI

Post by magicmike »

Holy crap I can't weld! Off to Harbor Freight for a grinding disc. Also, note to self, dont try to fill a weld burn hole with more weld! lol
-Mike

2011 Infiniti G37x Sedan - Current
2007 Ducati 800ss - Current
1994 Subaru Legacy Sport Wagon (White)
1994 Subaru Legacy Sport Wagon (Silver)
2003 Infiniri G35
1998 Infiniti I30t
1995 Honda Civic DX
1987 Subaru GL Wagon
1987 Subaru Loyale
fishbone79
Second Gear
Posts: 502
Joined: Fri Sep 03, 2004 3:14 am
Location: Armpit, USA

Post by fishbone79 »

If you're using a mig, using 0.024" wire on low heat, medium feed will give perfect spots. If you blow through on this setting with this wire, you need to remove more rust because the metal is too thin.

Only do spots - no actual bead. Space your spots out at ~1" from one another first, and go progressively around a panel, rather than across like your torquing down a head. If you go across, you will end up needing to shrink the center because it will pop up.

e.g., (and no, that's not my bondo work...)
Image

Once the panel is spotted in all the way I usually begin filling in between the spots slowly, allowing the panel to cool, and keeping my spots spaced out so I don't accumulate heat in the work.

e.g., before I did the final grind/hammer and dolly work, you can see the individual spots.

Image


evolutionmovement wrote:I'm no metal forming expert, but I think a bead roller for the sheet metal overlap and a shrinker/stretcher for the inner wheel arch beads should do quite nicely. I don't think you'd need an English wheel for the arches unless you're doing some real extensive replacement in which case, you really should question whether it's worth it. But if I'm wrong, it might be nice to have an explanation in this thread as unlikely as it is that anyone here will have access to one.
I have an english wheel, but not the mandrels and attachments to make nice corners and edges... I'm not very good with it either;). It really is not suited to this sort of work anyway. For most of the bending and fitting needed here, a dolly, shot bag and body hammers were all that were necessary. The panels are flat so the rolled edge and corner are the hardest.

I did use my shrinking disc on the inner fender wells on one spot, but it really wasn't needed (it's always good to justify tool purchases to yourself though).
Cheers,
morgan

1992 Legacy BF
1946 Ford 1.5 Ton Truck (The Beast): http://community.webshots.com/user/fishbone79
evolutionmovement
Knowledgeable
Knowledgeable
Posts: 9809
Joined: Mon Jun 16, 2003 11:20 pm
Location: Beverly, MA

Post by evolutionmovement »

Ha ha! Yeah, that's how I'm trying to convince myself I "need" a bead roller and shrinker/stretcher. Especially the latter.
Midnight in a Perfect World on Amazon or order anywhere. The first book in a quartet chronicling the rise of a man from angry criminal to philanthropist. Midnight... is a distopic noirish novel featuring 'Duchess', a modified 1990 Subaru Legacy wagon.
magicmike
Fifth Gear
Posts: 2772
Joined: Thu Nov 21, 2002 8:30 pm
Location: USA, RI

Post by magicmike »

So far today:
Image
Image
Image
Image
Image
Image
Image
Image

And finally:
Image

Oh, and for the record I am in no way schooled or qualified as an autobody technician :)
-Mike

2011 Infiniti G37x Sedan - Current
2007 Ducati 800ss - Current
1994 Subaru Legacy Sport Wagon (White)
1994 Subaru Legacy Sport Wagon (Silver)
2003 Infiniri G35
1998 Infiniti I30t
1995 Honda Civic DX
1987 Subaru GL Wagon
1987 Subaru Loyale
fishbone79
Second Gear
Posts: 502
Joined: Fri Sep 03, 2004 3:14 am
Location: Armpit, USA

Post by fishbone79 »

That looks pretty damn good. Are you using flux cored wire? If not, can turn up your shield gas a bit (maybe >20fps)? Your welds look like they are getting a little too much oxygen.

Steve, have you seen these shrinking discs?

Image

This guy makes them: http://allshops.org/cgi-bin/community/c ... 0121727059
I bought one to try it out and bought 3 more when I found out how awesome they work. No more screwing around with torches or chasing a lump in a panel around for half a day.

P.S. is this turning into a newcastle thread? It's one fine beer...
Cheers,
morgan

1992 Legacy BF
1946 Ford 1.5 Ton Truck (The Beast): http://community.webshots.com/user/fishbone79
2.2TurboLeg
In Neutral
Posts: 11
Joined: Wed Jul 15, 2009 8:48 pm
Location: Toronto, Ontario

Post by 2.2TurboLeg »

Wow that looks like its coming together really well for you. Glad to see its goin your way so far.

The metal work your doing has really got me bummed though. I was hoping to be able to repair the holes myself but I dont think I have the resources to do so after seeing your thread come along, and I almost definately dont have the money to get it done professionally right now.

Also noticing more and more rust on the car, and the most devastating spot to see is on the rocker panel under driver and passenger front doors along the pinch weld. Not really sure that is even repairable. Any ideas what it would cost to get rust damage comparible to yours fixed professionally? (Both sides)
93forestpearl
Fifth Gear
Posts: 3043
Joined: Tue Jan 25, 2005 9:14 pm
Location: Twin Cities, MN

Post by 93forestpearl »

I only made the english wheel reference if one was trying to patch in large pieces of formed sheetmetal, lol. My car that got boned was so bad that I would have needed that.


Looks like you have a handle on it though. I've seen some glass/filler work that made me cry, and you're not doing that here.


Also, if you can get a bump small enough, you can file it flat. I'm dealing with that on my hood. The previous owner decided to pound the under bracing to clear some IC plumbing, instead of cutting it. Body hammers can only go so far in this instance.
→Dan

piddster34 at h0tma1l d0t c0m
evolutionmovement
Knowledgeable
Knowledgeable
Posts: 9809
Joined: Mon Jun 16, 2003 11:20 pm
Location: Beverly, MA

Post by evolutionmovement »

Newcastle is good stuff.

Haven't seen those discs. I'll have to remember that in case I get some of those dents that look like bad acne. I have one on the front fender, but I've gotten most of it. I just need a small dolly to get it 100%. I was thinking the shrinker/stretcher to form the lip for the fender, which is difficult to do on a curve with hand tools (in other words, I don't know how to do it with an appreciably decent gauge metal).
Midnight in a Perfect World on Amazon or order anywhere. The first book in a quartet chronicling the rise of a man from angry criminal to philanthropist. Midnight... is a distopic noirish novel featuring 'Duchess', a modified 1990 Subaru Legacy wagon.
magicmike
Fifth Gear
Posts: 2772
Joined: Thu Nov 21, 2002 8:30 pm
Location: USA, RI

Post by magicmike »

Day 3:
Finish up welding passenger side and start the bondo-ing.
Image
Image
Image
Image
Image
Image
Image
Image
Image
Image
Image
Image
Image
Image
Image
Image
Image
Image
Image
Image

This is just my first coat of primer. I need to smooth this out now and use some puddy to fill in the small holes and imperfections.

I know there is still some rust but given that its in a spot where I am not able to remove and replace with my set of tools ( i.e. where the tub meets the piece behind the bumper cover) I'm leaving for the next owner :)

more to come...
-Mike

2011 Infiniti G37x Sedan - Current
2007 Ducati 800ss - Current
1994 Subaru Legacy Sport Wagon (White)
1994 Subaru Legacy Sport Wagon (Silver)
2003 Infiniri G35
1998 Infiniti I30t
1995 Honda Civic DX
1987 Subaru GL Wagon
1987 Subaru Loyale
Grayguy
Second Gear
Posts: 392
Joined: Mon Apr 30, 2007 4:26 am

Post by Grayguy »

nice work so far. I am just about to start the same thing on my 92'. I have been thinking about buying one of those flange tools, how well did that work?
92' SS: SOLD
98' 2.5GT SOLD, bought back, new stupid build in the works.
98' 2.5 GT-rx :bought not built
fishbone79
Second Gear
Posts: 502
Joined: Fri Sep 03, 2004 3:14 am
Location: Armpit, USA

Post by fishbone79 »

Yeah mike, that does look pretty good. I too was interested in your flange tool. I've played with the rivet depression maker and the pneumatic rivet gun, but not a flange maker... How do you like that thing?
Cheers,
morgan

1992 Legacy BF
1946 Ford 1.5 Ton Truck (The Beast): http://community.webshots.com/user/fishbone79
magicmike
Fifth Gear
Posts: 2772
Joined: Thu Nov 21, 2002 8:30 pm
Location: USA, RI

Post by magicmike »

That thing is crazy good. Best 40 bucks I ever spent!!!! I think it was around 40 anyway, I don't remember, but I got it at harbor freight. Thanks for the props!
-Mike

2011 Infiniti G37x Sedan - Current
2007 Ducati 800ss - Current
1994 Subaru Legacy Sport Wagon (White)
1994 Subaru Legacy Sport Wagon (Silver)
2003 Infiniri G35
1998 Infiniti I30t
1995 Honda Civic DX
1987 Subaru GL Wagon
1987 Subaru Loyale
Post Reply