Highlights:
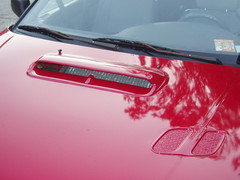
* No hammering necessary. I think the secret was having David Carter's fiberglass hood and also cutting down the throttle body.
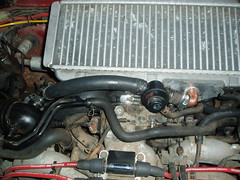
* We managed to connect stock turbo (with it's damn clocked outlet) to feed BOTH IC inlets.
* Manifold Boost of 9psi after install... declining to 8ish at high rpm. [EDIT - have run as much as 13psi].
Stuff we did (only the stuff I remember)
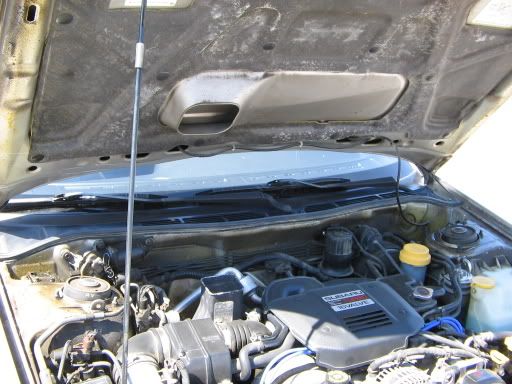
1) Moved ignitor bracket. No need to cut wires, bend anything, or drill anything. We just moved it a couple inches and bolted it to an existing hole on the driver's side of it's little pedestal - pointing downwards. [EDIT - the ignitor died a couple weeks later in this position, and I suspect it had something to do with the IC. So, I moved its replacement over between the driver's side strut tower and the firewall.]
2) Moved the electrical harness, AC line, and maybe some other lines that ran along the firewall underneath the "dogbone". Once again, no need to disconnect any lines, we just unbolted the dogbone, shoved the whole bundle underneath, then bolted it up again.
3) Made VRG's blowoff valve adaptor (see below). Basically, we bought a steel plate intended for an electrical conduit box and also a copper tube with a 90 degree bend. Vikash artisically dremeled the steel plate to the right shape to plug the BOV hole. Then he drilled a hole in the middle of the plate and soldered the copper elbow to the plate. We reused the old BOV gasket to mount it up to the IC. On the other end of the BOV piping, we used a 90degree plastic elbow to connect the BOV piping to the intake piping. This elbow was bought from advanced auto and was titled "emissions elbow" or something like that. It's just a plastic 90degree elbow with the right diameters. [EDIT - later replaced all of this with a TurboXS 90 degree elbow. See later post: link.]
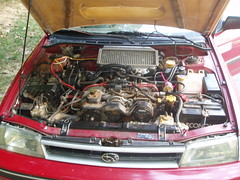
4) Moved the fuel filter to make room for the coolant tank. It's basically just ziptied out of the way somewhere where it won't hit anything (the metal thing with pretty pink zip ties). This is pretty ghetto, you proabably shouldn't follow our example because gasoline can blow you up. Another thing you shouldn't copy from us is routing the fuel lines directly over the hot coolant tank. We bought some random fuel filter that was small to make it easy to locate (copying Matt). NOTE - the fuel lines had to be replaced to accomplish this, and that always sucks. [EDIT - None of this would be necessary if you put the coolant tank in another section of the engine compartment which I did later.]
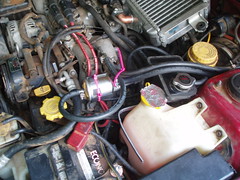
5) The infamous coolant take relocation. We followed Matt's lead and just stuffed it next to the washer bottle. It is actually remarkably secure considering there is no mounting hardware whatsoever. I'm working on an aluminum bracket around the washer bottle, but it's worked fine without a bracket so far. NOTE - to move the coolant tank you will need to reroute 4 coolant lines: 2 lines are 0.5" and 2 lines are 5/16" (is that right Vikash?) [EDIT - later moved the coolant tank over next to the ABS module. See later post: link.]
6) Y Pipe - we used the stock WRX y-pipe and stock metal inlet pipes. We cut the plastic y-pipe as short as possible (so that it left only 2 "ruffles ridges" in the flexible part). Then, we stuffed a metal pipe in there to couple to the next piece of tubing and clamped down hard as crap with a hose clamp (this idea was stolen from Phil). The metal pipe we used as coupling was just something we found on the exhaust tips rack at Advance Auto. It was 1 3/4" ID (1 7/8" OD). [EDIT - later replaced with aftermarket silicone y-pipe which made a MUCH better seal. See later post: link.]
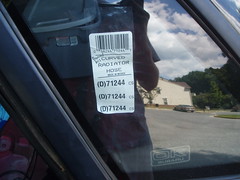
7) Compressor Piping - routing the piping between the stock turbo and the y-pipe SUCKED because of the stock turbo's outlet angle. I'm still not happy with the kinks, but they're passable. This was the magic part:
Advanced Auto: (D)71244 Curved Radiator Hose
That was the best fit out of a half-dozen different pipes we tried. We cut it to fit. We kept the wide end of the tube for connecting to the y-pipe coupler. We cut off about half of the other end (the small diameter end) leaving only a couple bends (trial and error). In the end, there are kinks which annoy me. But, they are probably less restrictive than the compressor outlet, and I'm not getting much pressure drop at all across the whole system, so it works!
8 - Collar between IC and Throttle body - we sawed off as much of the throttle body metal inlet as we could to fit the IC in without hitting the firewall. We used the stock WRX rubber hose to connect the throttle body to the IC outlet. It had to be cut down, and in particular it had to be cut at an angle since the IC was mounted at an angle relative to the throttle body. [EDIT - this damn collar blew off the throttle body at several rallycrosses in a row. Make sure it's as long as possible so it can reach even when the engine and intercooler move around. Also make sure it's clamped as well as possible.]
Conclusion: 15 hours later, it fired up perfect the first time. NO leaks (fuel, oil, air, coolant, or electrons), and virtually NO pressure drop across the whole setup.
Ahhhhhh fresh air!