
Disclaimer: If you get hurt or break stuff it’s your own damn fault, not mine.
Special tools: 5.5-6mm punch, duck (optional)
The FSM is a good guide already, but it doesn’t have pics. Assuming you’ve already removed the driveshaft, disconnected the downpipe, jacked it up and removed rear wheels, this is what you’ll see.

The exhaust needs to be removed from the 2 rear hangers, the one in front of the muffler, and another way up toward the front. Using a jack to support it can help. Wiggle the rubber hangers, maybe use a pry bar to persuade them off.

Remove the exhaust shield in front of the axle with 4 bolts.
Soak nuts and bolts with PB Blaster to prepare them for removal.

Attempting to drive spring pins out at this point will be frustrating. Do NOT use a ¼ inch punch, it is about 0.5 mm too large and will get stuck.

Remove the lower diff plug to drain the fluid. It’s about 14mm, but a ½ inch extension will work.

It will probably be coating in crap like this.

The fluid may have dark wisps in it. Burned? IDK

Clean up the rear mounting nuts after their Blaster bath, then spray them again. This should be applied to almost every nut and bolt after this.

Do the same to the 8 nuts and bolts at the front of the diff.

Support the diff with a jack and some sort of cradle. Here I used an old piece of wood. The duck and the box are there just in case the diff wasn’t balanced on the wood. Note the punch is still stuck in there. You can remove the 8 nuts and bolts now, as well as the rear mounting nuts. A plate will come off with the front bottom-facing nuts. It is not necessary to remove the 2 farther spaced rear nuts, they are not part of the diff.


This is the hardware from the front of the diff, except for that large bolt and the two nuts below it.
Remove the 3 bolts holding the parking brake cables to the body. This allows enough slack to get the front member out. Loosen the large bolts on the front member. Loosen but do not remove the 2 smaller bolts next to the large ones. Get a friend to hold one side while you remove the 2 smaller bolts on the other side. This releases the plate that holds up the member. With both front sides free, the member is still held in place by 2 brackets going through the diff. Lowering the diff jack will give enough room to remove the brackets, freeing the member. Then you and your friend wiggle the member out past the cables one side at a time. Sorry, I only have “after” pics of this.


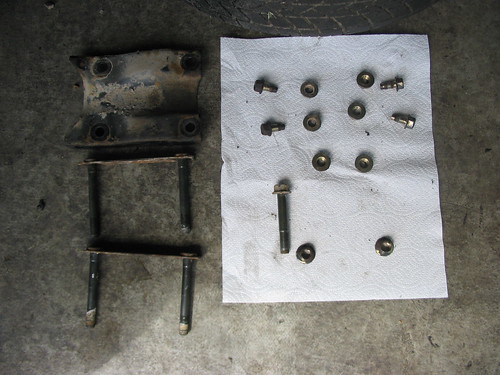
These are the member and brake cable bolts. Also the bolts from the exhaust shield (one is broken).

The front member mounts.

The front member.

Front member holding plate.

Now it looks like this.

Removing the axles requires a hammer and a 6mm punch. I found a length of 5.5mm steel rod that I cut down to a reasonable length. It worked great on the left axle spring pin. The axle holes have an obvious chamfer to them on one side. Hammer your punch through the chamfered side.


As mentioned earlier, the ¼ inch punch was still stuck in the right axle. It was far enough in that the spring pin was partially exposed. A hammer, channel locks and anger managed to break the punch, leaving a smaller part of it in the axle. I used a drill to remove the waxy crap in the spring pin, then channel locks to twist it until it was looser in the axle. Then I could grip it with the locks and use the axle for leverage to pull it out. Then the 5.5mm punch went through the axle to smack out the broken ¼ inch piece. Top to bottom: homemade “punches”, busted punch, spring pins.

The nice twin and the evil twin. Notice the bending due to channel lock rotation.

Pins out.

Pull the axles away from the diff, maybe wiggle it side to side a little. It's finally out!

Use some old coat hangers to hold up the dangling axles if you want the car to roll without them dragging.

I hope someone finds this useful, at least one person should benefit from my newfound knowledge not to use a ¼ inch punch.
Edit: Chamfer detail added.