So you broke a shifter fork- A DIY'er fix.

Flywheel, Clutch, Transmission, Axles, etc...

Moderators: Helpinators, Moderators

Post Reply
biggreen96
Third Gear
Posts: 961
Joined: Sun Nov 23, 2003 4:16 am
Location: Moscow, ID and Pullman WA
Contact:

So you broke a shifter fork- A DIY'er fix.

Post by biggreen96 »

I dropped the transmission because the noise it came with became louder and even more menacing. I figured a bearing was the cause of the noise(it still is) but I also found a chunk of fork.

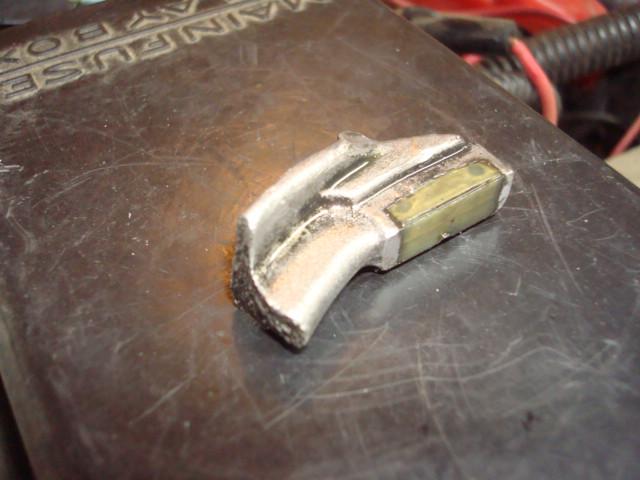
So if you drain your Sparkle fluid and this pops out, refer to this guide.

Image
Image

Start by taking your transmission out. There are other guides out there, but if you are attempting to change a piece in your transmission then you probably have a haynes or chiltons already, or just have a greasy thumb.

Tools you will need in addition to your sockets and wrenches:
-3/16 punch.
-big allen key (for TOB release fork pivot shaft hole cap)
-Off the top of my head I used 19mm 17mm 14, 12 and 10's.
-Floor jack and stands.
-There were no special tools to get the fork out besides the punch.

I left the engine and it's fluids alone to drop the trans.

Once you have the trans out open the top cap.
Image

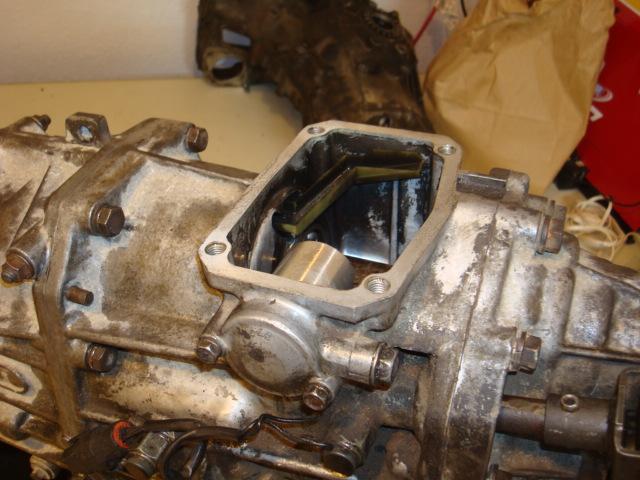
In here you gain access to this:
Image

Undo this screw(the one in the collar, on the shaft) this makes it so the internal linkages can clear each other and you will be able to split the rear differential housing off of the main housing.
Once you have all the bolts off(14mm's) then twist the shifter linkage counter clockwise, thereby "clearing the internal links" and pull the rear section off.

Now you have have something like this.
Image
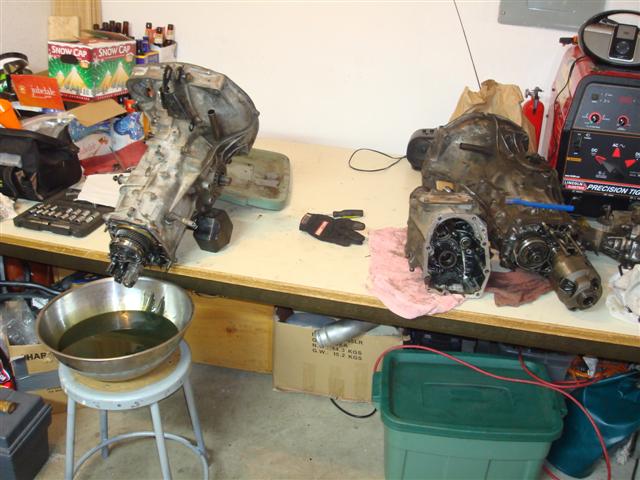
Let some more fluid drain and have a beer. I like Snowcap this time of year.

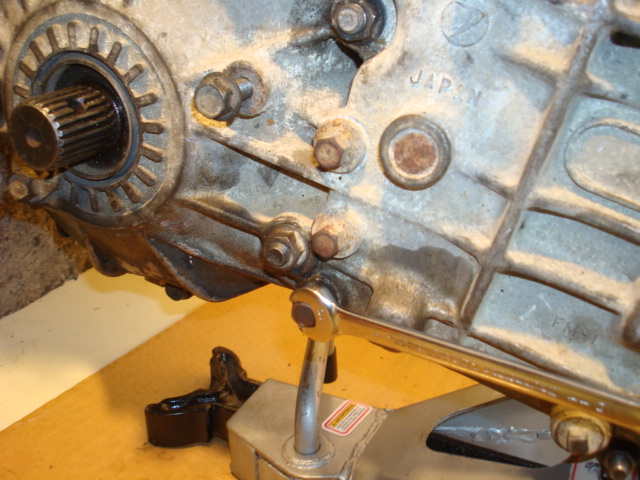
Now it's time to start undoing the large handful of bolts that are holding the transmission together. I had the unit upright and level with the cinderblock in the front and a jackstand on it's side under the rear. This made it easier than having it on it's side to get the bolts out.
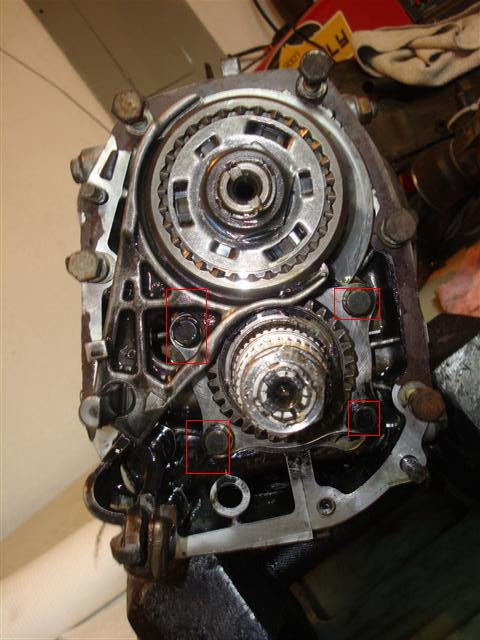
These four will also need to come off in order to get the halves apart:
Image

Once your bolts are out lay the transmission with the drivers side down(left side), and gently tap the halves apart using the tabs around the seam.

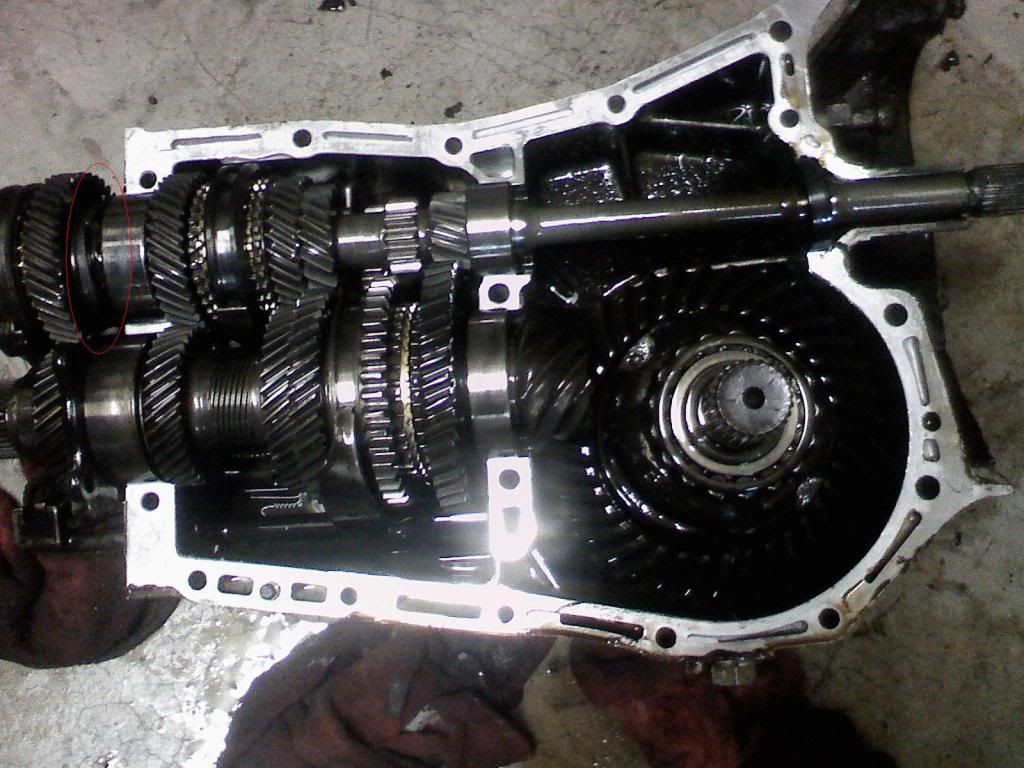
And now you should be looking at this:
Image

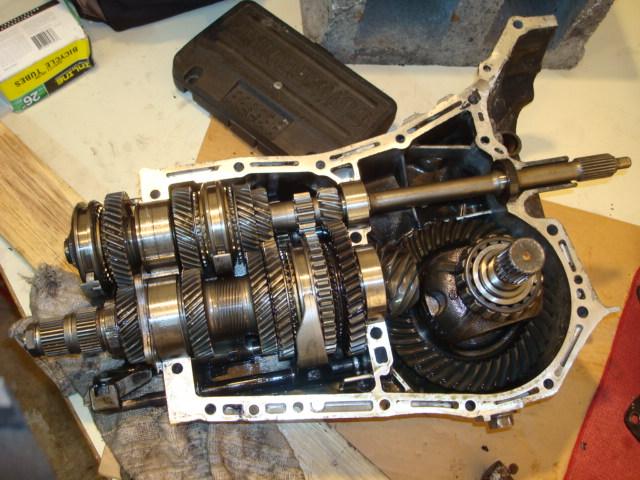
Now you can lift the input, output/pinion shafts out.
I always thought that there was special aligning to be done whenever you ventured into a 5mt, but only when you are altering the gear parts. Since we are just lifting them out to change a fork and dropping them back in, there's no voodoo magic to be worked.

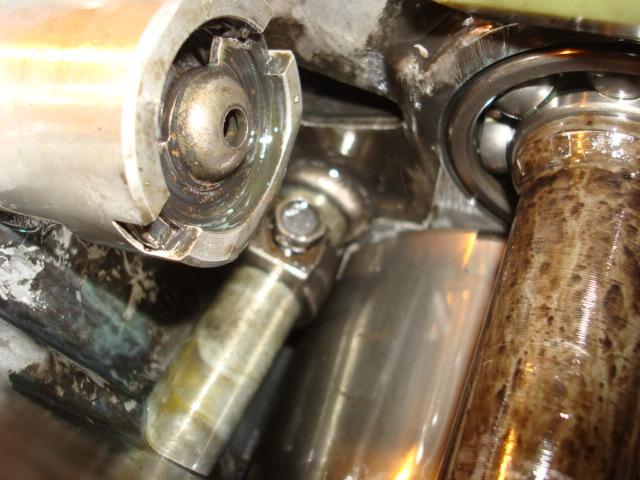
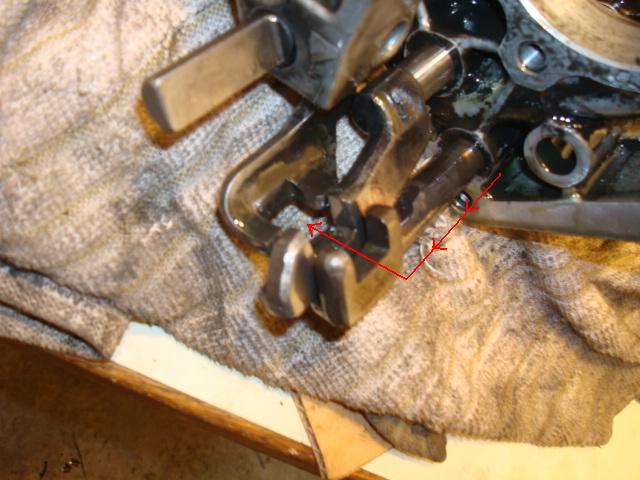
Now that the shafts are out you can get to the fork. And in order to get the fork out you need to drive out this pin:

Image
Grab the 3/16 punch and drive it out. Mine had a smaller pin within the larger pin that is pictured, I used a nail with the tip ground flat to drive the small inner pin.

Now the pin is driven and the broken forks is ready to come off the rail. To get the rail out loosen this bolt:
Image
Behind this bolt is a spring and ballbearing which is the mechanism that either provides the "snapping into gear" feeling or makes it so you can't engage more than one gear at a time. It also keeps the rail from sliding completely out the back. My broken fork was on the bottom rail, yours may be on the upper rail. In that case loosen the bolt that corresponds to the correct rail.

Slide the busted fork off- mine was sticky and needed massaging, keep trying- and slide the new one on.

Getting the rail back into it's home over the ball bearing was tricky. There is a safety mechanism that only allows the rail to slide back and forth when the others are are in neutral, making sure you can't get into 1st and reverse and the same time. So when you are reassembling you have to have the rails in the perfect spots otherwise it won't slide into place. Having the case nice and level was a big help.

Things you have to pay attention to when putting it back together:
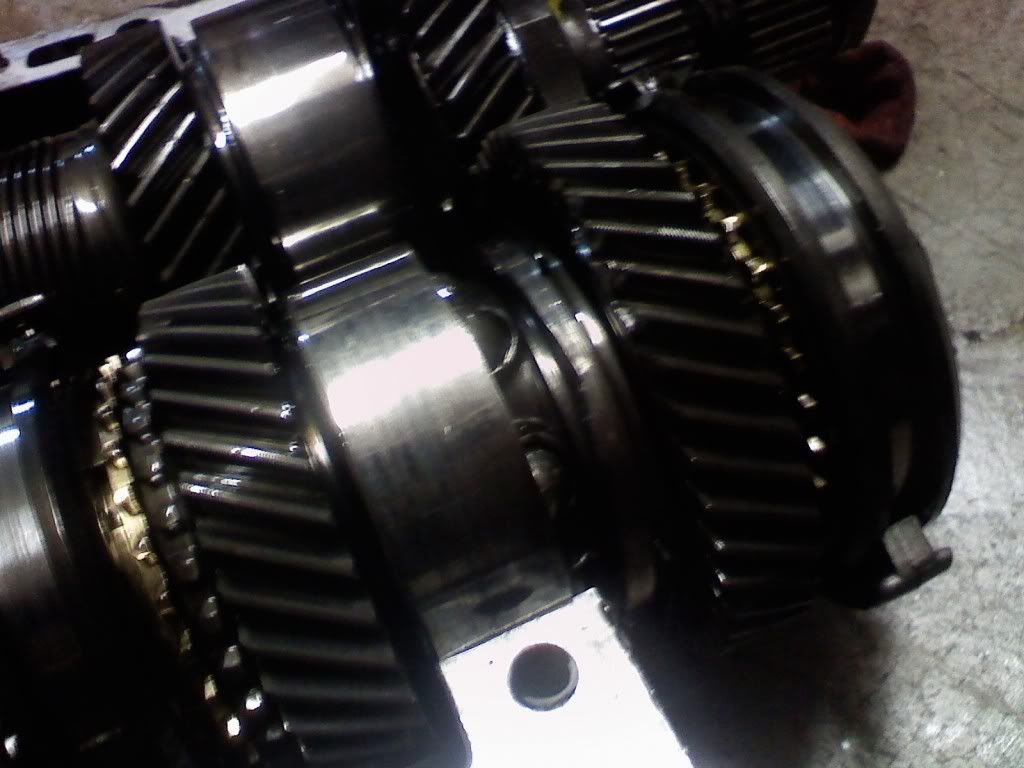
The two front bearings on the input and output shafts have a dimple where a small pin in the race fits:
Image

Image

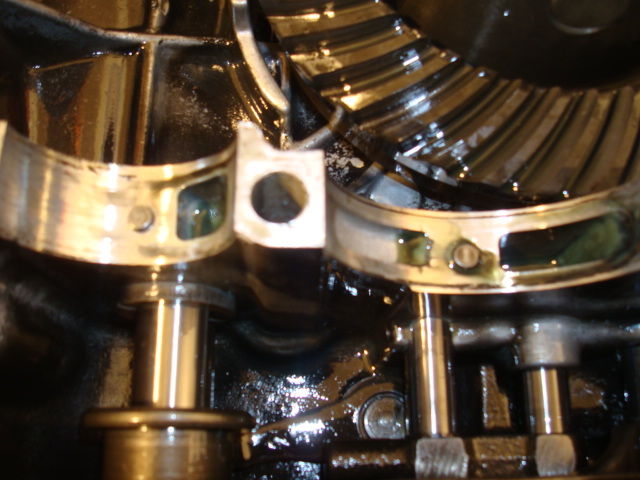
Getting these to fall into place was tricky too, but I was able to make a tiny score mark 180* from the dimple and align it that way.

The bearing at the rear of the input shaft has a ring around it, much like a piston ring, that needs to be snug against the case when being laid back into the race. The ring has a section cut from it so it's able to clear the plate that is held to the case by the 4 bolts (sixth pic from the top).

Once you have the case halves back together, and are ready to put the rear section back on it's helpful to hold the shifter rod full counter clockwise again like we did when taking the rear off.
You have to get the tab into the slot, hehe, in this sort of fashion:

Image
It's pretty easy and you will know when you have it in from the way it feels.

Tighten up the bolts holding the rear section on.
Put the screw pin back into the collar on the shaft that is under the top cap and you are ready to put it back in the car.
Use a torque wrench and use the spec's found in the 5mt pdf's found here - http://www.main.experiencetherave.com/s ... FSM_Scans/


This repair was not nearly as bad as I thought. Mostly I was glad to have the luxury of tearing into a blown trans for fun over the summer and figuring how everything went together. Hopefully this can be helpful to folks.
Last edited by biggreen96 on Mon Mar 01, 2010 12:09 am, edited 1 time in total.
Legacy777
Site Admin
Site Admin
Posts: 27926
Joined: Tue Oct 15, 2002 11:37 am
Location: Houston, Tx
Contact:

Post by Legacy777 »

Nice write-up!
Josh

surrealmirage.com/subaru
1990 Legacy (AWD, 6MT, & EJ22T Swap)
2020 Outback Limted XT

If you need to get a hold of me please email me rather then pm
skid542
Fifth Gear
Posts: 2857
Joined: Fri Dec 26, 2003 6:37 am
Location: North Idaho

Post by skid542 »

I've currently got a tranny split in two and am ready to start putting it back together.

First off this is an excellent write up. It helps ease some concern over putting it all back together.

Second, what type of RTV should be used when putting these back together?

Third - I would like to submitt a vote that this thread be added to the Sticky's due to it's value of words and pictures.
Lee

93' SS, 5mt swapped, 182k, not stock...
96' N/A OBW 5sp, 212k, Couple mods... RIP
99' N/A OBW, 4eat, mostly stock.
smh0101
Fifth Gear
Posts: 3056
Joined: Wed Jan 18, 2006 7:56 am
Location: Orlando, FL

Post by smh0101 »

I just realized something...

I have no interest in every rebuilding a tranny...
~Spencer
94 Legacy Turbo (550 Robtune/ej20h v2 Sti RA drivetrain)
94 Legacy Ti Wagon (5mt ej22e)
91 rhd Legacy GT Wagon (factory 5mt, ej20g)
93 rhd Legacy GT type S2 Sedan (4eat, ej20g)
91 rhd Legacy Ti Type S 1.8
03 Lincoln LS V8 Sport
08 300 SRT8
biggreen96
Third Gear
Posts: 961
Joined: Sun Nov 23, 2003 4:16 am
Location: Moscow, ID and Pullman WA
Contact:

Post by biggreen96 »

Lee- I didn't use any sealant on the two halves. I don't have any leaks, but you might now be as lucky. One thing though, the person that was in the trans before I was put WAY too much of whatever type of sealant they used and it was protruding from the seam a lot on the outside and, less impressively, on the inside.
You have to drive and you and have to try if you want the win, you don't achieve anything if you just cruise around - Jari-Matti Latvala
Long live the forums! Down with FB!
Legacy777
Site Admin
Site Admin
Posts: 27926
Joined: Tue Oct 15, 2002 11:37 am
Location: Houston, Tx
Contact:

Post by Legacy777 »

Permatex ultra gray would probably work.


Also added this thread to sticky.
Josh

surrealmirage.com/subaru
1990 Legacy (AWD, 6MT, & EJ22T Swap)
2020 Outback Limted XT

If you need to get a hold of me please email me rather then pm
monstaru
First Gear
Posts: 71
Joined: Fri Sep 23, 2005 2:27 am
Location: spokidoki

Post by monstaru »

that is awesome!i ventured into some ea 4 spd trannies, and did not have good luck due to difficulty in disassembly.this seems simpler.....

awesome to know.i am really interested in the D/R ej assemblies.have a friend that is in the process of making them out of rx/ej/ea boxes.......

the only downfall of having them is a smaller clutch.therefore numbchux's box is worth the dough...
cheers, brian
biggreen96
Third Gear
Posts: 961
Joined: Sun Nov 23, 2003 4:16 am
Location: Moscow, ID and Pullman WA
Contact:

Post by biggreen96 »

Just wanted to add the trans is still doing well after taking it apart. It's just over a year and 10k-13k miles older. Though now I'm running some THICK oil. 140 weight, the car tries to move forward in neutral when it's super cold first thing in the morning.
You have to drive and you and have to try if you want the win, you don't achieve anything if you just cruise around - Jari-Matti Latvala
Long live the forums! Down with FB!
skid542
Fifth Gear
Posts: 2857
Joined: Fri Dec 26, 2003 6:37 am
Location: North Idaho

Post by skid542 »

Thanks for the update. Glad it's still holding out well. Why the switch to the thick oil though?


Also, I can't seem to find the torque specs for the case bolts on Josh's site. I don't know, maybe I'm just being an idiot and overlooking them but I don't see the page. It seems that the page I need isn't listed, i.e. I can find the page before and the page after but not the middle page. I've got everything cleaned and ready to go back together but just need some torque specs.

Many thanks :).
Lee

93' SS, 5mt swapped, 182k, not stock...
96' N/A OBW 5sp, 212k, Couple mods... RIP
99' N/A OBW, 4eat, mostly stock.
Legacy Rally Guy
Third Gear
Posts: 586
Joined: Tue May 23, 2006 2:30 pm
Location: Northern Missouri

Post by Legacy Rally Guy »

Hmm, when you have it apart, howd you set your preload, or I guess since you reinstalled the same main shaft, your front diff and pinion didn't change locations huh
1991 Legacy N/A- Being built to withstand zombie apocalypse!
2004 WRX STi- (GT3076r, 850cc Deatchwerks, Unequal Length Headers, FMIC, Alum Driveshaft, Camber Kit, Daily Driver)
biggreen96
Third Gear
Posts: 961
Joined: Sun Nov 23, 2003 4:16 am
Location: Moscow, ID and Pullman WA
Contact:

Post by biggreen96 »

Whoops missed your replies. I changed to thick oil because I was reading that rally guys were using it, so I decided to give it a shot. So far it helps in that I'm not getting little grinds after the trans I nice and warm like I used to get with 75w90.

Did you get torque specs yet?
You have to drive and you and have to try if you want the win, you don't achieve anything if you just cruise around - Jari-Matti Latvala
Long live the forums! Down with FB!
WagonMafia
First Gear
Posts: 195
Joined: Mon Aug 11, 2008 12:33 am
Location: Chandler, az

Re: So you broke a shifter fork- A DIY'er fix.

Post by WagonMafia »

I just split my trans too. I had a broken bearing in my mainshaft, here's the carnage.

Image

Image

Hardest part was getting the tranny in and out of the car in my garage by myself, aaaaaaand lack of airtools. cordless batteries don't last long in these situations. Its all back together now, running well so far. I did post this in another thread but it still holds true for this one too.

1.) when putting the trans. back together, there are a few spacing plates on the pinion shaft bearing. they all need to be in the correct location and on the correct way before both shafts/bearings will mesh (theres a clip on the mainshaft bearing that will catch the spacers
everytime). if u dont do this, your trans. may not spin, you will ruin your spacers and it just wont be correct.
2.) watch your case bolts and where you put what. there are 14mm and 12mm. and dont forget to stagger them, 14mms go in from one end and the 12mms go in from the other way. Also the legnths matter too, just watch them.
3.) obviously the shafts must spin in the trans. before you get the transfer case/center diff. on.
4.) make sure you use lots of grease.
5.) keep moving the shafts (ALL OF THEM) along the way. if u get the whole thing together and dont spin it till it goes in, and get no spinning, then thats your own damn fault! Better safe then sorry.
6.) Best way to load the t-case onto the trans. was to put the trans. on its nose atop 2 4X4s, and just drop it on.
7.) mind the shifter pin on the t-case, make sure it will go together well with the forks inside.

Great writeup, great pictures too.
WagonMafia
-Pure White 93 L Wagon converted to Turbo Wagon (almost complete)
-Pure White 92 SS parts car (doner) donated to friend
-91 Mazda miata drifto DD
http://photobucket.com/wagonmafia
Post Reply